- Automation
- Home
- /
- Learning Hub
- /
- Mastering Selenium IDE
- -
- June 5 2023
Mastering Selenium IDE: A Comprehensive Guide for Test Automation
It is a comprehensive guide for test automation with Selenium IDE, covering various topics and techniques for effective web testing.
OVERVIEW
On the Internet, there are millions and billions of websites. Have you ever considered the fact that they work nearly flawlessly? The most important thing for their seamless working is that they were tested thoroughly using various tools, one of which is Selenium IDE.
In this blog, we will look at the introduction to Selenium IDE, its features, and its advantages. Along with these, we will also look at its architecture, how to install it on different browsers, running a sample test, and some best practices, and towards the end, we will see how to integrate Selenium IDE with other tools.
Before we dive into Selenium IDE, let’s have a brief look at Selenium itself so that you have a better understanding of the placement of Selenium IDE as a product.
What is Selenium?
Selenium is one of the most well-known open-source test automation frameworks. It enables test automation of websites or web applications across various operating systems & browsers. Additionally, it supports a variety of computer languages, including Python, C#, Java, JavaScript, and more, enabling testers to automate their website testing in whichever programming language they are most comfortable with.
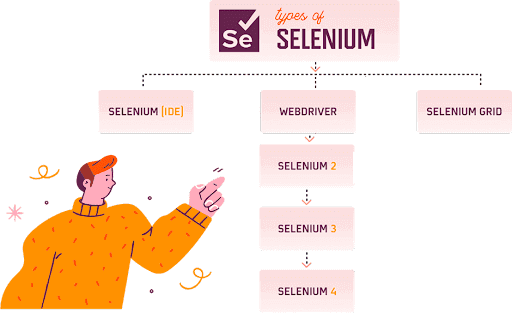
Selenium suit consists of 3 different tools classified as:
Selenium IDE
Selenium IDE (Integrated Development Environment) provides a record and playback tool that will generate scripts based on actions performed on a browser. We will dive deep into this topic in the further sections of this blog.
Selenium WebDriver
Selenium WebDriver offers a more reliable and object-oriented method of automating browsers. Writing automation scripts in programming languages like Java, C#, Python, Ruby, and JavaScript is possible with WebDriver. By interacting with the browser directly, it may programmatically control it. Numerous browsers, including Chrome, Firefox, Safari, Edge, and others, are supported by WebDriver.
Selenium Grid
Selenium Grid enables parallel test execution by allowing you to split test execution across several physical or virtual machines. You can simultaneously run tests on several browsers, operating systems, and machines thanks to its integration with Selenium WebDriver. Several nodes and a hub make up Selenium Grid. Tests are disseminated to the available nodes for execution from the hub, which serves as a central location for test registration.
Selenium IDE
Selenium IDE is a web application testing software. It is an integrated development environment (IDE) for Selenium that simplifies the process of creating and executing automated tests for web applications. Selenium IDE was first created by Shinya Kasatani and later donated to the Selenium project in 2006, which has been actively maintained by them since 2018. It supports multiple programming languages and frameworks and provides a simple interface for beginners to start testing their developed web applications without any advanced knowledge of programming.
Imagine you own a website for blogging with a few hundred blogs. It is popular in the tech community and receives huge traffic. The users will be using mobile phones, tablets, desktops/laptops with variable screen sizes to read the blogs. Testing every functionality or behavior of the website might take a lot of time if done using manual testing, but not impossible.
One of the smart ways of doing this is to use Selenium IDE. It will help you automate the testing process and reduce the need for manual testing, which in turn helps developers and testers to fix bugs or any other issues efficiently and quickly. Moreover, it is user-friendly for users who do not have a programming background, making it an excellent tool for testing web applications.
Selenium IDE Features
It provides a range of features for creating and executing browser automation scripts to test web applications. Here are some key features of Selenium IDE:
- Record and Playback: It enables you to automatically create test scripts and record your interactions with web applications. Simple navigation around the application allows you to carry out tasks like button-clicking, form-filling, and component verification. The stages can be repeated by playing back the actions that were recorded.
- Script Editing: The code editor in it allows you to see and edit the recorded test scripts. To make your automation scripts more functional, you can include extra commands, assertions, and verifications. Numerous programming languages, including JavaScript, Python, Ruby, and others, are supported by the editor.
- Element Locators: : Different methods for locating components on a web page are provided by Selenium IDE. To identify components for interaction, you can use XPath, CSS selectors, className, linkText, and other locator strategies techniques. By highlighting them on the page, the IDE offers an easy way to select components visually.
- Test Debugging: Selenium IDE 3.17.0 and above have debugging features that can be used to find and resolve errors in your test scripts. To comprehend the execution flow, you can set breakpoints, step through the code, and investigate variables. This function is important for checking script behavior and troubleshooting issues.
- Test Suites: You can group your test scripts into test suites using Selenium IDE. A group of test cases that may be run simultaneously is referred to as a test suite. In addition to configuring features like test timeouts and reporting, you can specify the order in which test cases within a suite are executed.
- Test Playback and Reporting: Once you have created your test scripts, it enables you to execute them directly within the browser of your choice. It provides the most needful playback controls, such as play, pause, and stop. After the execution, you can view detailed test reports showing each step's results, including pass/fail status, execution time, and error messages.
- Export Options: Selenium IDE allows you to export your test scripts in different formats. You can export scripts as Java, C#, Python, Ruby, and other programming languages. This flexibility enables you to integrate your Selenium IDE scripts into various testing frameworks and tools.
Selenium IDE by its Architecture and Working
The primary use focus of Selenium IDE is to “record and playback”. It is an easy-to-use tool; hence, a person with no programming background can easily understand and use it in their projects/business.
Selenium IDE can export test cases in various programming languages, such as Java, C#, Python, Ruby, and others. As a result, users may take their recorded tests and if necessary, incorporate them into more sophisticated automation testing frameworks.
To develop more complex and reliable tests, the recorded interactions can also be altered and improved with other commands and assertions. Test cases can also be organized into test suites, and the results of test runs are displayed in a log and summary report. Selenium IDE provides a simple, easy-to-understand graphical user interface (GUI) for test creation and management.
The installation process is quite easy as it is as simple as installing an extension from the web browser. Before deep-diving into using the tool, let's first discuss its architecture and working principle.
Selenium IDE Architecture
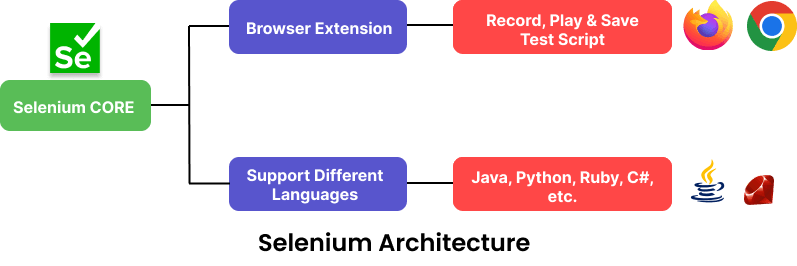
Talking about Selenium IDE Architecture, it is very simple and easy to understand in one go. So there are three major parts of it.
- Selenium Core: The engine that powers IDE is called Selenium Core. It is in charge of carrying out test script execution, interacting with the browser, and providing test results.
- Browser extension: Selenium IDE is designed as a Firefox extension, and later it gets support for other browsers like Chrome except for Safari Browser, allowing for smooth integration with the browsers.
- Selenium IDE User Interface(UI): Selenium IDE offers an intuitive user interface that makes it simple for users to design, change, and run tests.
Selenium IDE Working Principle
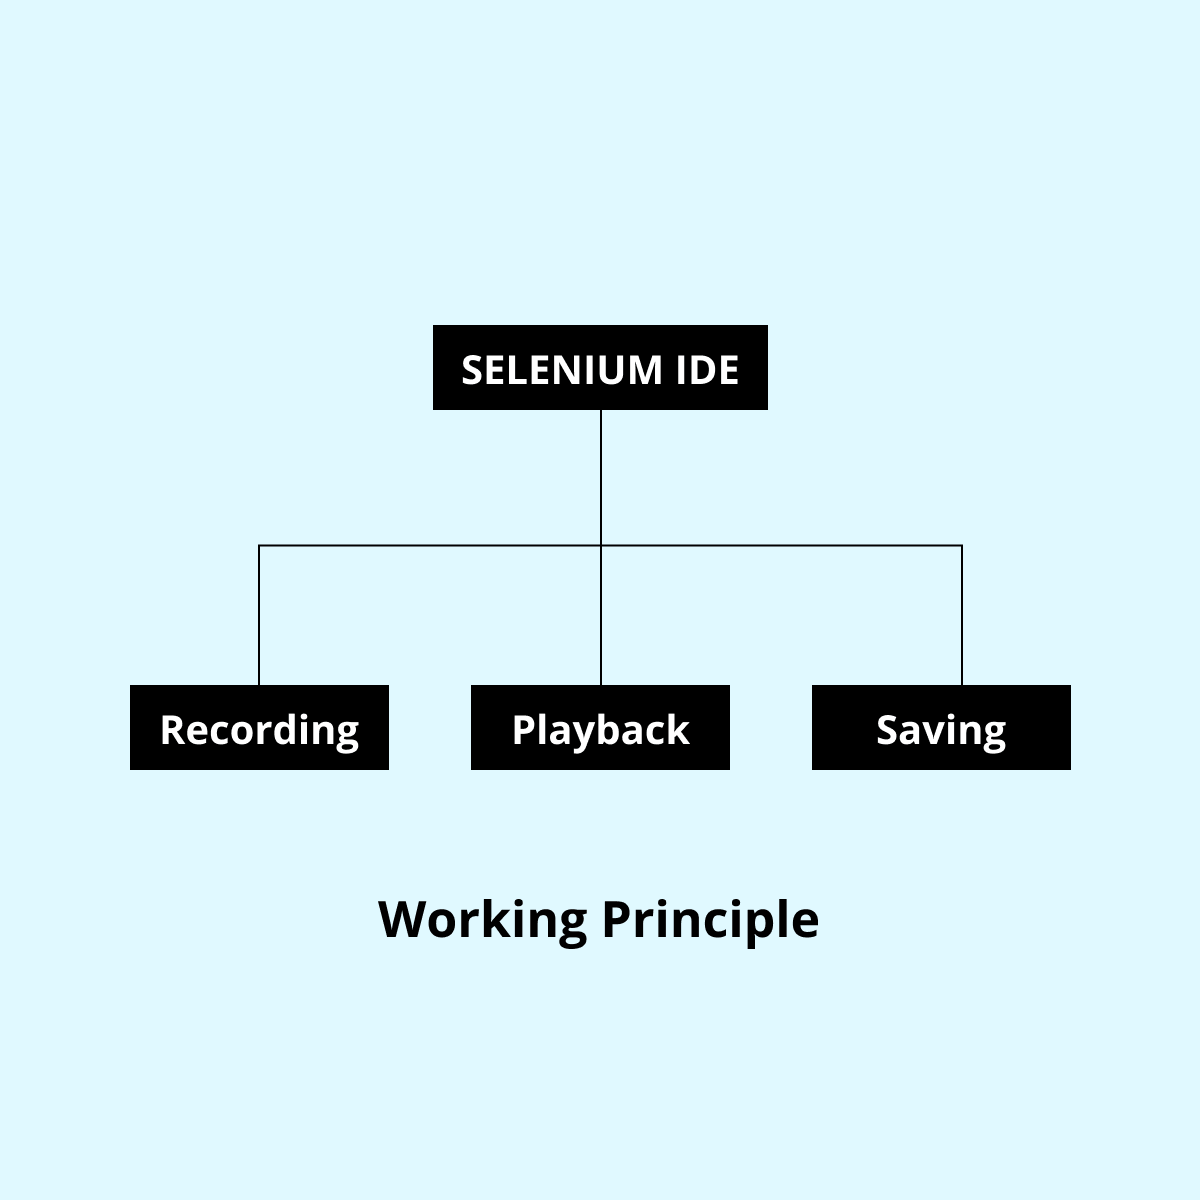
It consists of 3 main actions, which are explained as follows:
- Recording: Using a browser extension, Selenium IDE enables users to record their actions on a web application. It keeps track of the user's actions, including button clicks, text inputs, and page navigation.
- Playback: To automate the test process after editing, the script can be played back. The script is run by Selenium IDE, which interacts with the browser to mimic user activities.
- Saving: : The recorded file can be saved for future use. It will save the test case script with the extension “.side”.
Advantages of Selenium IDE
Selenium IDE is a robust tool for web application testing that offers several advantages to its users. Here are some key advantages of using Selenium IDE:
- Easy to use: Simple and user-friendly interface with no heavy installation to run it.
- Record and playback functionality: Users can easily record actions on a web application and play them back to automate tests.
- Cross-browser testing: It supports multiple browsers, including Chrome, Firefox, Microsoft Edge, Safari, and most new browsers like Brave, making it easy to test web applications across different browsers.
- Open source: It means it is free to use and customize according to one’s needs.
- Extensible: Allowing users to add custom functions and plugins to enhance its functionality.
- Easy integration: Works seamlessly with other Selenium tools like Webdriver, as well as with various programming languages and testing frameworks.
- Speed of execution: Test runs seamlessly, enabling developers and testers to run more tests in a shorter amount of time.
Getting Started with Selenium IDE
Now that we have a fair understanding of what Selenium IDE is, its features, where is it placed in the Selenium suit’s product line, and its working; let’s deep dive looking into the installation process and run the first test!
The installation process for various browsers
Nowadays, most of us are using Google Chrome, Mozilla Firefox, or any reputable browser. So, if you already have a browser installed except Safari Browser on your computer, you don't require anything else to use Selenium IDE because it is a browser extension.
Now let's start with the installation process for various browsers:
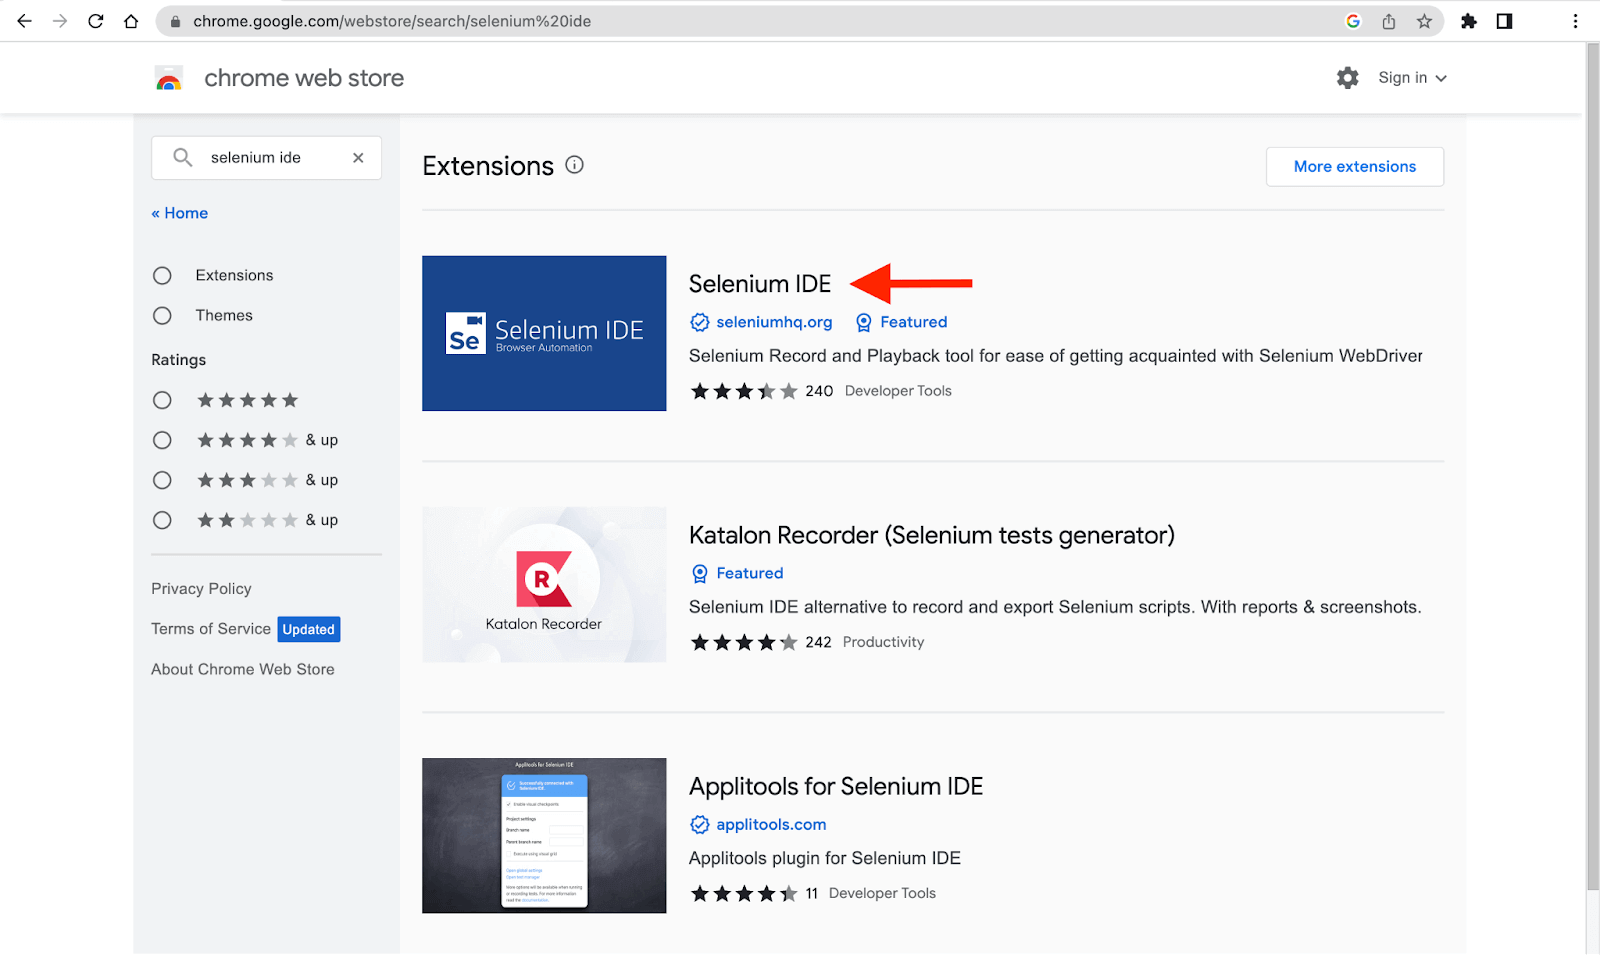
Chrome Browser
- Search for the Chrome web store in Chrome or click here
- Search for Selenium IDE in the search bar on the left side or click here and install it.
Firefox Browser
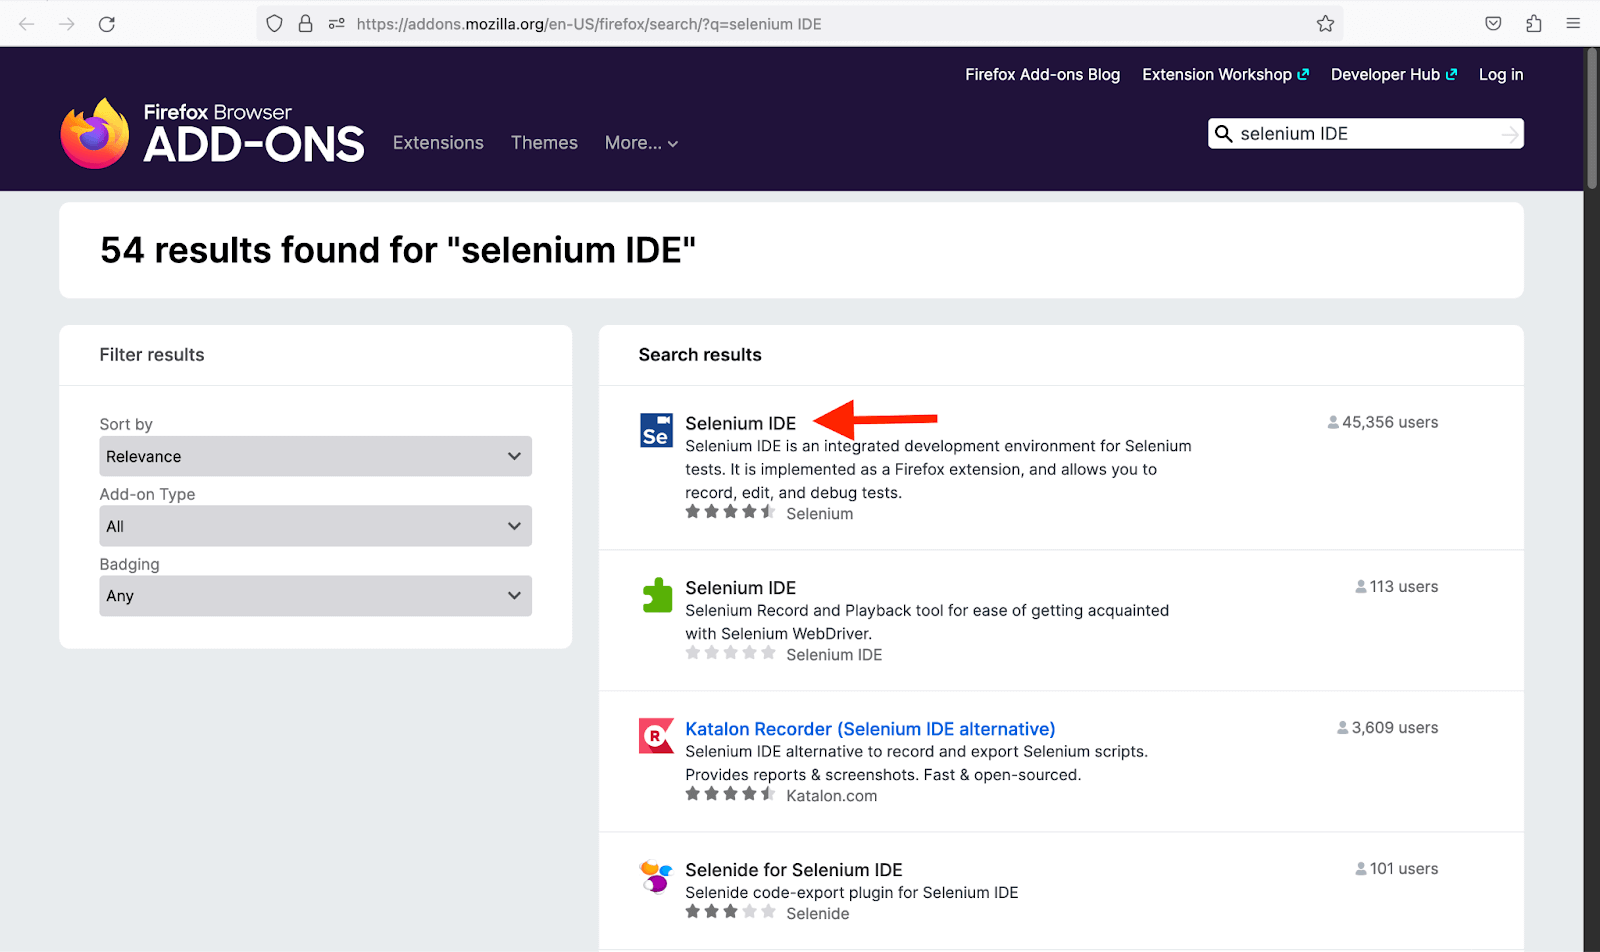
- From the hamburger on the top right corner of the browser, select Add-ons and themes or search for about:addons or click here.
- Search for Selenium IDE.
Edge Browser
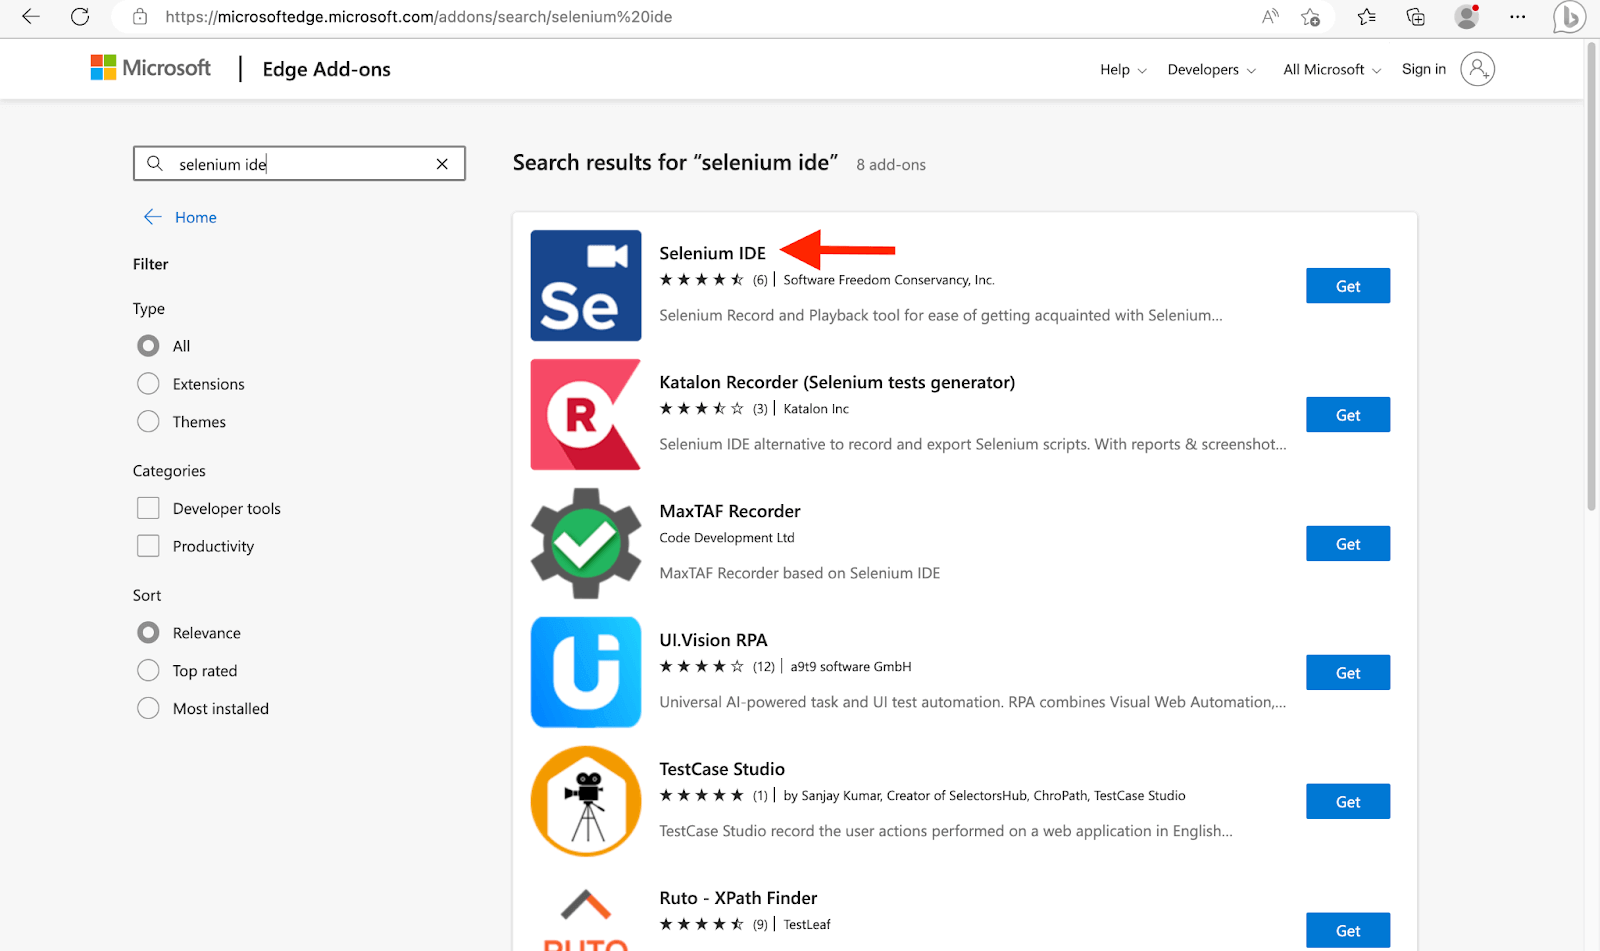
- From the three dots icon on the top right corner, select Extensions or follow this link.
- Search for Selenium IDE in the search bar on the left side.
Brave Browser and Opera Browser
Both support the chrome web store natively. So, if you want to download and run the Selenium IDE on it, just follow the installation process of the Chrome browser.
Safari Browser
Sadly, Selenium IDE has no official release for Safari.
Overview of the user interface of Selenium IDE
The UI (User Interface) of Selenium IDE provides a complete and intuitive environment for creating and executing automated test cases for web apps. It offers a range of features and tools that help users in efficient recording, editing, and playing back test scripts.
For this demonstration, we are going to use Chrome as the browser.
- To open Selenium IDE, go to the extension icon in the top right corner of the Chrome browser. It will look like the image below:
- Select Selenium IDE to open it.
- Select, “Create a new project” and give a desired name to your project.
- Once you create a project it will redirect to the project screen.
Once it is running it will look like this:
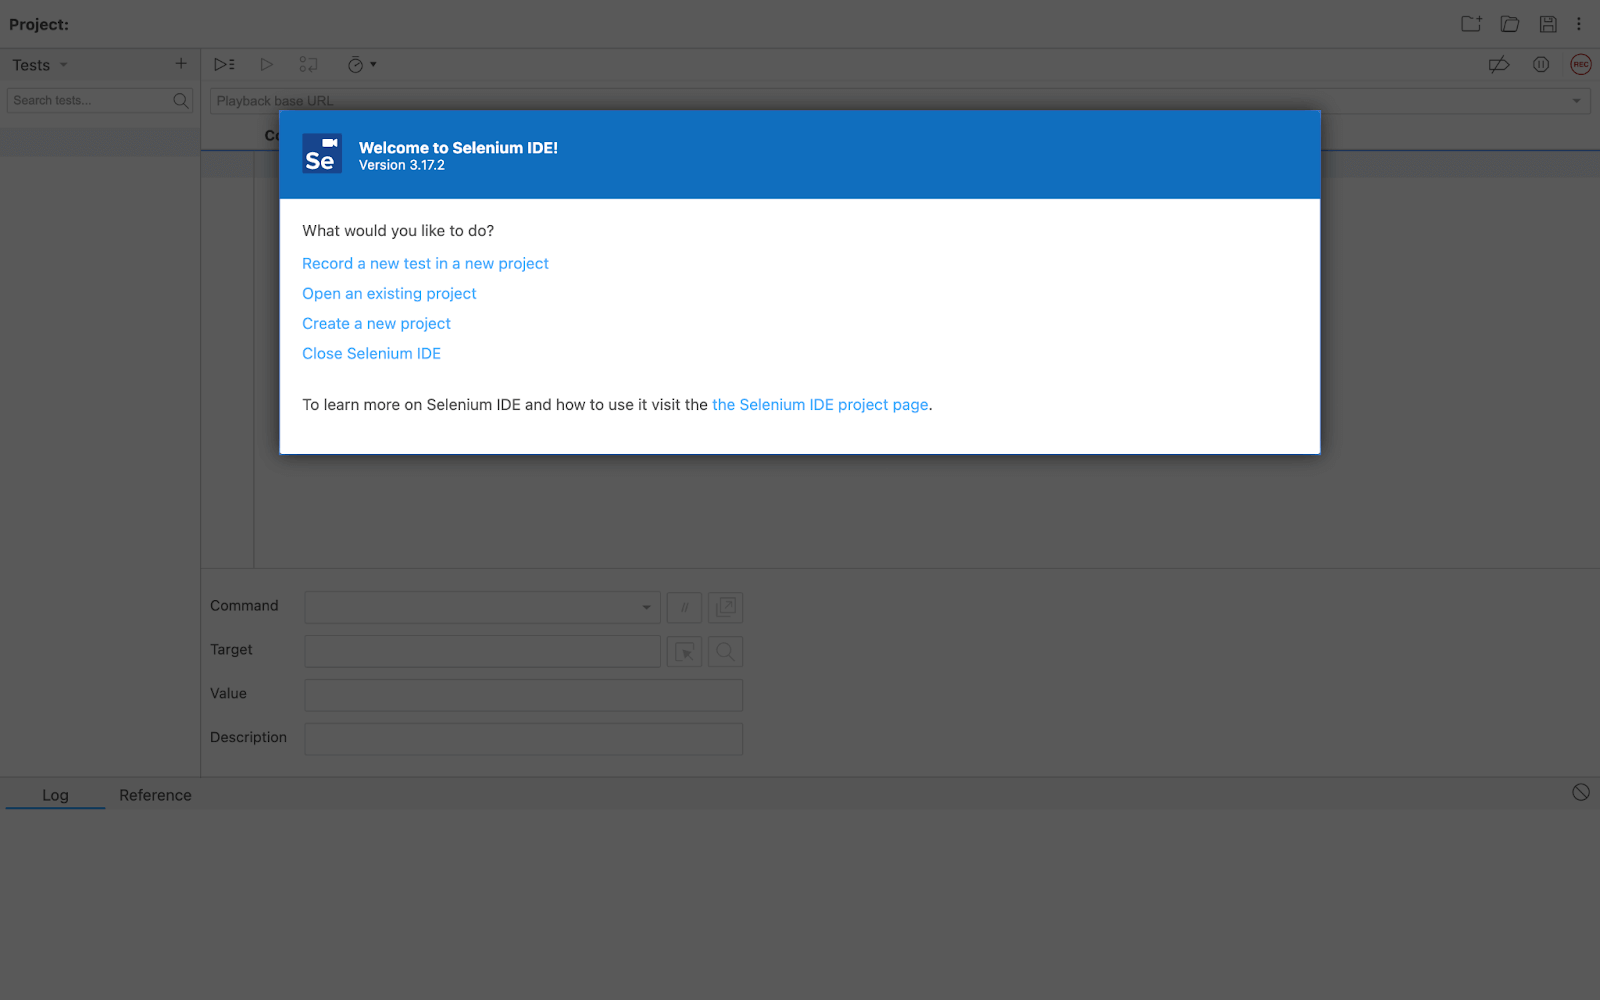
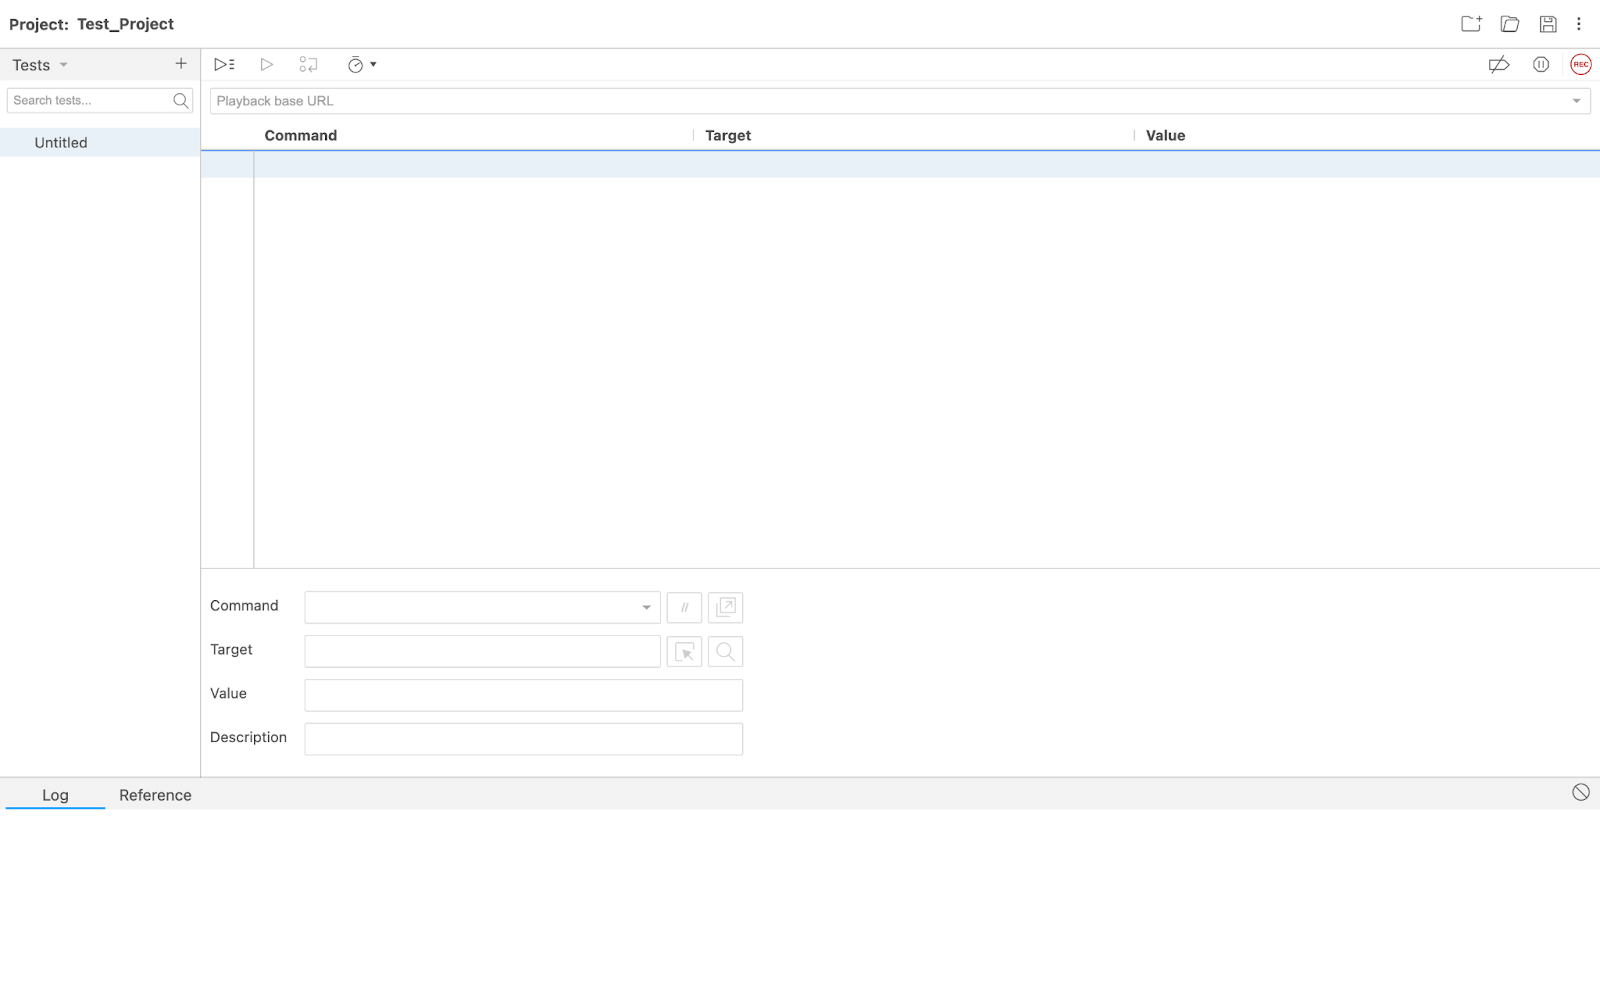
Let’s look at the interface of the application:
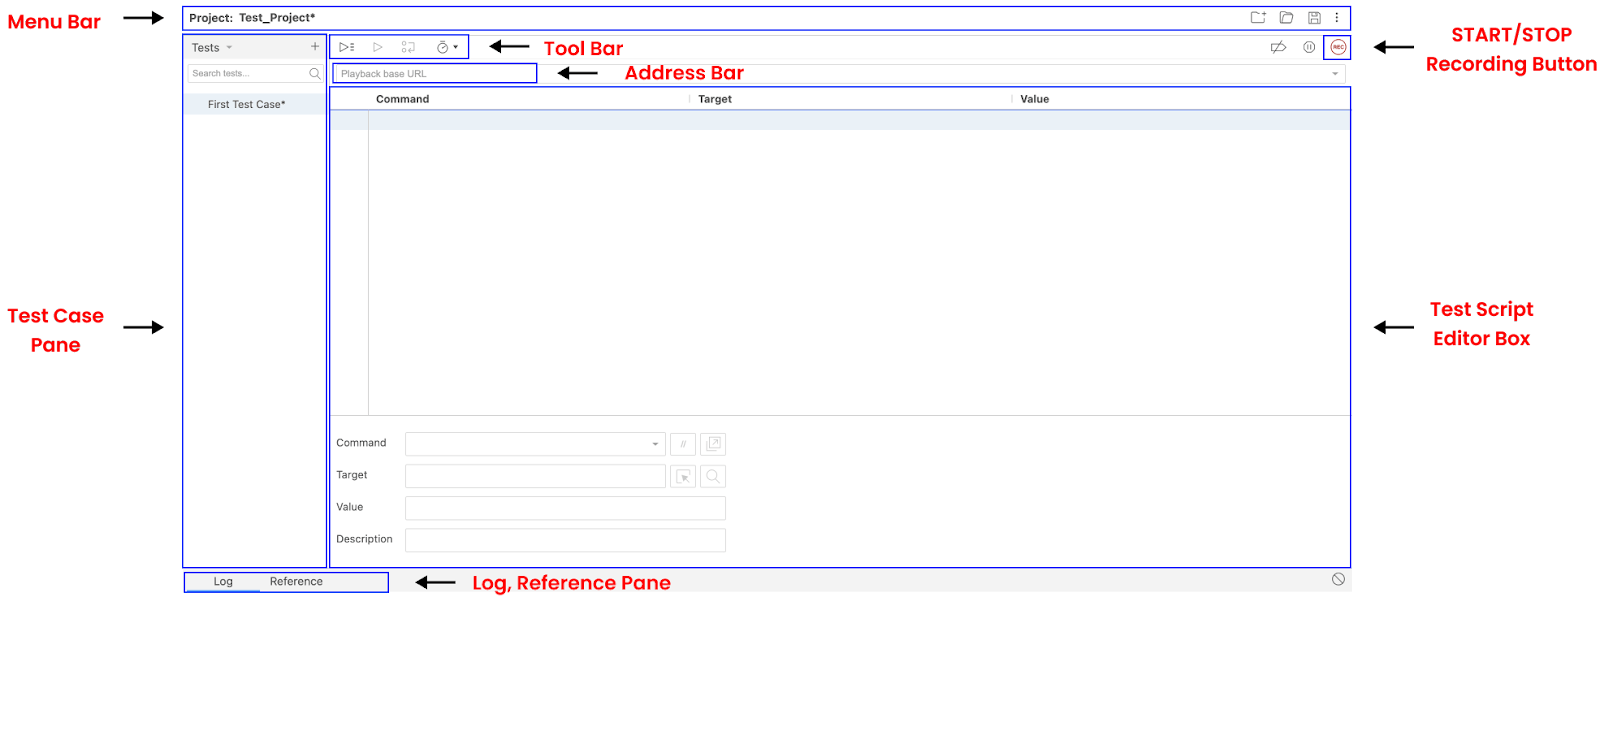
- Menu Bar: The menu bar has options for running, pausing, and terminating tests as well as for opening, saving, and exporting test cases. Additionally, it has controls for preference and test suite management.
- Tool Bar: It offers a selection of setup choices, such as controls for playback speed, element locators, and other preferences.
- Address Bar: Users have to add the URL of the site where they want to run the test cases.
- START/STOP Recording Button: To run or stop the video recording of the test cases.
- Test Case Pane: You create and manage individual test cases in the test case window. Using the various commands and assertions present in the IDE, you may create, delete, and alter test steps.
- Test Script Editor Box: You manage test suites, or groups of test cases, in the test suite pane. Test suites can be added to, modified, deleted, and have test cases added to them.
- Log, Reference Pane: The outcomes of test runs, including any errors or failures, are shown in the test log. It gives thorough details regarding the procedures used during the test and any claims that were made.
Creating the first test case with Selenium IDE
Test cases were created to verify the functionality of a feature or component using Selenium IDE. It aims to ensure that users can successfully log into the application using valid credentials. There are three major processes that are provided by the IDE.
- Recording user input into the browser.
- Playing back the script that has been recorded.
- Saving the test suite for future use.
Let's start with the first step of the process:
Recording
- Launch the Chrome browser.
- Open the extension as discussed earlier and create a new project with the name “Test_Project”.
- Now put the website URL in the Address Bar.
- We are going to use a small to-do project hosted on LambdaTest’s GitHub repo.
- Now create a new test case from the left side of the window with the name “First test case”.
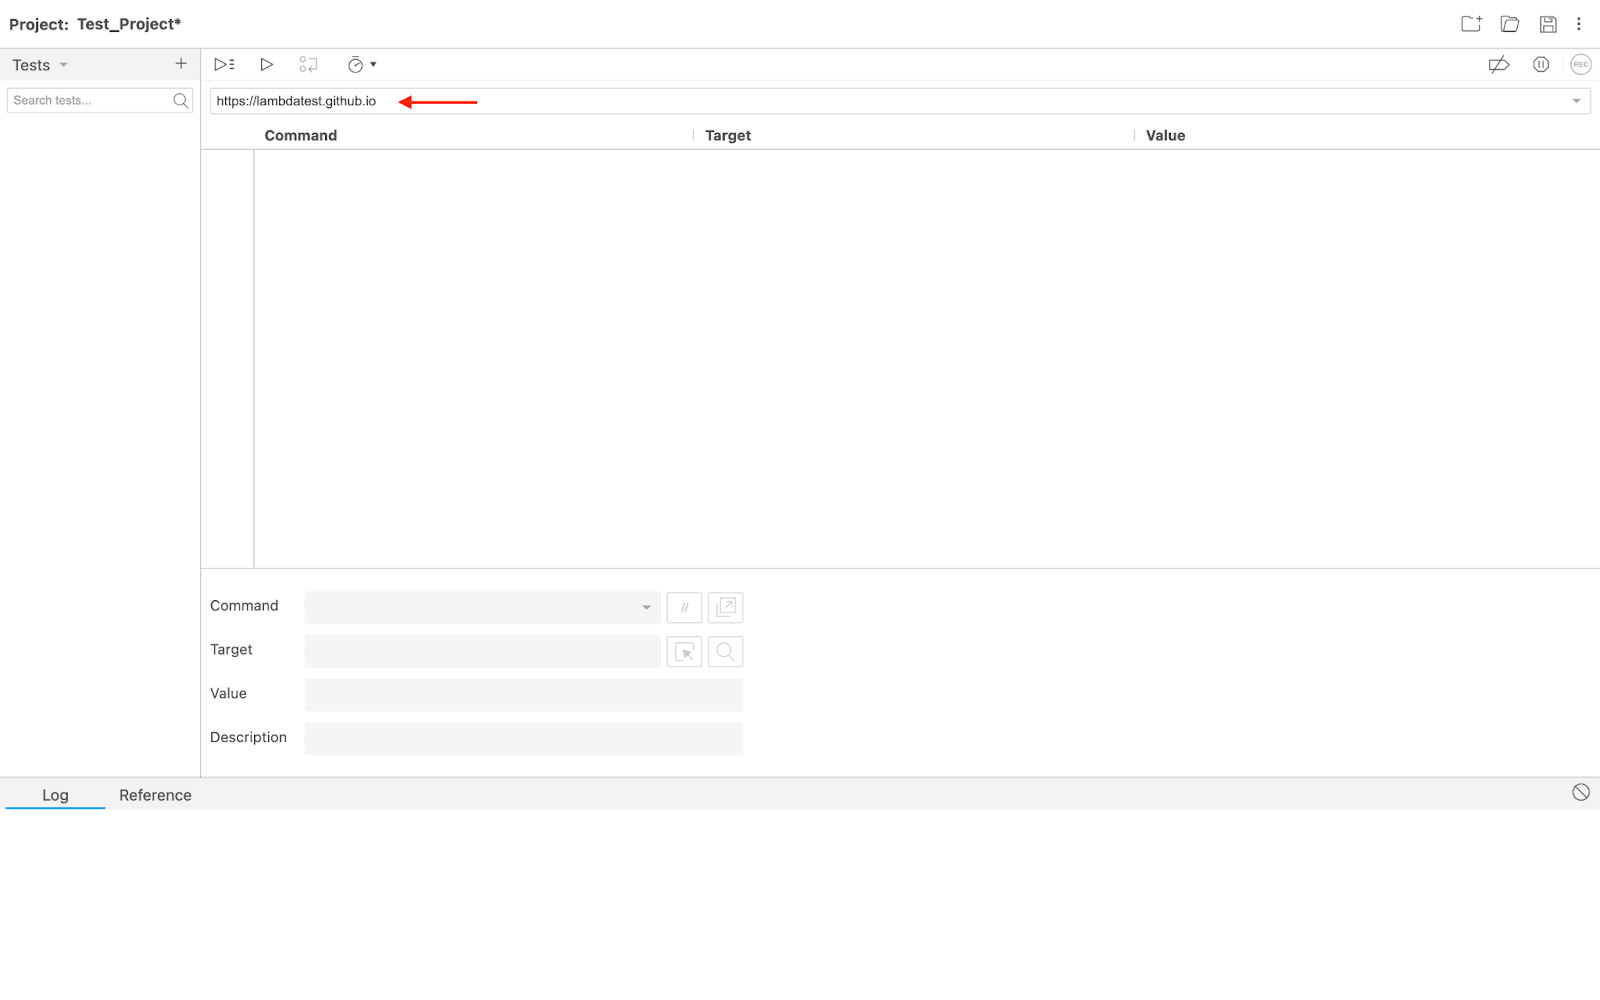
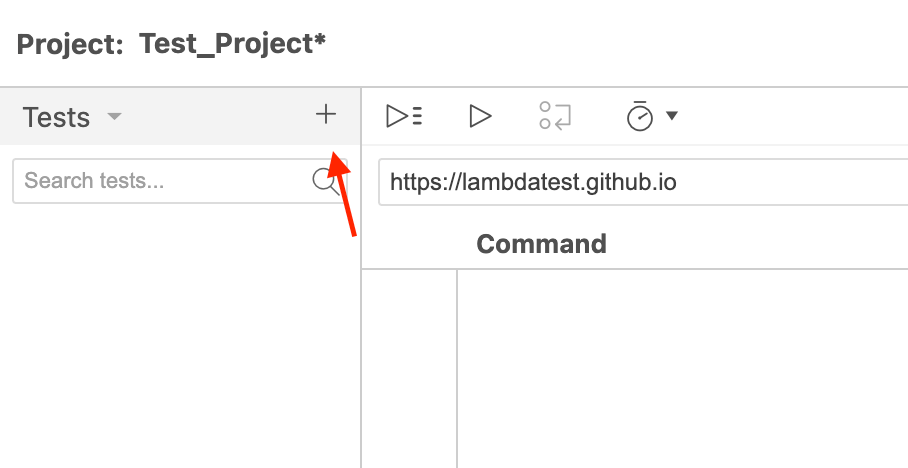
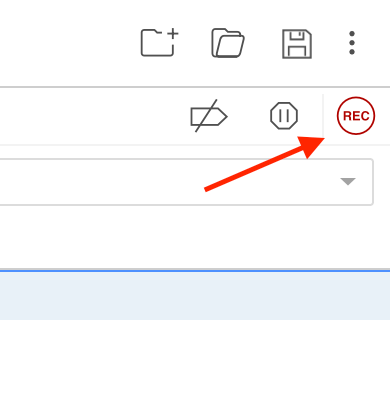
After completing the above steps, you are all set to record your first test case. With a simple press of a button on the right side of the window with the name “REC”(START/STOP Recording Button).
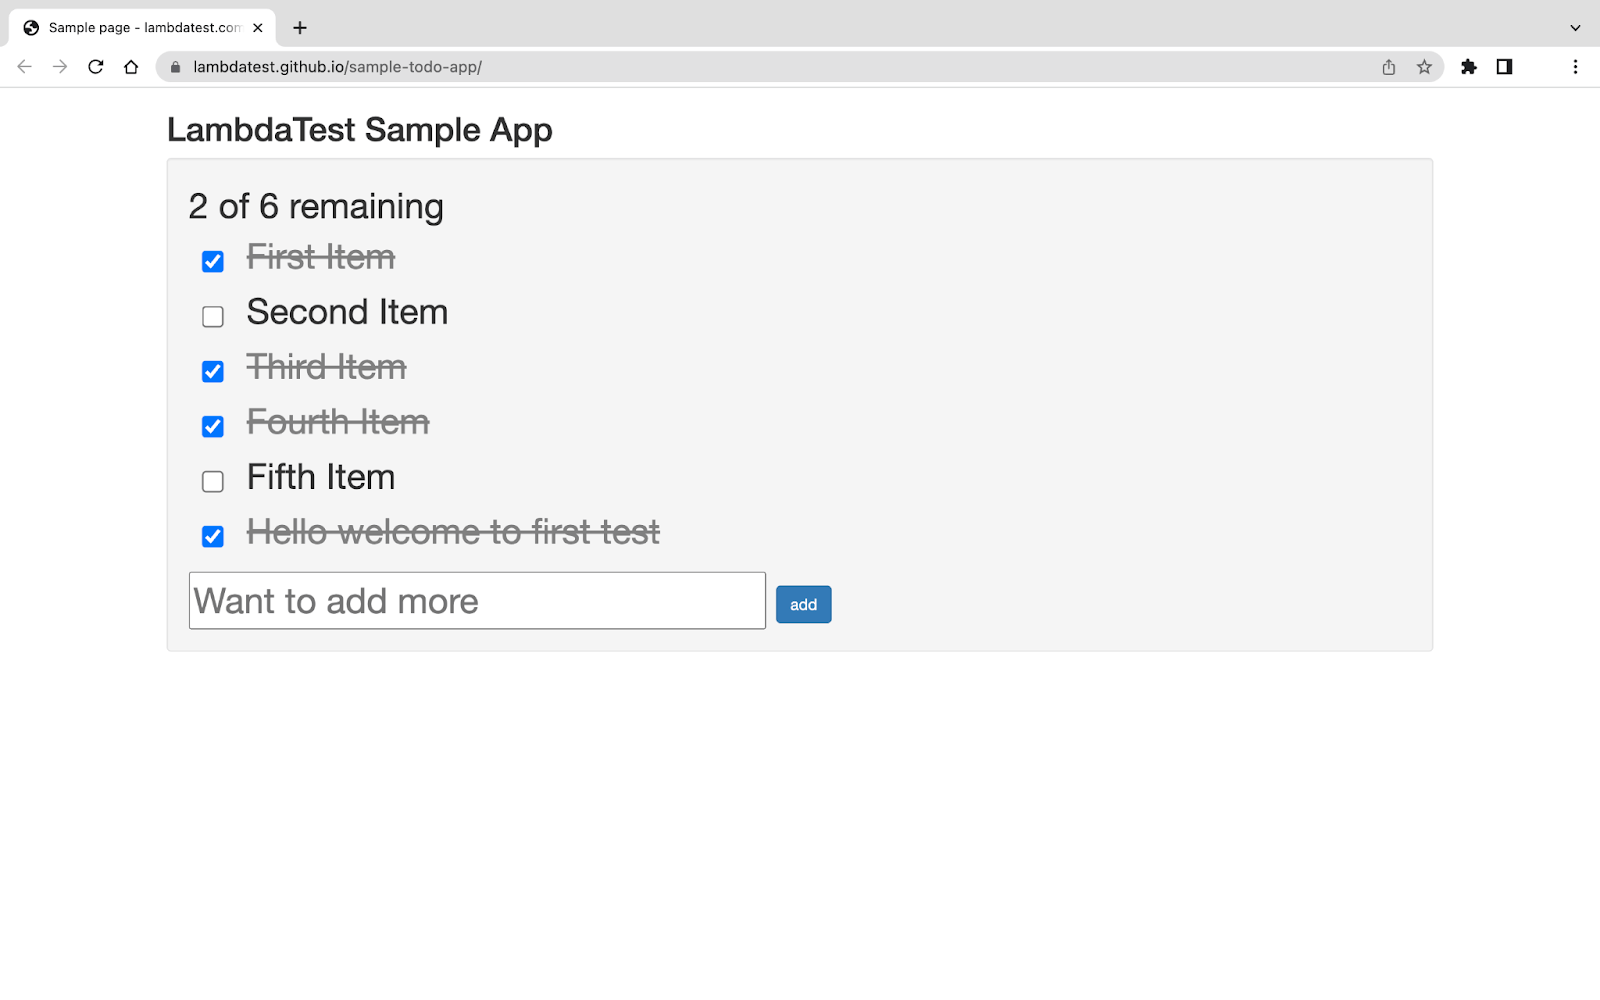
After pressing the REC button, you will be redirected to the browser, and it will open the website. Now whatever you do is going to be recorded by the IDE, and it will be converted to a script.
The activity that was done on the webpage.
The list of all your activities with the browser is now displayed in the Text Editor box:
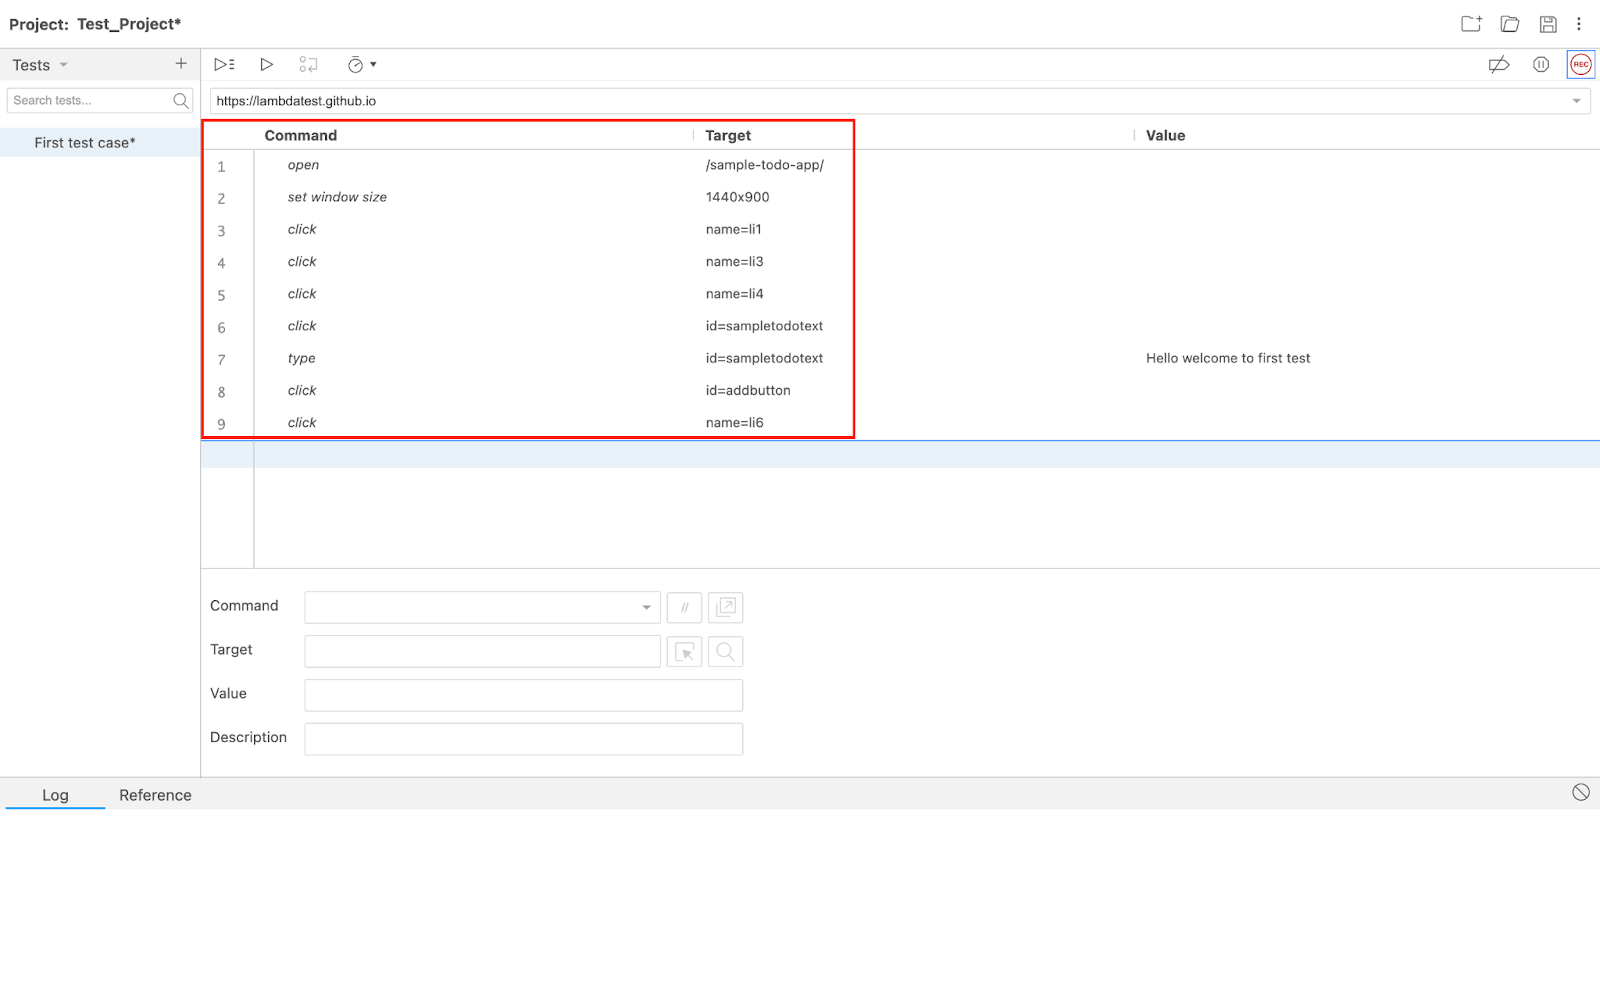
Now that script is recorded, it's time to play it.
Playback
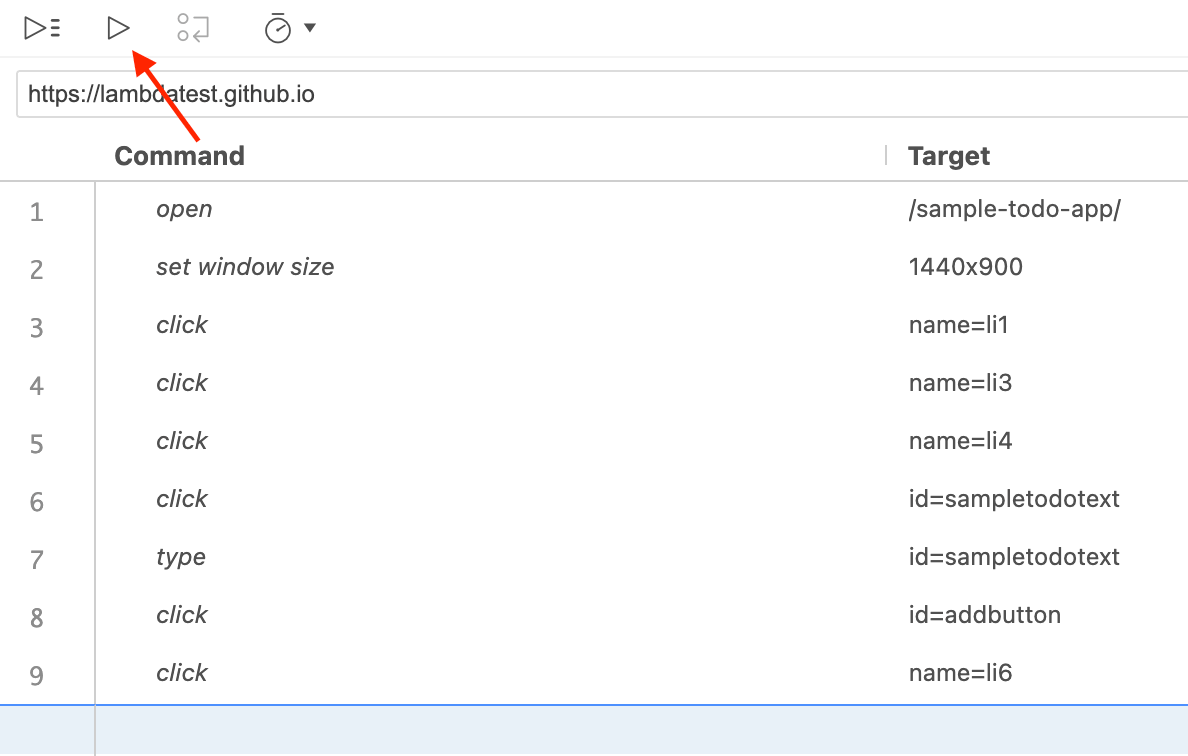
On the IDE's toolbar menu, select the "Run Current Test" button.
It will carry out all of your browser interactions and provide you with an overall breakdown of the test script that was run.
The log Reference pane shows an overview of all run test scripts.
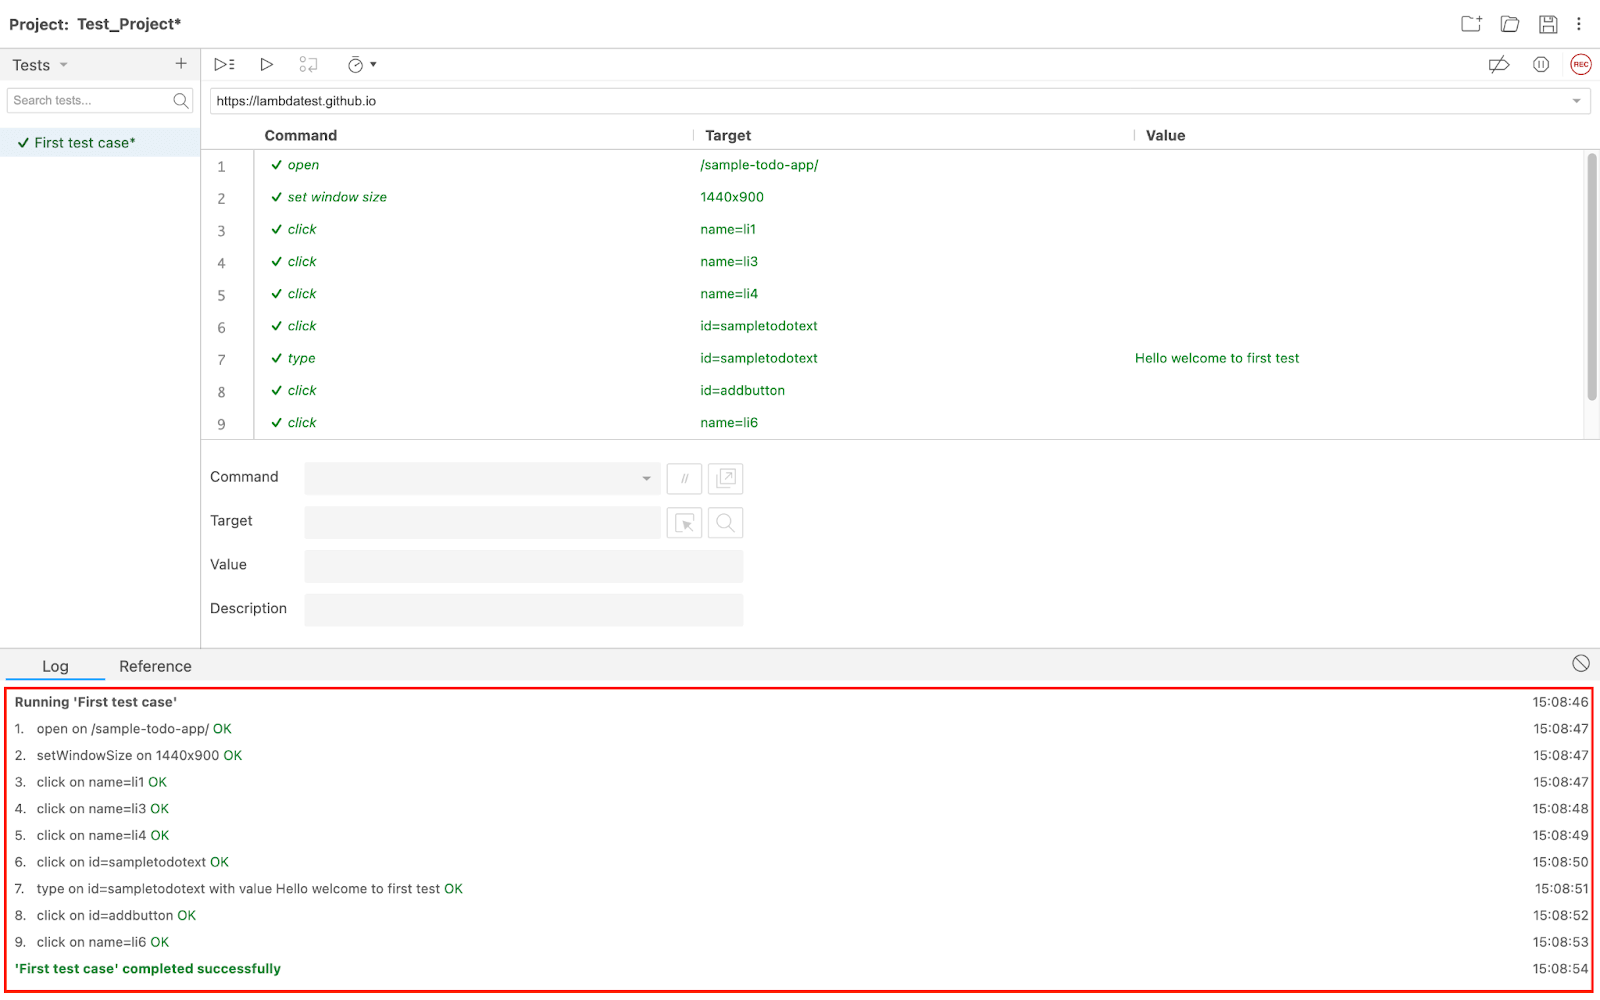
Now that everything is working as expected, let’s save the test suite for future use.
Saving
The save button is located in the menu bar's upper right corner.
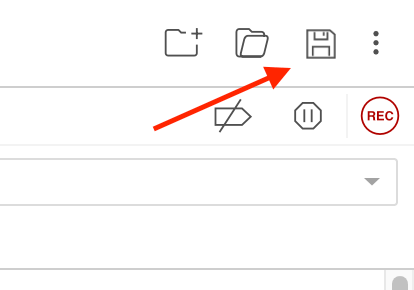
The test suite will save as “Test_Project.side”. We will see how to run this file later in the blog.
Advanced Selenium IDE Techniques
Now that the basic test case is running properly. Let’s learn some new commands which will help to develop custom scripts along with the generated scripts. These techniques empower testers and developers to create robust automated tests with increased precision and customization.
There are various commands which are available in the Selenium IDE. But the most common ones are as follows:
- if, else if, else, end
- times, end
- do, repeat if
- while, end
If you want to get more details about each command, refer to Selenium-IDE-Control-Flow-Docs.
Let's discuss some commands by implementing them within the previous test case.
If, else, end commands
If:
It is the command used to start a conditional block.
You also have to add a JavaScript expression that you want to evaluate. Variables that were previously created by JavaScript expressions in your test could make up for this. All of this enters into the if command's target input field. The test will run the subsequent commands till the next one if the expression evaluates to true.
Else:
The last possible condition in an if block is the else condition. This command will only be carried out if none of the prerequisites are satisfied. When finished, it will execute the end command.
End:
The conditional command block terminates with this command. If you try to run your test without it, you'll get an error message informing you that the command block is incomplete.
One must need to use end along with if to avoid runtime errors.
Let’s discuss one example to get a better understanding of the commands.
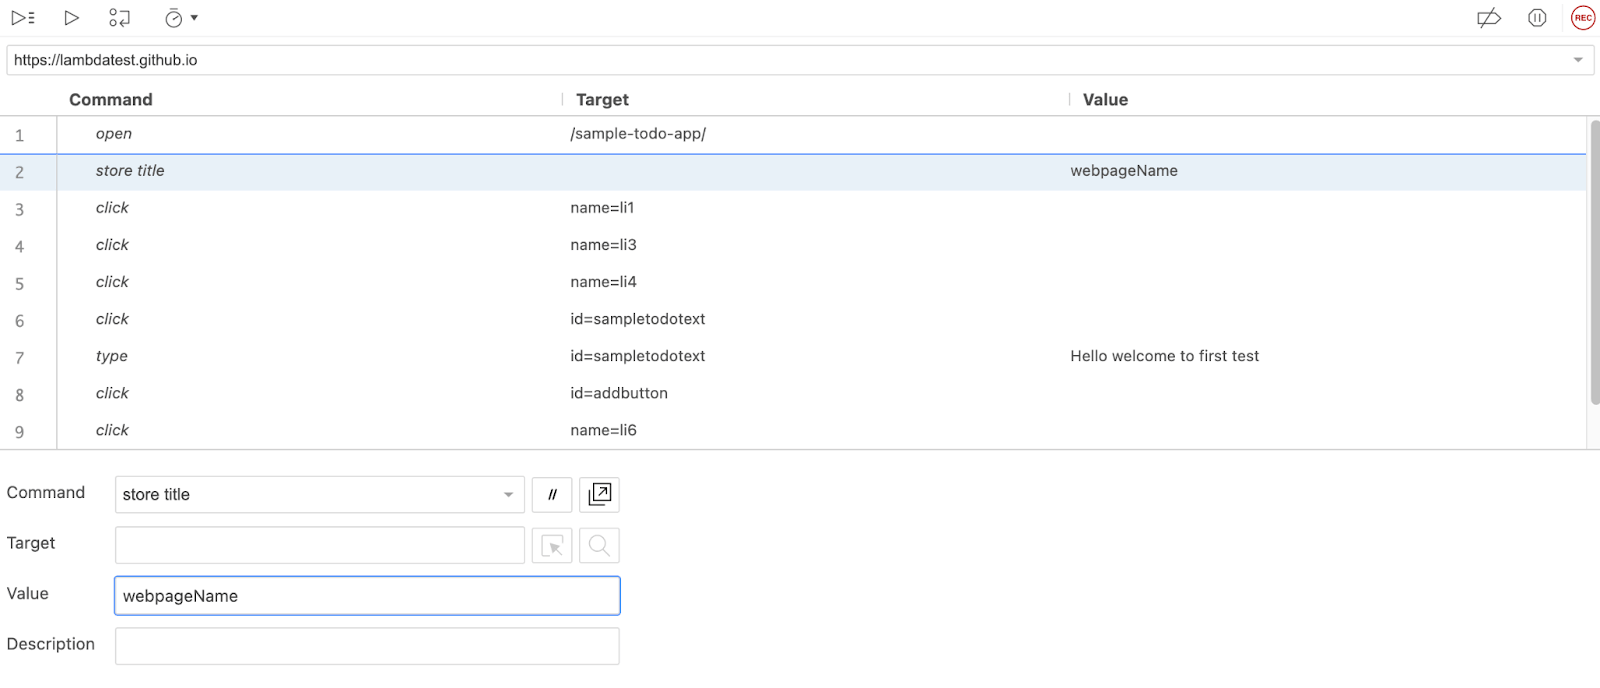
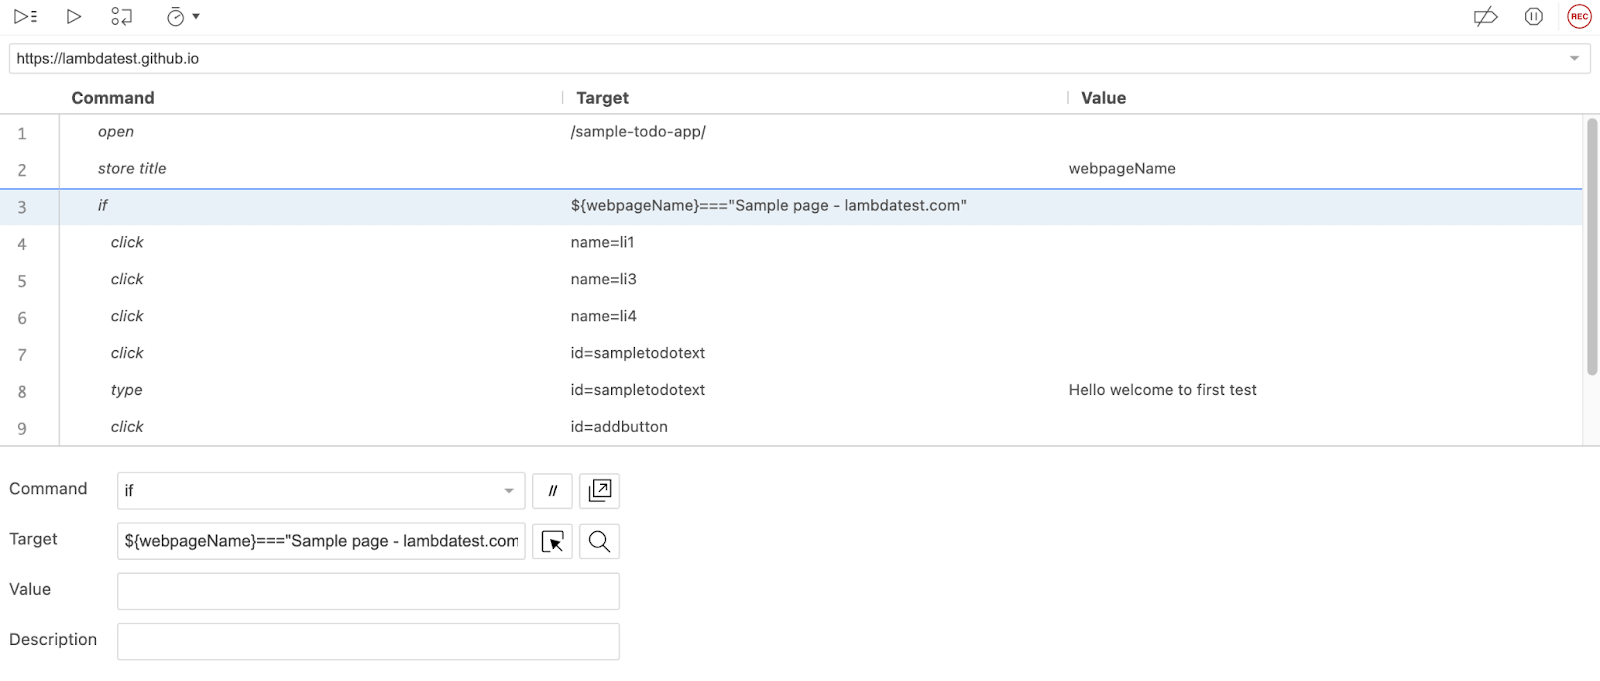
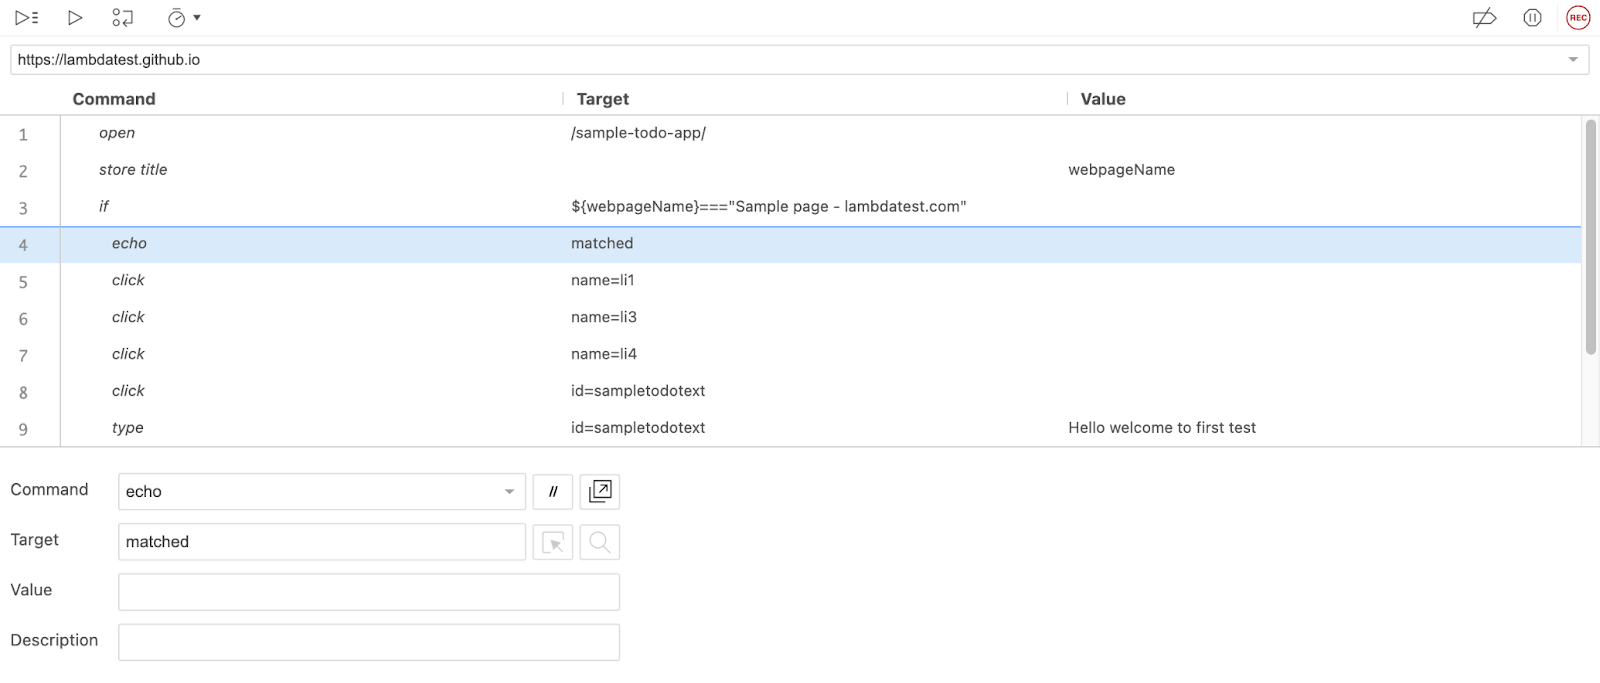
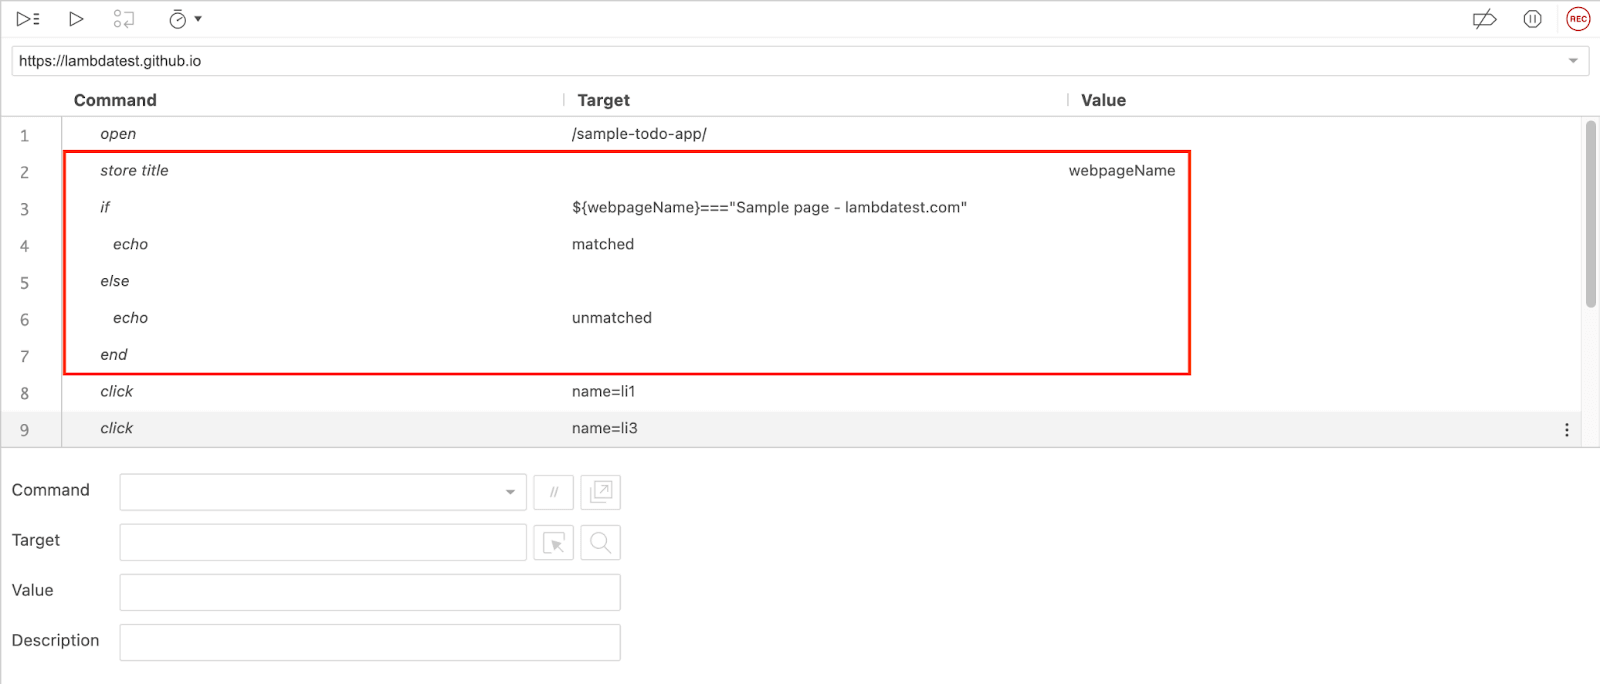
In this example, you have to fetch the title of the webpage and print matched if it is “Sample page - lambdatest.com”, else print unmatched.
- store title command: It will store the title of the webpage in the variable you provide in the value input field. Here the variable name is webpageName.
- Creating If block with the condition as $webpageName==="Sample page - lambdatest.com".
- echo is a print statement to print statement in logs.
- This is what a conditional block will look like.
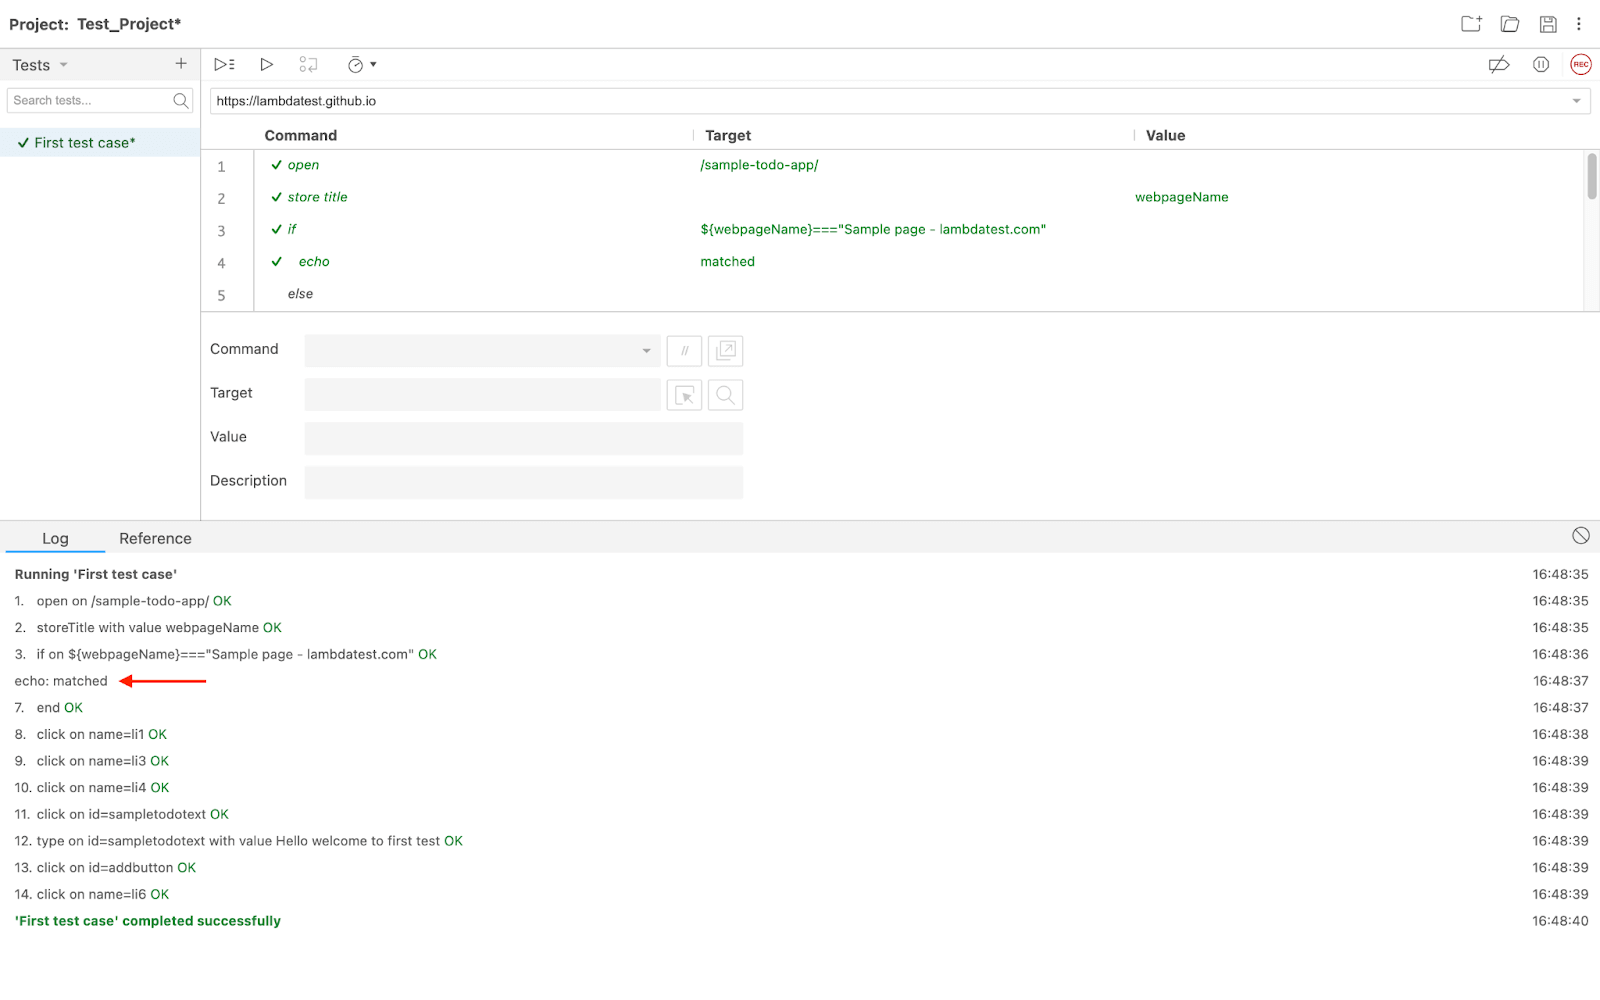
- Once the script is executed it will give the output in the log, reference pane.
Times command
With a times command, you can indicate how many times a group of commands should be executed. The target input field of the times command receives the number.
Use the end command to finish the times command block.
There are other commands like while, forEach, and do, which work quite similarly to times.
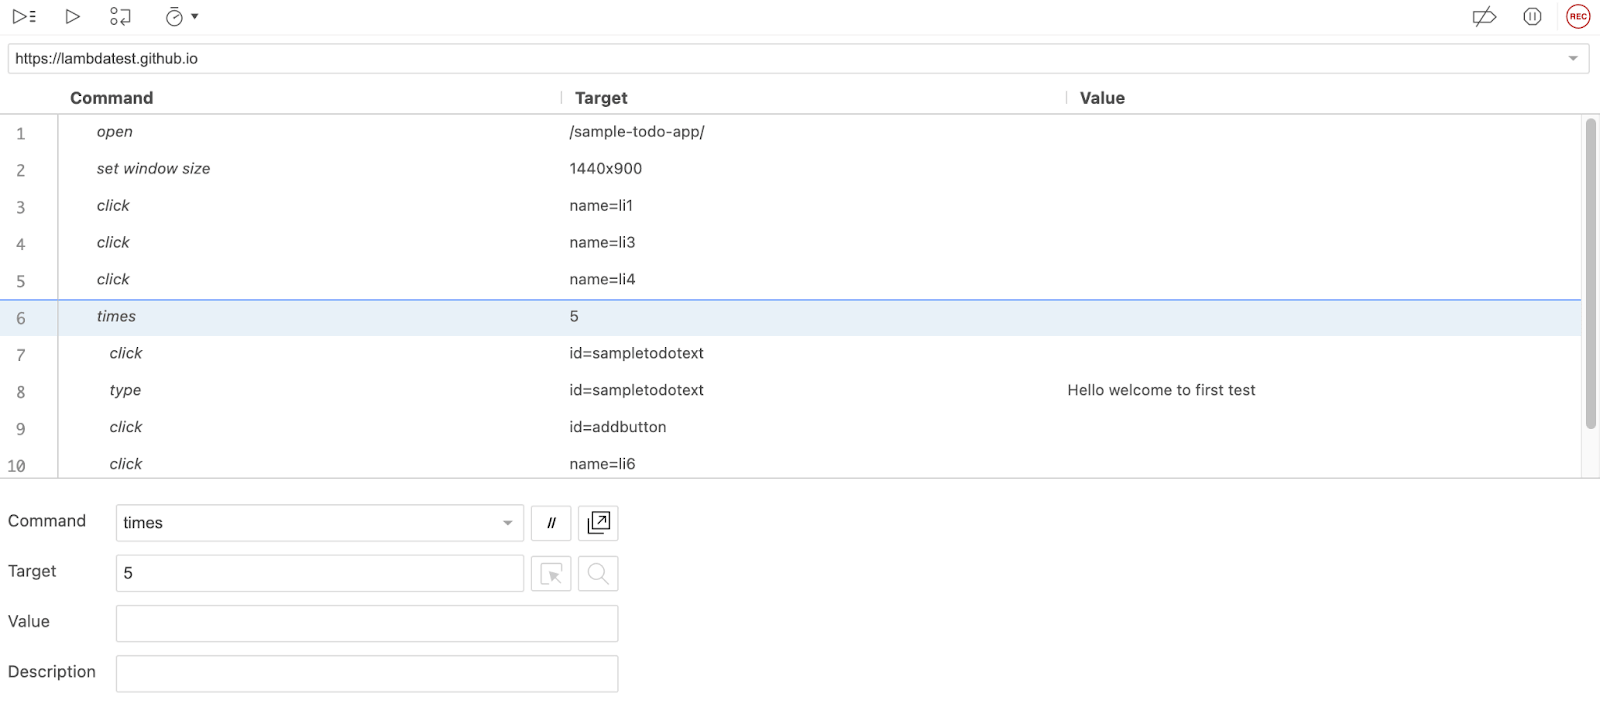
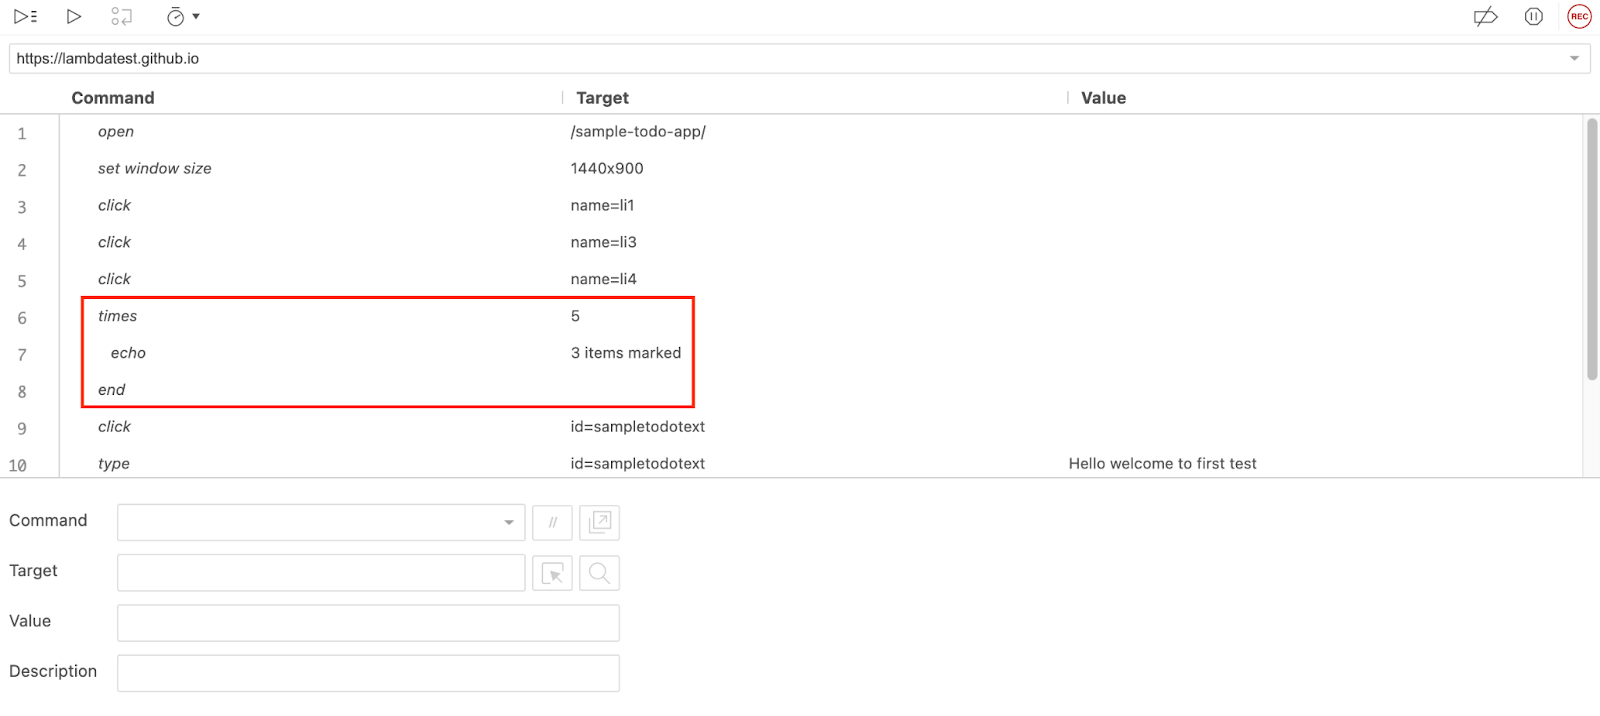
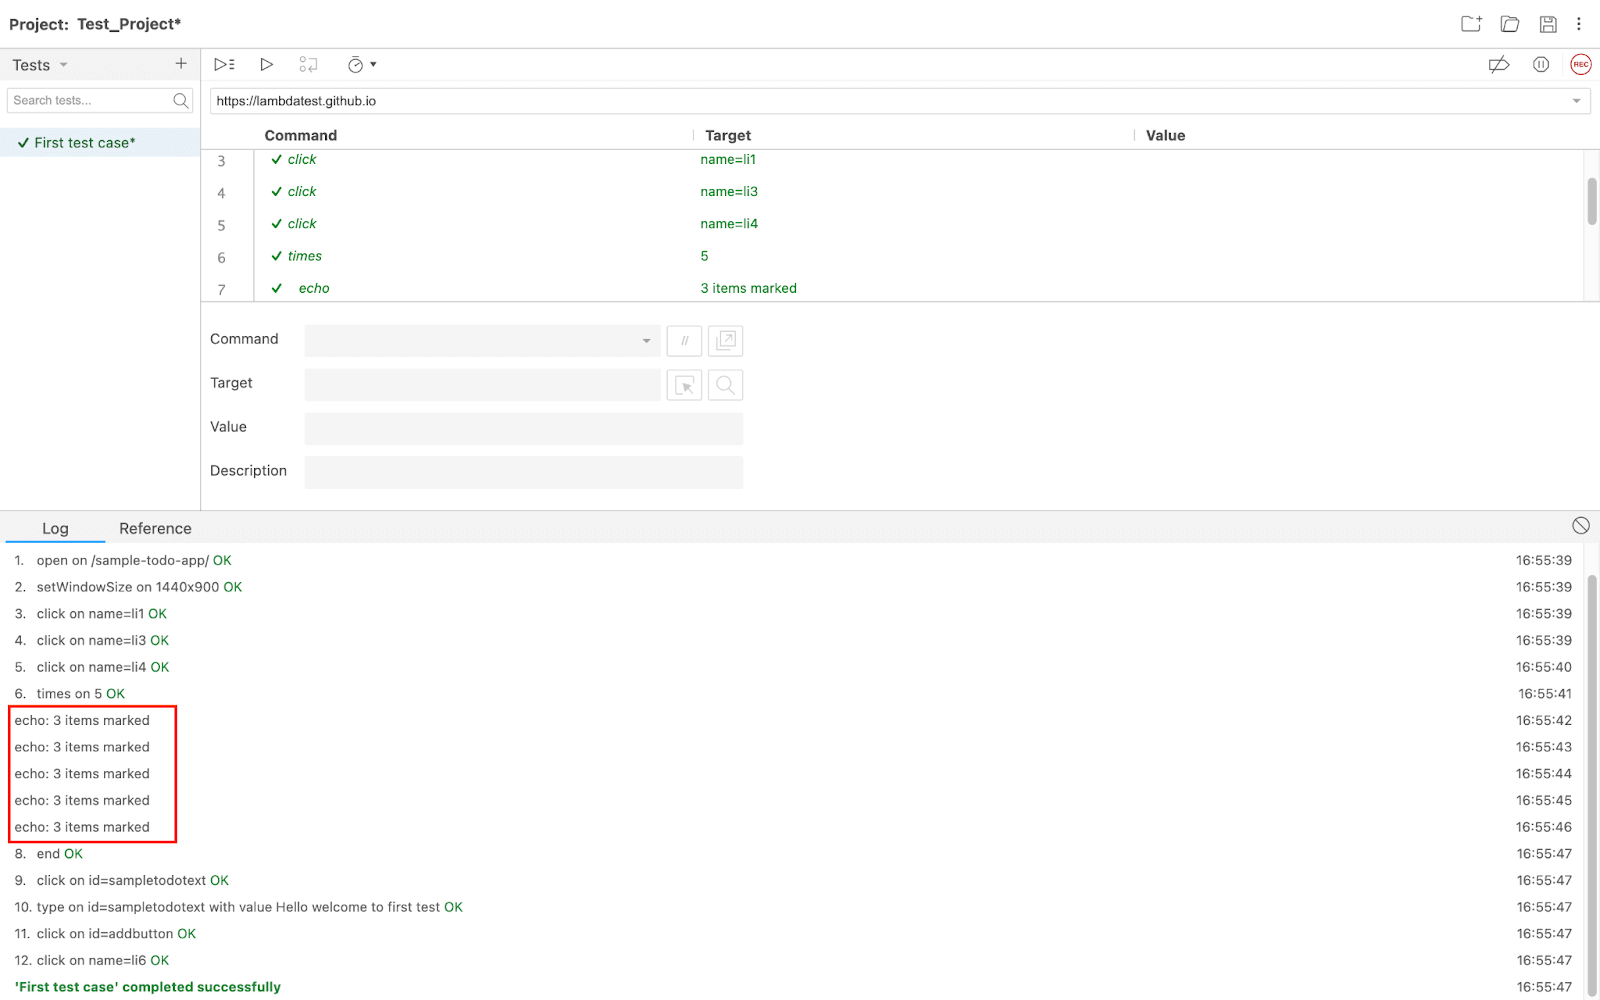
Let’s consider an example where one needs to print a statement 5 times after 3 items are marked.
- Add a times command.
- Add echo and end commands to complete the times block.
- The output of the following command.
Using variables to increase the usability of the code
Store command:
The store command in Selenium IDE is used to store variables. The example below puts the word "lambdaTest" in a variable called "name". Simply wrap the variable in a $"{...} sign to have access to it.

Verify element present command
Depending on whether the provided element is present, this command either stores "true" or "false". The script below assigns "true" to "value1" and "false" to "value2" for Boolean values. We'll use the "echo" command to display the values of values value1 and value2 to confirm.

Store Text command:
With the help of this command, you can store a variable with the inner text of an element.

Debugging for Selenium IDE
Script debugging was not supported by the previous versions of Selenium IDE. The inability to change scripts and the absence of debugging assistance were viewed by testers considering utilizing the IDE for Selenium automation testing as deal-breakers.
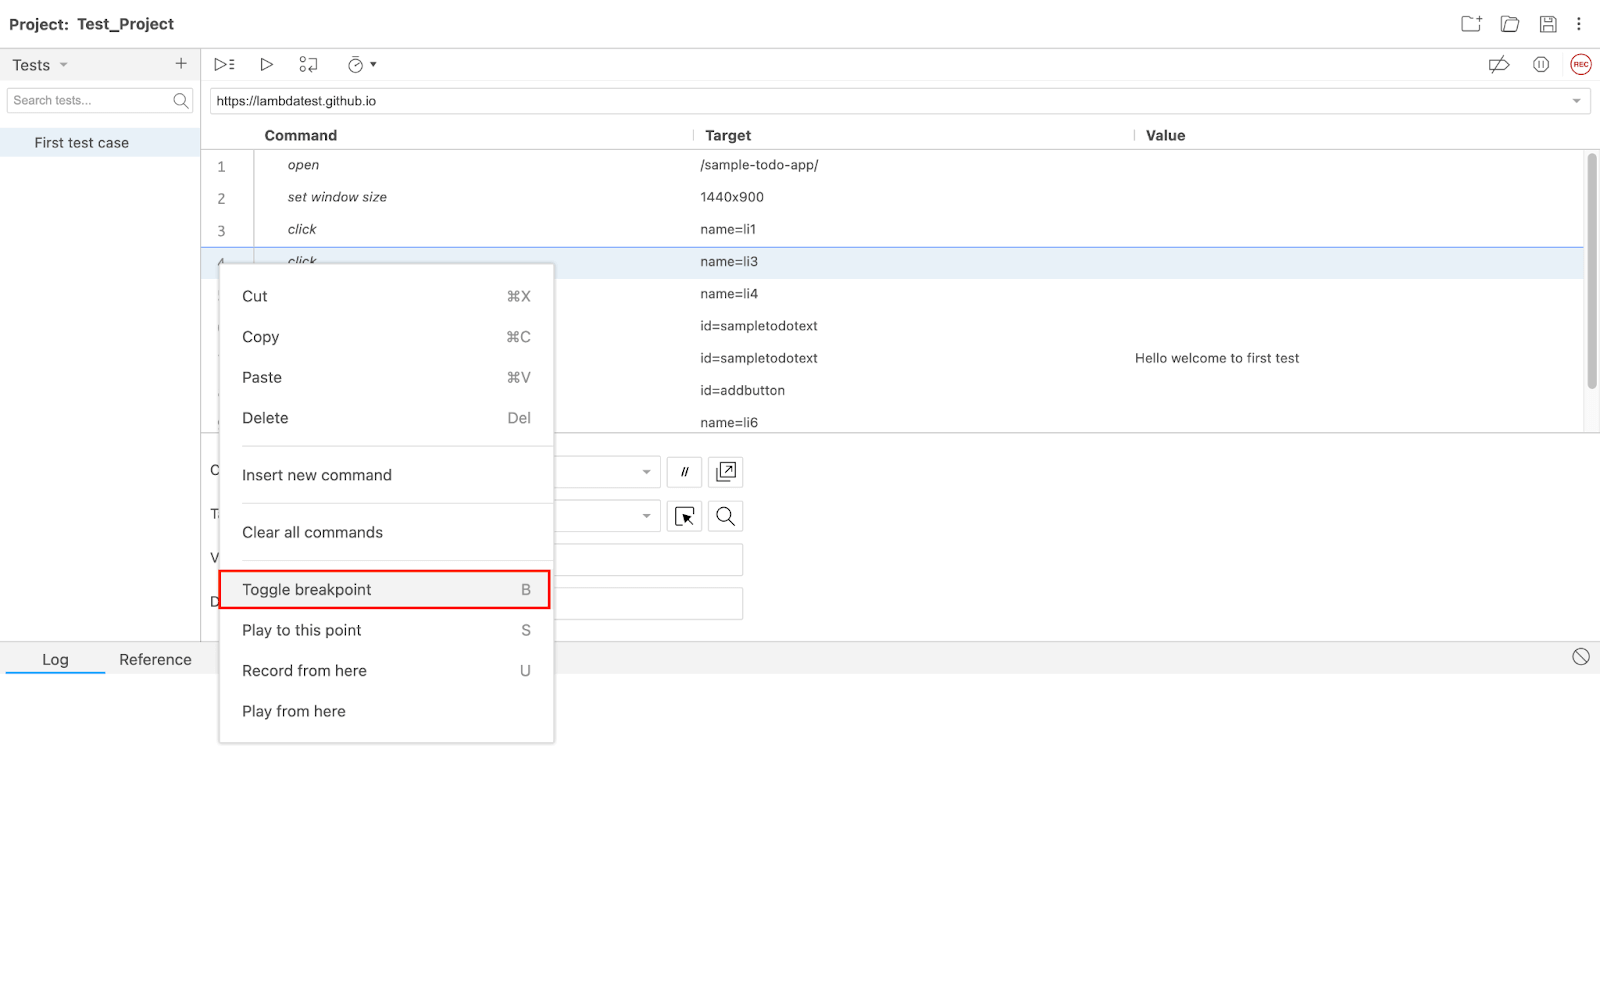
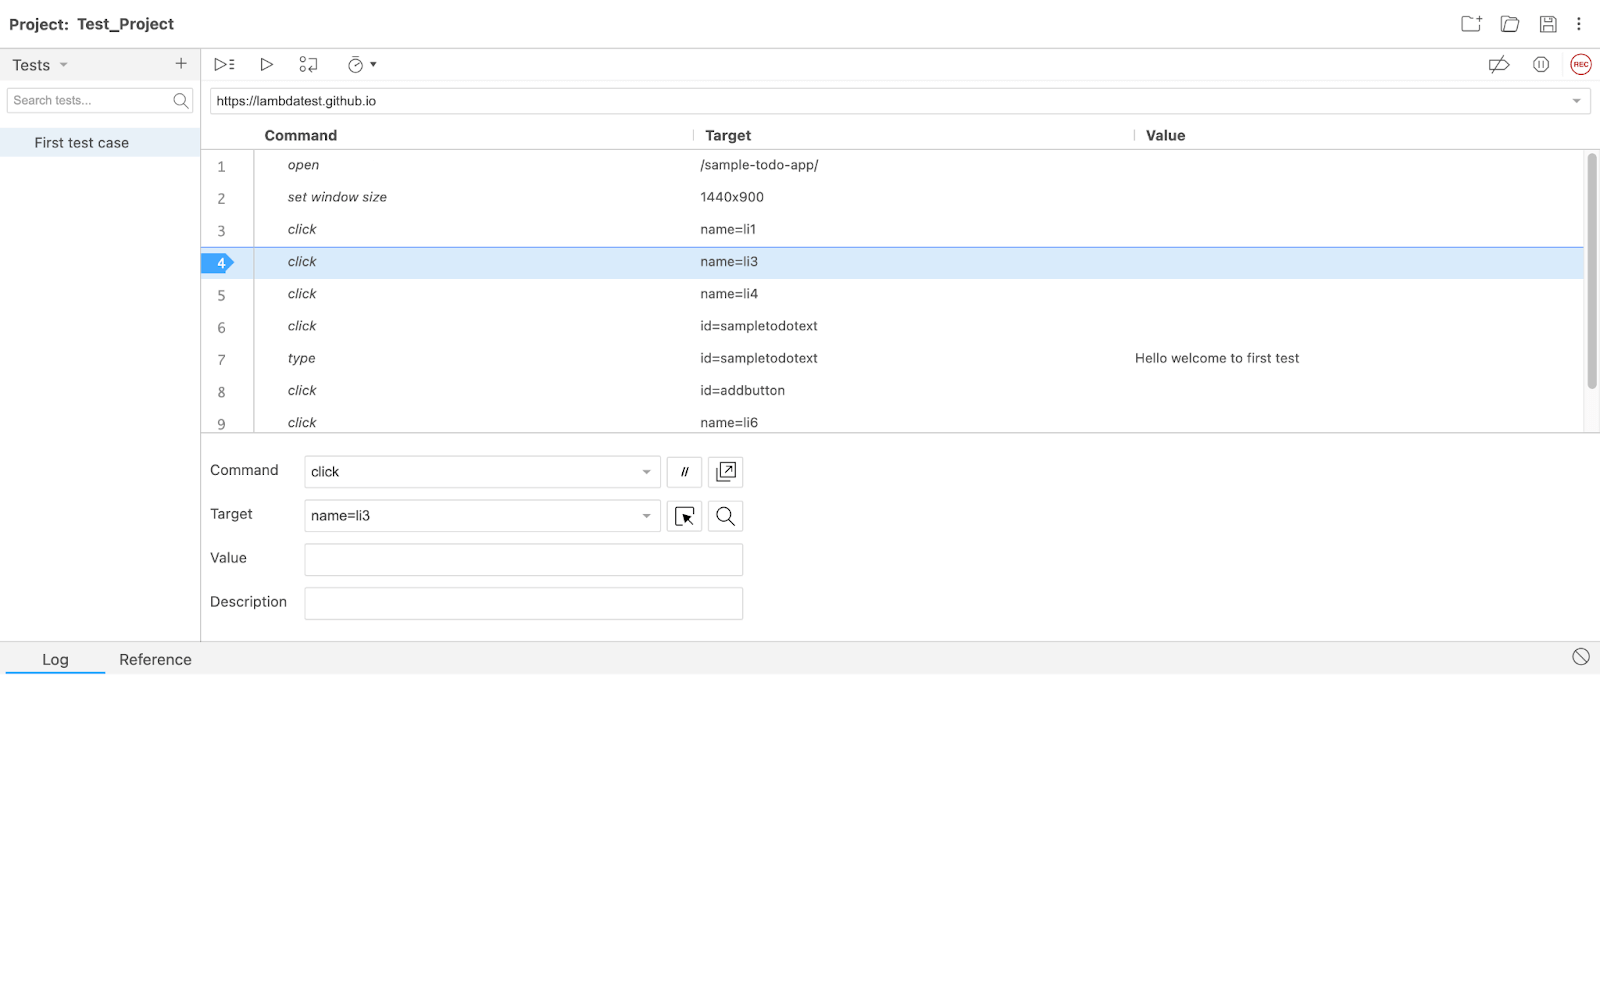
You also receive tools like establishing breakpoints and pause exceptions. Click on the Toggle breakpoint button after locating the place in the test script where a breakpoint has to be added. In the following illustration, the execution has come to an end at the moment where it hits a breakpoint:
Best Practices for Selenium IDE
One of the roadblocks while using Selenium IDE is that the generated scripts are not reusable and require continuous maintenance against the web application being tested.
To avoid this problem, one must keep these points in mind:
Good to have while using IDE
Several features and qualities are considered "good to have" as they enhance the overall development experience and productivity. These attributes can vary depending on the use case of the selenium IDE being used, but here are some general aspects that are often beneficial, which we will look at in this section.
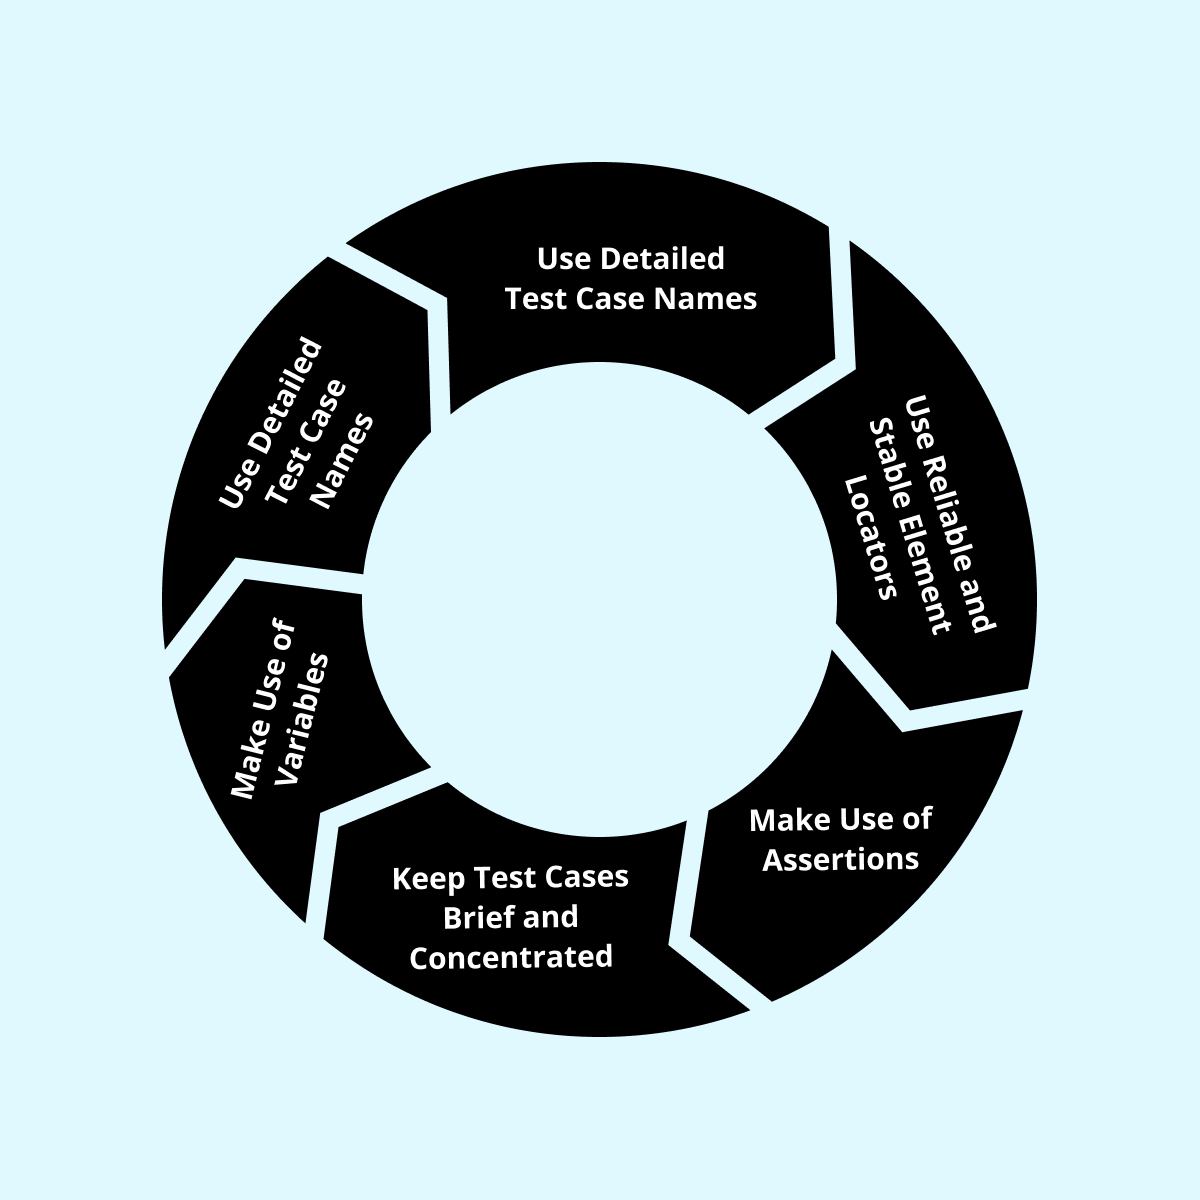
- Use Detailed Test Case Names: Give your test cases descriptive names that completely capture their function and goal. This facilitates maintenance and organization while also making it simpler to comprehend what each test case is testing.
- Use Reliable and Stable Element Locators: Use element locators that are trustworthy and stable across various browsers and devices. Utilizing locators based on element position or appearance should be avoided as they can be less accurate and may result in problems when the application changes.
- Make use of Assertions: Assertions can be used to confirm that an application is acting as expected. This guarantees that the program is operating as expected and assists in finding mistakes and problems early in the development process.
- Keep Test Cases Brief and Concentrated Write test cases that are concise and concentrated on a single feature or piece of functionality. Because of this, it is simpler to maintain and update them over time, and it is easier to ensure the tests are effective.
- Make use of Variables: Store values utilized by several test cases in variables. As a result, updating values utilized in several test cases is made simpler, and the likelihood of mistakes brought on by duplicate code is decreased.
- Delays & Timeouts: To deal with delays brought on by sluggish page loads or network latency, utilize explicit delays and timeouts. This makes it easier to guarantee the consistency and dependability of your tests in various situations.
Common challenges you might face using Selenium IDE
Most of the software we use has some pros and cons. The same goes with this IDE too. Some of the cons, like limited browser support and lack of advanced features, can only be addressed by using relevant tools. However, some of them might be overcome with better practices.
Some of the challenges and how to overcome them:
- Cross-Browser Compatibility: Selenium IDE might not function the same in every browser. Thus it's critical to evaluate your test cases in various browsers to ensure they function properly.
- Dynamic Material: JavaScript-generated or constantly changing dynamic material may not be supported by Selenium IDE. In these circumstances, you might need to verify your application's functioning using alternate techniques.
- Maintenance Over Time: As the application changes over time, test cases produced with Selenium IDE may become old or need to be updated. To ensure your test cases are still precise and useful, it's crucial to examine and update them periodically.
Optimization of test case run time
Optimization of the test case without compromising its effectiveness is very important and crucial at the same time. This will help to enhance the efficiency and productivity of the test scripts. Some of the methods discussed below are to use waits, parallel testing, and many more.
- Use Explicit Waits: Make sure that your test cases wait only as long as is required for the application to load by using explicit waits. This may shorten the time it takes to run the test.
- Reduce Network Traffic: Use effective locators and only load the required content to reduce the amount of network traffic created by your test cases.
- Run Tests in Parallel: Run tests simultaneously to shorten the time it takes to complete a test. Selenium Grid or other testing frameworks can be used for this.
- Use Headless Browsers: Running tests without a GUI using headless browsers helps hasten test execution and uses fewer resources.
- Prioritizing the test cases: Test cases should be prioritized according to their run time and priority. This can ensure that time-consuming tests are run last and that crucial tests are executed first.
Understanding the “.side” file in Selenium IDE
The ".side" file is a key feature of Selenium IDE. Users can effectively organize and manage their test automation projects by using it as a container for test cases and test suites. Test cases saved as ".side" files can be readily shared to many Selenium IDE instances and with other team members. Collaboration, information exchange, and effective distribution of automated testing are made possible as a result. Additionally, the ".side" file format is compatible with version control programs like Git, allowing users to efficiently collaborate, track changes, and manage various test case versions.
Apart from this, the “.side” file is platform and browser friendly. So suppose you record your tests on the Chrome browser; you can easily run and test the script with other browsers like Firefox, Edge, Safari, and Opera with the help of a side runner.
Running Selenium .side files Locally
In this section, we will look at how to run a .side file in the Firefox browser. The process for running a “.side” file locally on a different browser takes a few more steps after exporting the file from the Selenium IDE.
Prerequisites
- Npm package
- Web drivers
To run your “.side” file on a Firefox browser, you first need to install node on your system.
Follow the steps to install Node.js.
Once node is installed, you can check its version by running the following code in cmd(Windows) or terminal (macOS or Linux).
node -vAs discussed earlier, let’s install a side-runner with the help of the npm package manager by writing the following command:
npm install -g selenium-side-runnerAbove command will install the latest version of the Selenium side runner, which is supported by Selenium 4.x.x .
If you want to use Selenium 3, you have to install the supported version of the side runner. For example, you can use the below commands to install Selenium and side runner.
pip install selenium==3.141.0npm i -g selenium-side-runner@3.14.0Whether you are using Selenium 3 or Selenium 4 running the “.side” file follows the same command.
Let’s run the file we saved earlier on the system with the name “Test_Project.side”
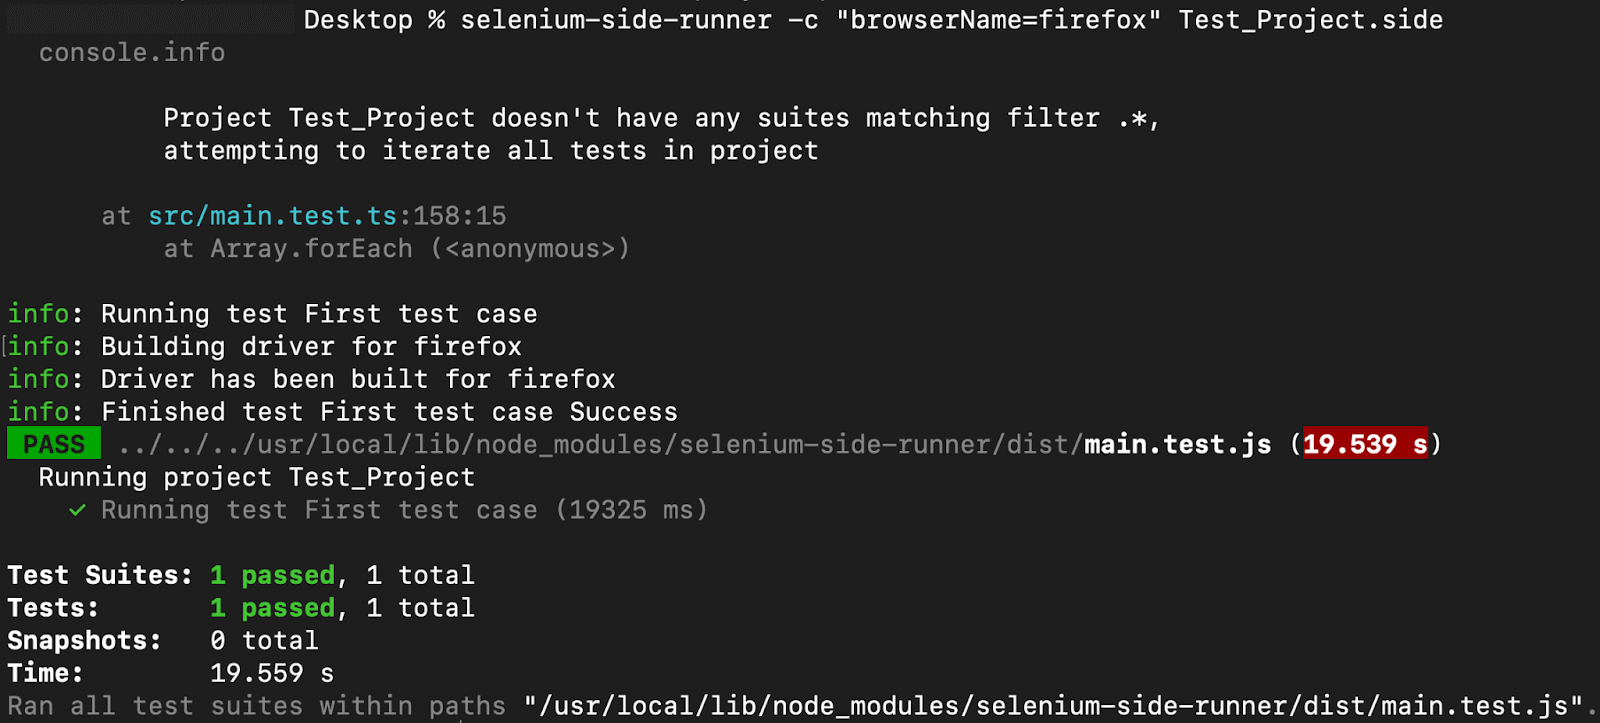
The following code will execute the .side file’s test case on the Firefox browser:
selenium-side-runner -c "browserName=firefox" Test_Project.sideOutput:
Running Selenium .side files on LambdaTest
We are using Selenium 3 to run the Selenium IDE “.side” file on the cloud grid.
Use the below code to install specific selenium version:
pip install selenium==3.141.0Therefore, for SIDE to operate with the LambdaTest platform, you'll need to install a few dependencies before you can begin automating Selenium tests:
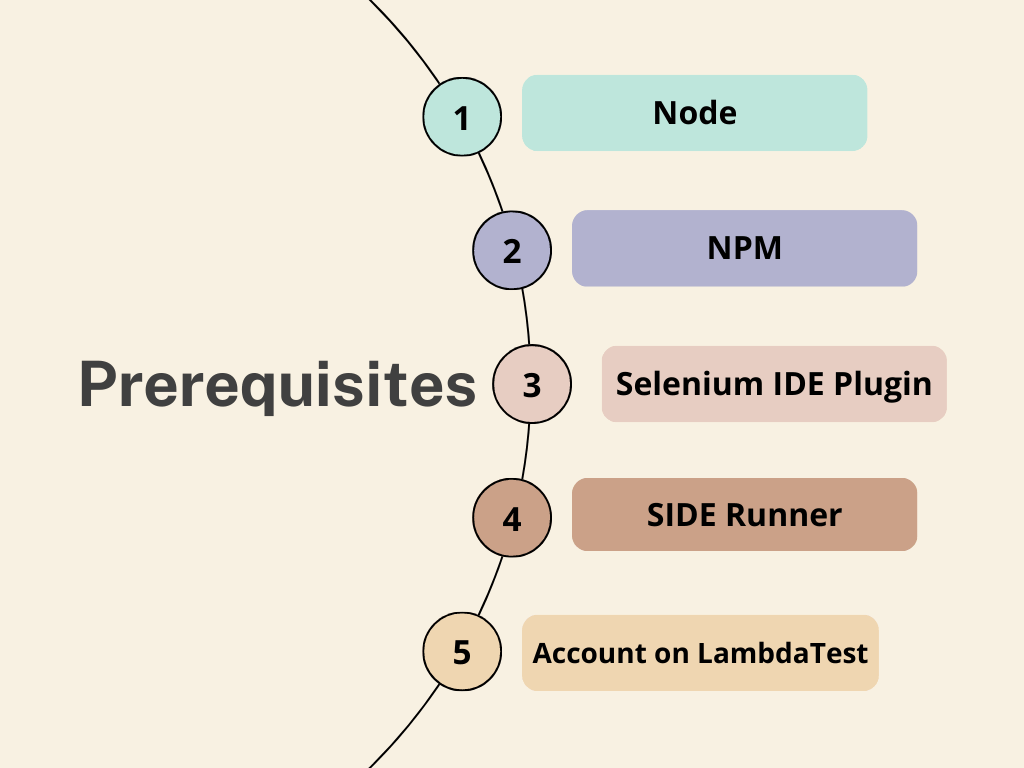
- Node – follow this link to download it on your system.
- NPM – NPM stands for Node.js Package Manager, typically installed with Node. The download link is here.
- Selenium IDE Plugin – Follow the steps from this section.
- SIDE Runner – use the below code to install the side runner. (Note: You have to install selenium 3.x.x to use it)
npm i -g selenium-side-runner@3.14.0Registered account on LambdaTest – You will require an authentic account on the platform as LambdaTest will be used for automated testing using Selenium IDE. To use LambdaTest to perform Selenium testing, click the signup link. The user name and access key needed to access the platform are contained in the profile link.
Get the username and Access key from the Password and Security section of the profile.
Open your saved “.side” file or once the new project is saved, navigate to the Test Suites available in the left-side panel or use the command ctrl+2 | cmd⌘+2.
You must right-click the test suite and select Settings to enable parallel testing for this Selenium IDE lesson. Enable Test in Parallel in the Settings window. It is significant to remember that the Cloud Selenium Grid only supports parallel testing when tests are run through the SIDE Runner (and not the Selenium IDE GUI).
You must give the required WebDriver capabilities along with the URL to the Grid to execute the tests on the LambdaTest Cloud Selenium Grid.
Command Structure:
Chselenium-side-runner <filename> --server <LambdaTest Grid URL> --capabilities <Browser Capabilities>angeIf you do not want to change the OS or browser then you can directly run the below command to run your test on LambdaTest:
selenium-side-runner "Test_Project" --server https://username:access_key@hub.lambdatest.com/wd/hub -c "browserName='Safari' version='14' platform='MacOS Big Sur'" To learn more about using parallel testing and how to store capabilities in a different file and use it. Follow this running Selenium IDE test on the online Selenium Grid
Using Selenium IDE with popular testing frameworks
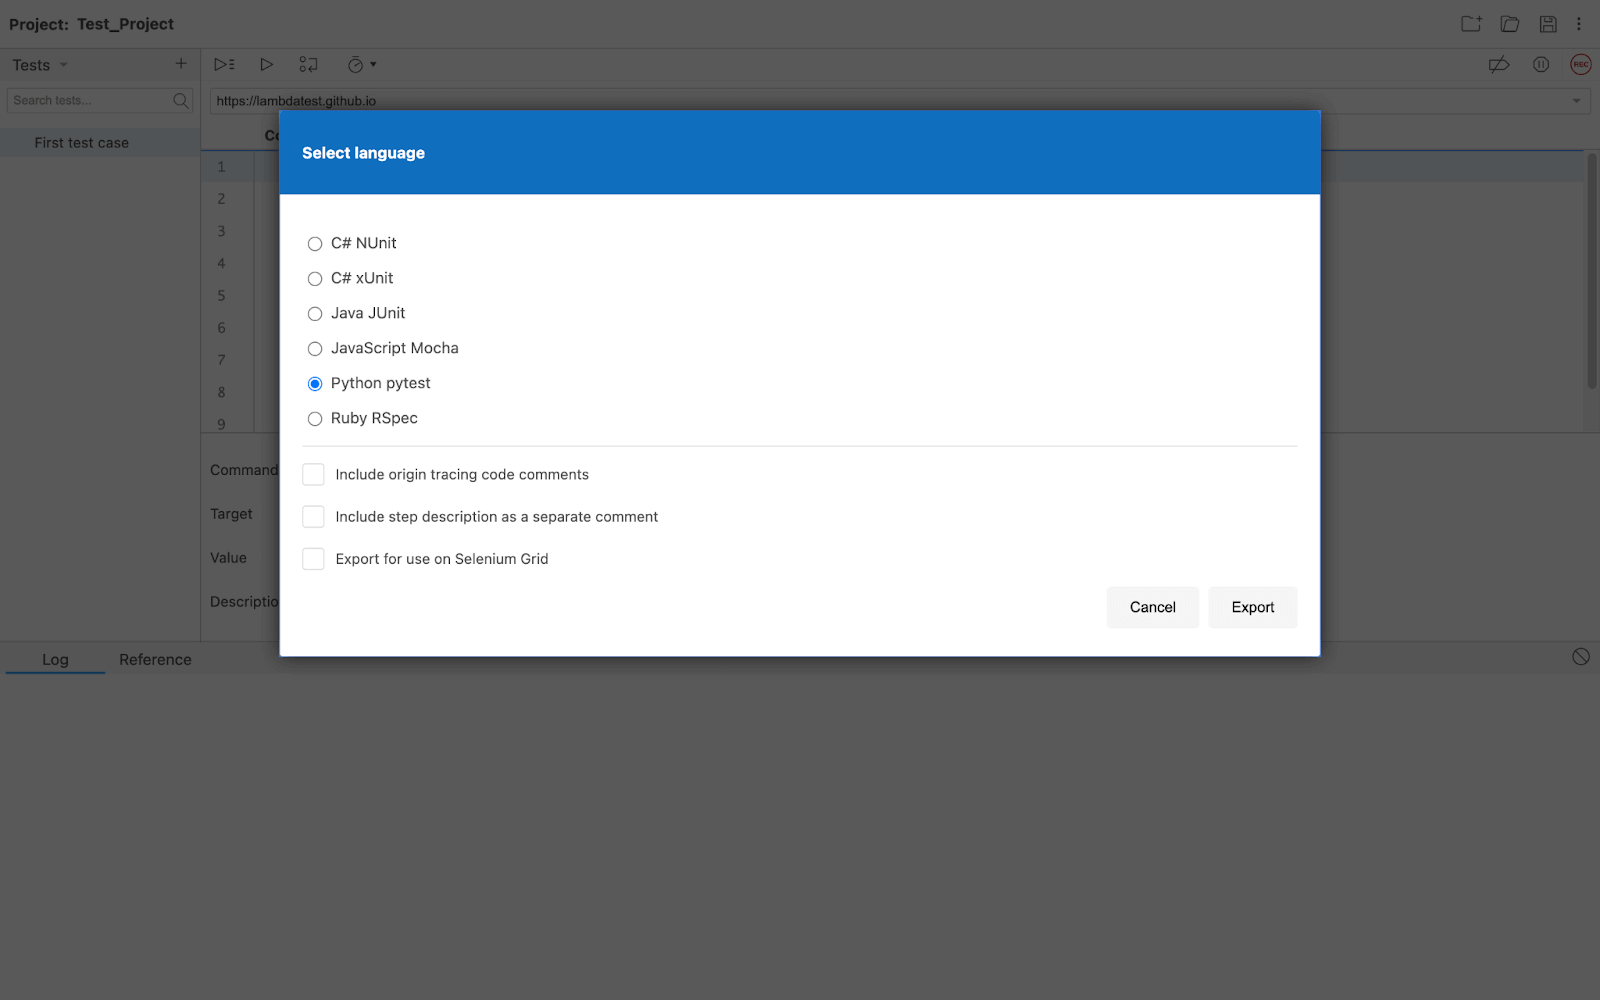
To run the generated scripts from the IDE, there are various options that it provides for various programming languages and testing frameworks such as JUnit, XUnit, Mocha, pytest, and RSpec.
To get the file according to the preferred platform you just need to do some basic steps:
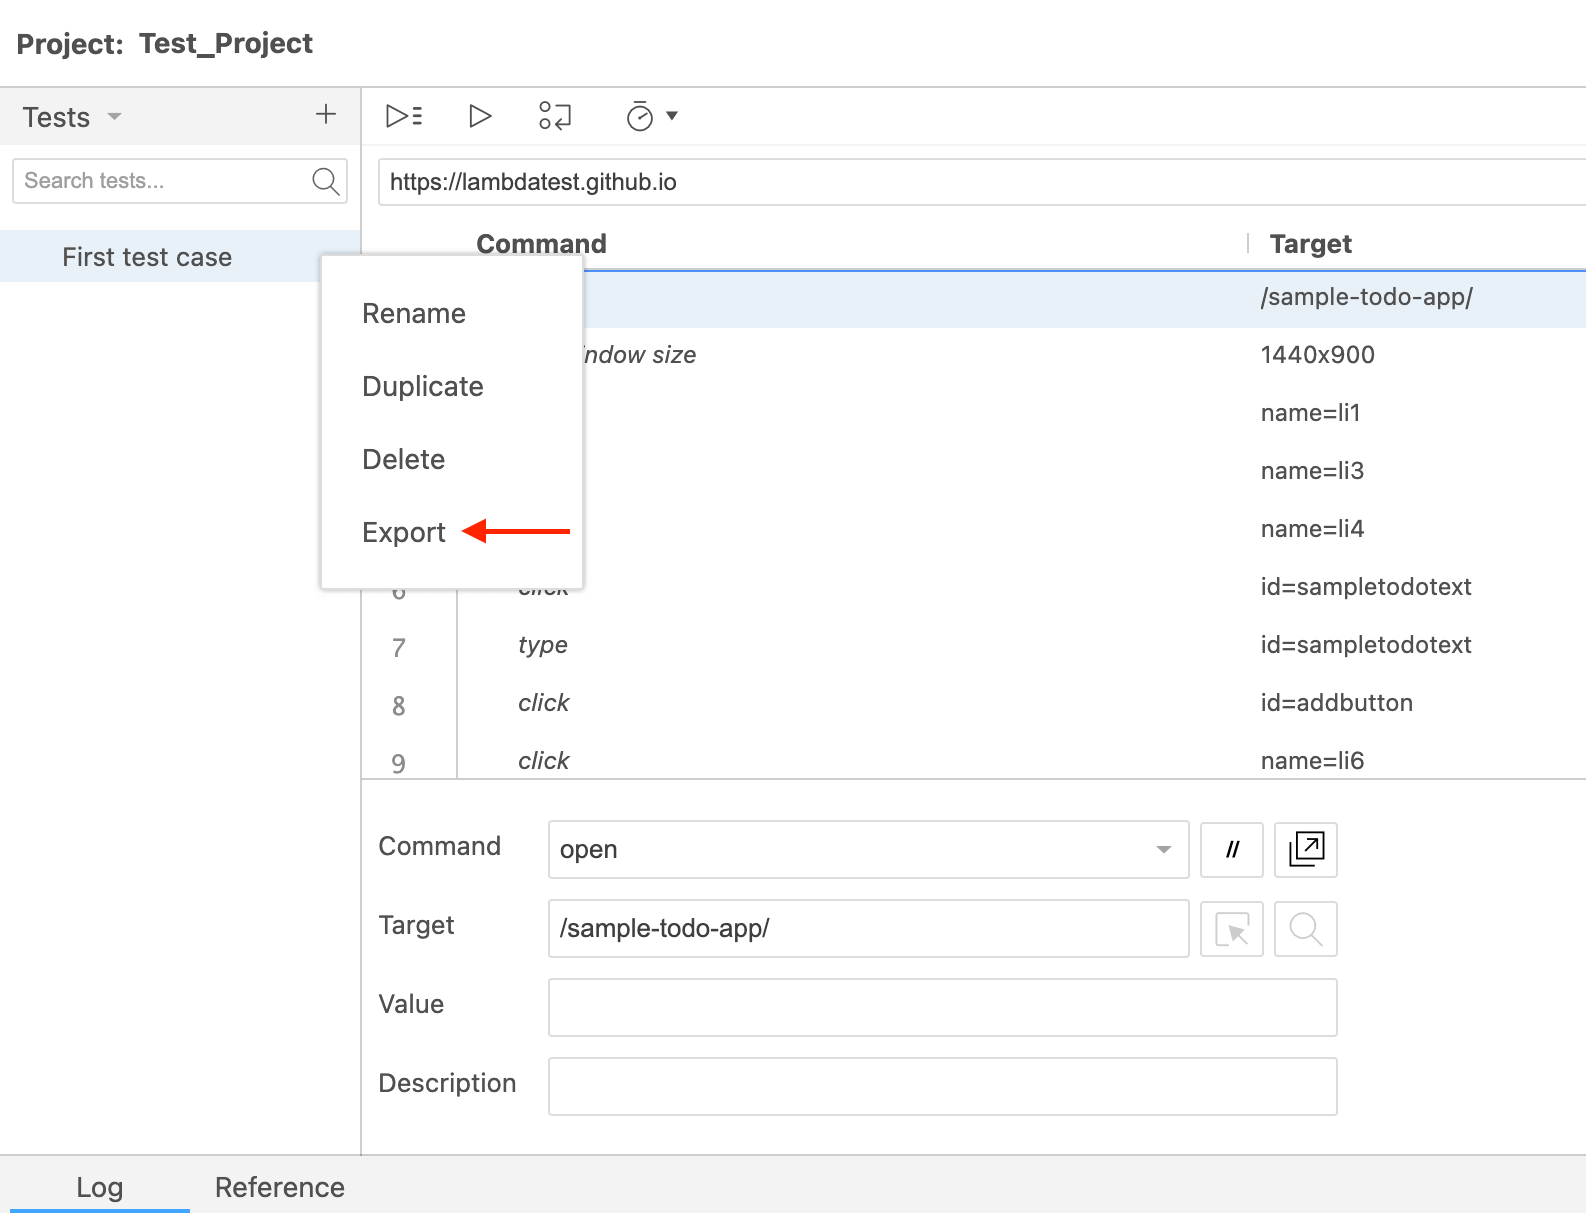
- From the left panel select the test case and right-click on the three dots and select Export.
- Once you select export, a menu will pop up. Select the programming language which suits your need and also provides the desired location to store the “.side” file.
- Select the type of file you want and then further run it with the supported framework.
Role of cloud-testing platforms in running Selenium IDE test cases
To test the web application on a particular operating system’s browser and version, one needs to install it on the system, without explicitly installing and running the test case, one cannot test. But practically, it is impossible to do it as it will be cost-heavy and time-consuming. The issue can be addressed by using cloud-testing platforms. Let’s discuss some of the benefits of using it.

- Infrastructure and Resource Management: Cloud-testing platforms will reduce the cost of physical infrastructure like maintaining servers and systems for testing.
- Cost Efficiency: Most cloud service providers generally offer a pay-per-use model so you can save the cost of unused infrastructure and maintain it.
- Scalability: You may increase your test execution capabilities based on demand using cloud platforms. They provide faster execution of test suites and shorter test cycle times by allowing tests to execute concurrently on many machines.
- Test Parallelisation: Multiple test cases can run simultaneously on cloud platforms since they can execute tests in parallel. This reduces the time it takes for the test to run and makes it easier to find bugs.
- Cross-Browser and Cross-Platform Testing: The cloud-testing platform supports a large number of browsers and platforms that can run Selenium IDE test cases. This makes it easier to assess compatibility and provides consistent behavior across various operating systems and browser versions.
- Collaboration and Integration: Testers can share test cases, test data, and test results with other team members, teams, and stakeholders with the features offered by cloud-testing platforms.
Conclusion
In this comprehensive guide, we looked at how Selenium IDE is growing in popularity among testers and developers thanks to its wide range of capabilities that make cross-browser testing, parallel testing, and test script maintenance simple. Additionally, we also learned how to generate scripts and play them on various browsers. We also explore some of the commonly used commands of the IDE, like if, else, times, and end.
Selenium IDE now offers features consistent with Selenium WebDriver's feature development, going beyond the limitations of its earlier record and playback capabilities. Moreover, the Selenium framework's code export feature has emerged as one of the best resources for getting started with automated browser testing.
On this page
- What is Selenium?
- Selenium IDE
- Selenium IDE by its Architecture and Working
- Advantages of Selenium IDE
- Getting Started with Selenium IDE
- The installation process for various browsers
- Overview of the user interface of Selenium IDE
- Creating the first test case with Selenium IDE
- Advanced Selenium IDE Techniques
- Debugging for Selenium IDE
- Best Practices for Selenium IDE
- Understanding the “.side” file in Selenium IDE
- Using Selenium IDE with popular testing frameworks
- Role of cloud-testing platforms in running Selenium IDE test cases
- Frequently Asked Questions (FAQs)
Frequently asked questions
- General
Author's Profile

Jainish Patel
Jainish Patel is a tech enthusiast specializing in web development. With a primary focus on React.js, React.native, and core front-end languages, He is well-equipped to tackle the ever-evolving world of web technologies. Building sleek and interactive Mobile and web applications is one of his strengths. Moreover, he is passionate about crafting seamless user experiences and transforming ideas into reality through programming. You can also follow him on Twitter.
Reviewer's Profile

Mohammed Afzal
Afzal, a growth strategist, brings over six years of comprehensive expertise in software development, teaching, content creation, and leadership to LambdaTest. With a commendable 4+ year stint at Coding Ninjas, where he was an integral member from the early bootstrap phase, Afzal played a pivotal role in launching and overseeing the Blog Platform. His leadership steered a content team that delivered blogs across a diverse range of topics, including Data Structures, Algorithm Design, SQL, Database Management, Full Stack Web Development, AI, Machine Learning, etc. Having served as a Software Developer for an early-stage startup and an Instructor at UpGrad early in his career, Afzal has honed his skills across various facets of the tech industry.
Did you find this page helpful?
More Hubs
Try LambdaTest Now !!
Get 100 minutes of automation test minutes FREE!!

 Christmas Deal is on: Save 25% off on select annual plans for 1st year.
