- Automation
- Home
- /
- Learning Hub
- /
- What Is pytest
- -
- June 10 2023
What Is pytest: Complete Guide With Best Practices
This pytest tutorial delves into what is pytest and explores its various features and best practices.
OVERVIEW
Pytest is a powerful and popular testing framework for Python that simplifies the process of writing, organizing, and executing test cases. It provides a comprehensive set of features and follows a simple and intuitive approach to testing. With its rich ecosystem and extensive community support, pytest has become a go-to choice for many Python developers when it comes to testing their applications.
As per the Python Developers Survey, 50% of Python developers use pytest, making it one of the most popular unit testing frameworks.
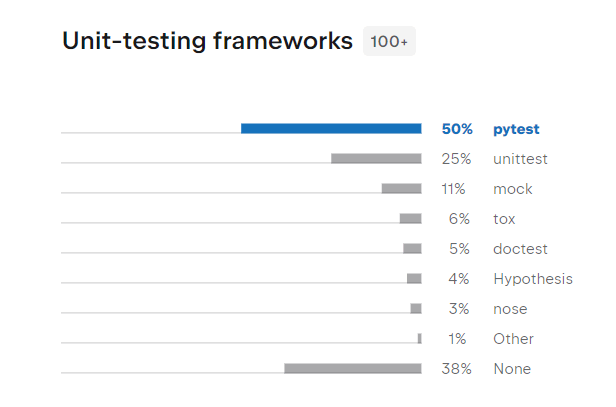
In this complete pytest tutorial, we will delve into what is pytest and explore its various features and best practices. Whether you are a beginner or an experienced Python developer, this pytest tutorial on what is pytest will equip you with the knowledge and skills necessary to build a comprehensive and reliable test suite for your applications.
So, let's get started.
What is pytest?
Pytest is an open-source Python-based testing framework that makes it easy to write and execute unit tests for your code.
Unit tests are small, isolated pieces of code that test specific functionality in your program. They are an important part of the software development process, as they help to ensure that your code is working as intended and to catch any bugs or errors early on.
For this tutorial on what is pytest, consider (arthemetic_test.py) of a simple unit test written using pytest:
def test_addition():
   assert 2 + 2 == 4


def test_subtraction():
   assert (4 - 2) == 3
This test function uses pytest's built-in assert statement to verify that the result of the addition is correct. If the test passes, pytest will print a message indicating that the test passed. If the test fails, pytest will raise an exception and print a message indicating that the test failed.
To run this test using pytest, you can simply use the pytest command from the command line:
$ pytestOutput:
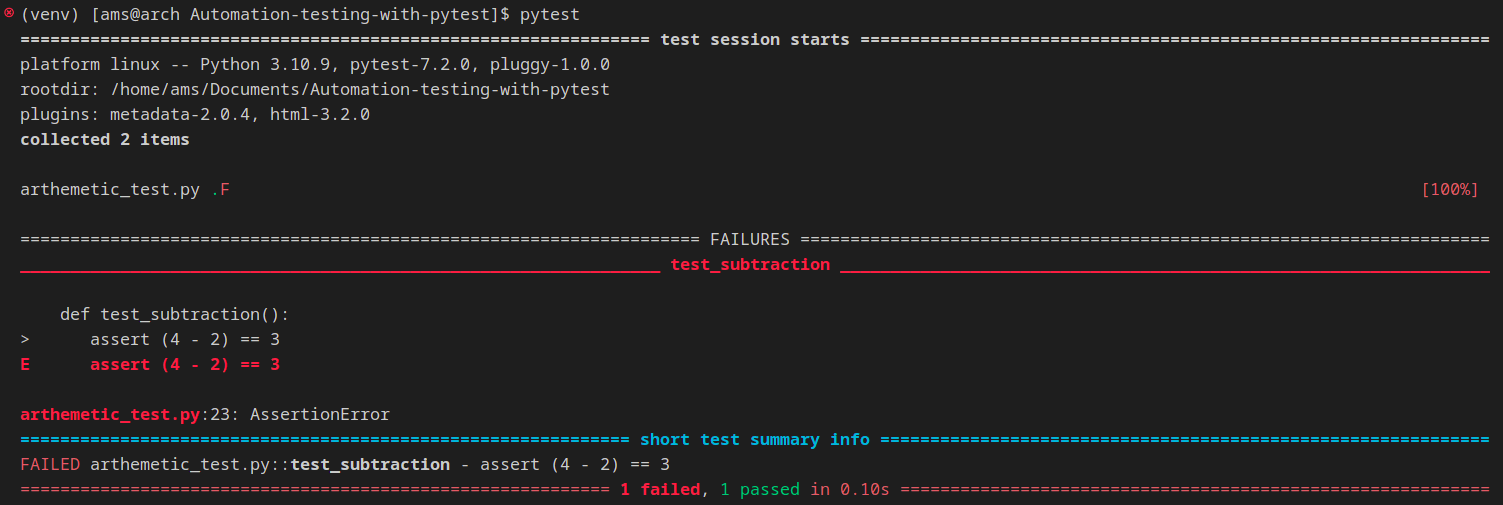
One of the key benefits of using pytest is its ability to discover and run tests automatically. This means that you don't have to manually specify which test cases to run, as pytest will automatically find and run all of the test cases in your test suite.
In this case, it will find and run the test_addition method and show the execution results on the terminal. It is also possible to run the tests selectively; we will look into it at a later point in time.
In addition to its simplicity and automatic test discovery, pytest also provides several useful features that can make writing and running tests easier. These include the ability to parametrize tests, generate test reports using plugins, and integrate with other testing tools and frameworks.
In short, pytest is a reliable and easy-to-use automation testing framework that can help you ensure the quality and reliability of your Python code.
Note : Run your Selenium Python tests on 3000+ browser and OS combinations. Try LambdaTest Now!
Why use pytest?
In this section of what is pytest tutorial, we will discuss why to use pytest for Python testing. There are several reasons why pytest is a popular choice for writing and running automated tests:
- Ease of Use
- Output in a human-readable format
- Test Parameterization
pytest allows you to write test functions or methods in your code and mark them with the @pytest.mark.test decorator. The @pytest.mark.test decorator allows you to apply a mark or label to a test function or method in your code, which can be used to group and organize your tests and selectively run specific tests or groups of tests.
You can then run these tests using the pytest command from the command line. You can also run the tests using an IDE like PyCharm. However, the command-line interface works best with pytest.
The framework automatically discovers and runs all of the tests in your codebase, so you don't have to specify which tests to run manually.
pytest produces clean and easy-to-read output. This can make it easier to understand the results of your tests and identify any issues that may have occurred.
By default, pytest prints a summary of the test results to the console, including the number of tests run, the number of tests passed, and the number of tests that failed or were skipped. It also prints the names of the failed or skipped tests, along with any error messages or stack traces that will help debug the tests.
In addition to the default output, pytest provides several options for customizing the output. For this tutorial on what is pytest, you can use the -v flag to enable verbose output, which will print more detailed information about the tests as they are run. You can also use the --tb flag to control the format of the tracebacks printed for failed tests.
$ pytest --help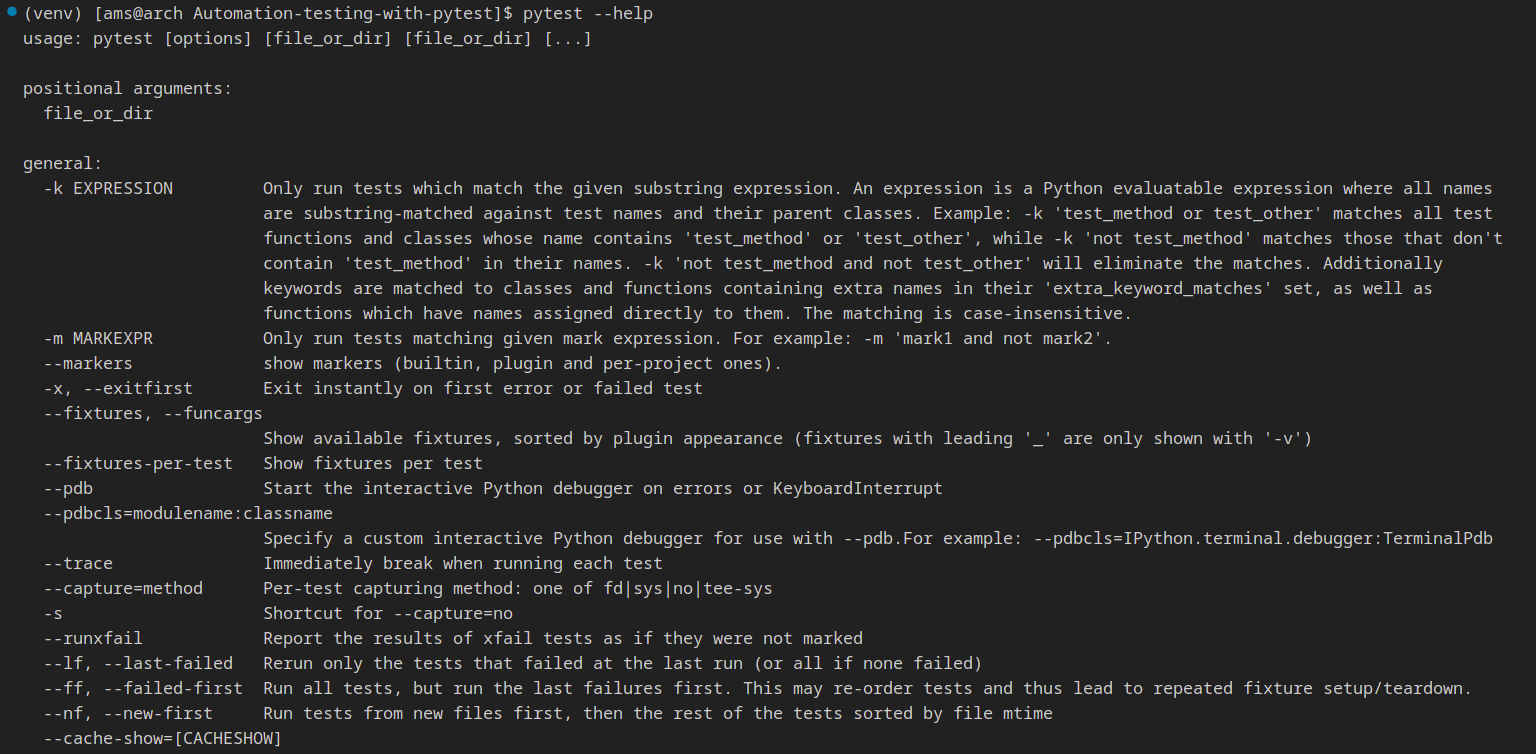
The --tb flag in pytest allows you to control the format of the tracebacks printed for failed tests. The default value for --tb is auto, which means that pytest will automatically choose the most appropriate traceback format based on the context of the failure.
$ pytest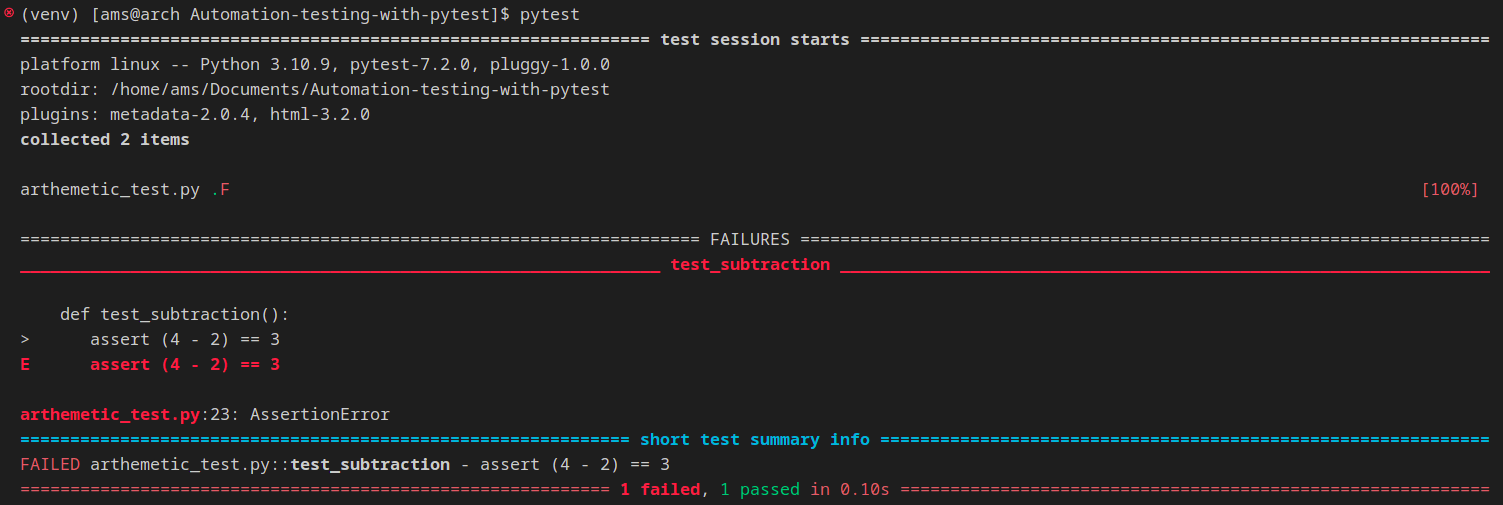 $ pytest -v
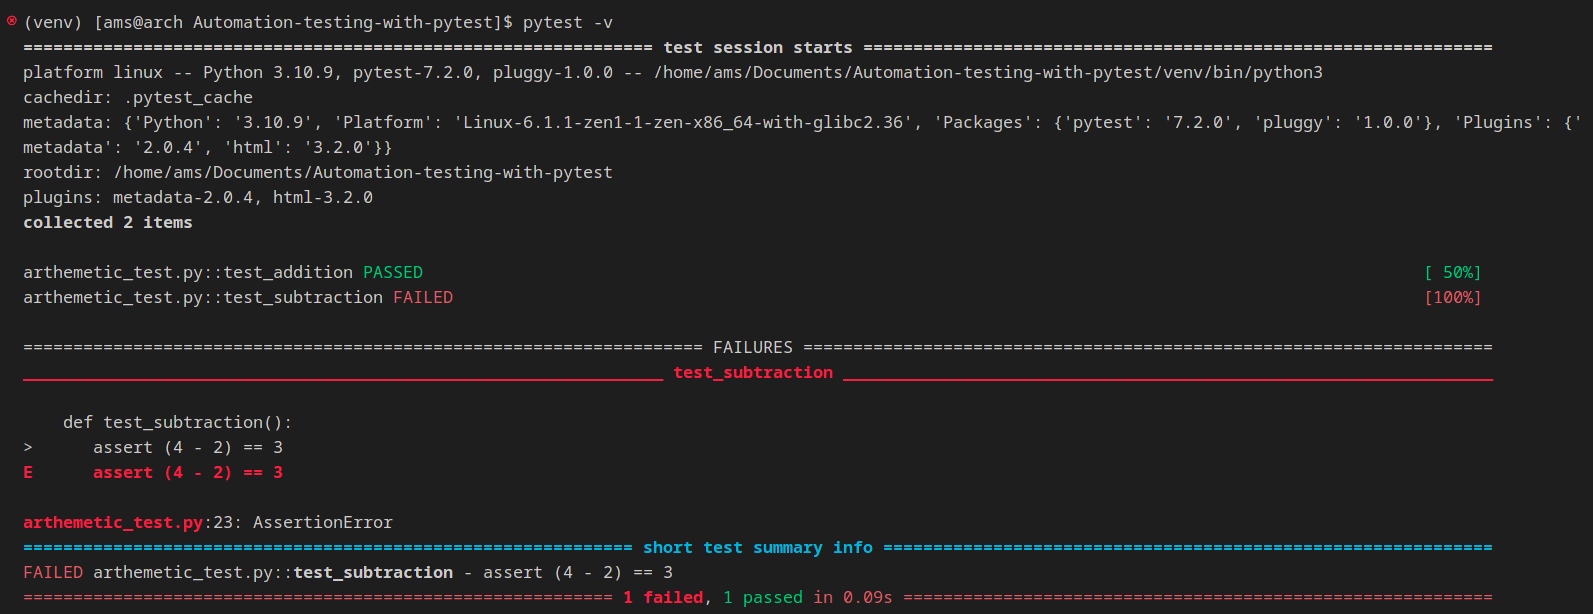
For this tutorial on what is pytest, two tests have run, and one failed. The name of the failed tests (test_subtraction) is printed, along with the error messages. This information can be useful for debugging the failed tests and identifying the root cause of the issues.
$ pytest --tb=longThis will cause pytest to print a long traceback for the failed tests. A long traceback includes the full traceback for the failure, including the calls leading up to the failure. This can be useful if you need more context to understand the root cause of the failure.

Parameterization in pytest is a useful feature that allows you to write a single test method that can be run with multiple input data sets. This can be useful if you want to test the same functionality with different input scenarios, as it allows you to write a single test function instead of multiple copies of the same test.
This avoids code duplication and improves the maintainability and scalability aspects of the test code.
For this tutorial on what is pytest, consider an example of how you can use pytest to parameterize a test function:
import pytest
@pytest.mark.parametrize("num1,num2,expected_output",
                        [
                           (2,2,4),
                           (3,6,9),
                           (4,5,10)
                        ]
                        )
def test_addition(num1,num2,expected_output):
   assert num1+num2 == expected_output
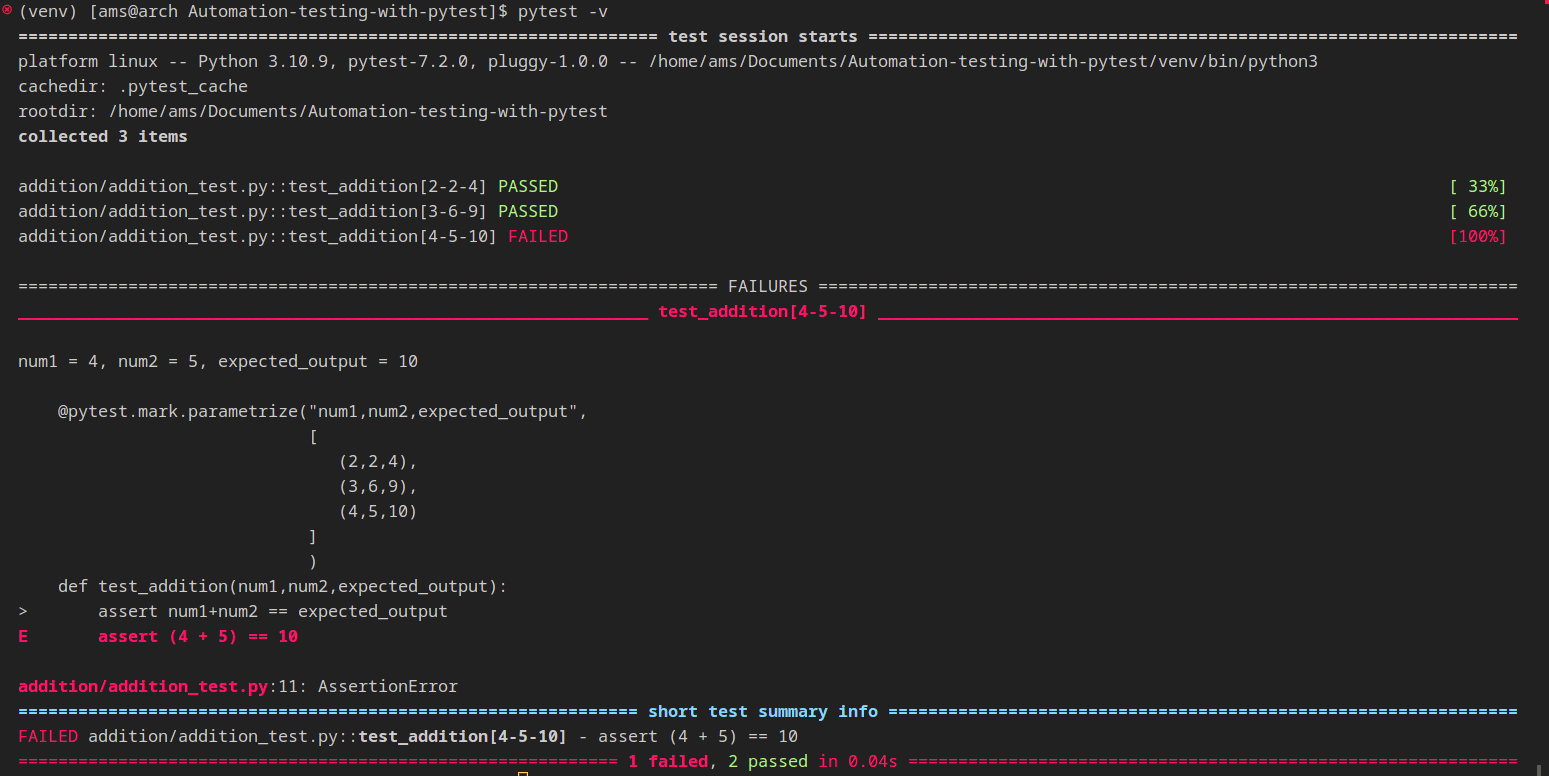
For this tutorial on what is pytest, the test_addition function is decorated with the @pytest.mark.parametrize decorator, which specifies the parameters to be passed to the test function. The parametrize decorator takes a list of tuples, where each tuple contains the input values and the expected output value for a single test case.
When you run this test using pytest, it will automatically generate and run three separate test cases, one for each tuple in the parametrize decorator.
$ pytest -vThis will run the test_addition function three times with the following input combinations: (2, 2, 4), (3, 6, 9), and (4, 5, 10).
Output:
pytest offers the capability to generate comprehensive test reports encompassing test results, coverage details, and execution status.
To generate an XML test report in pytest, you can use the --junitxml flag with the pytest command:
$ pytest --junitxml=test_results.xml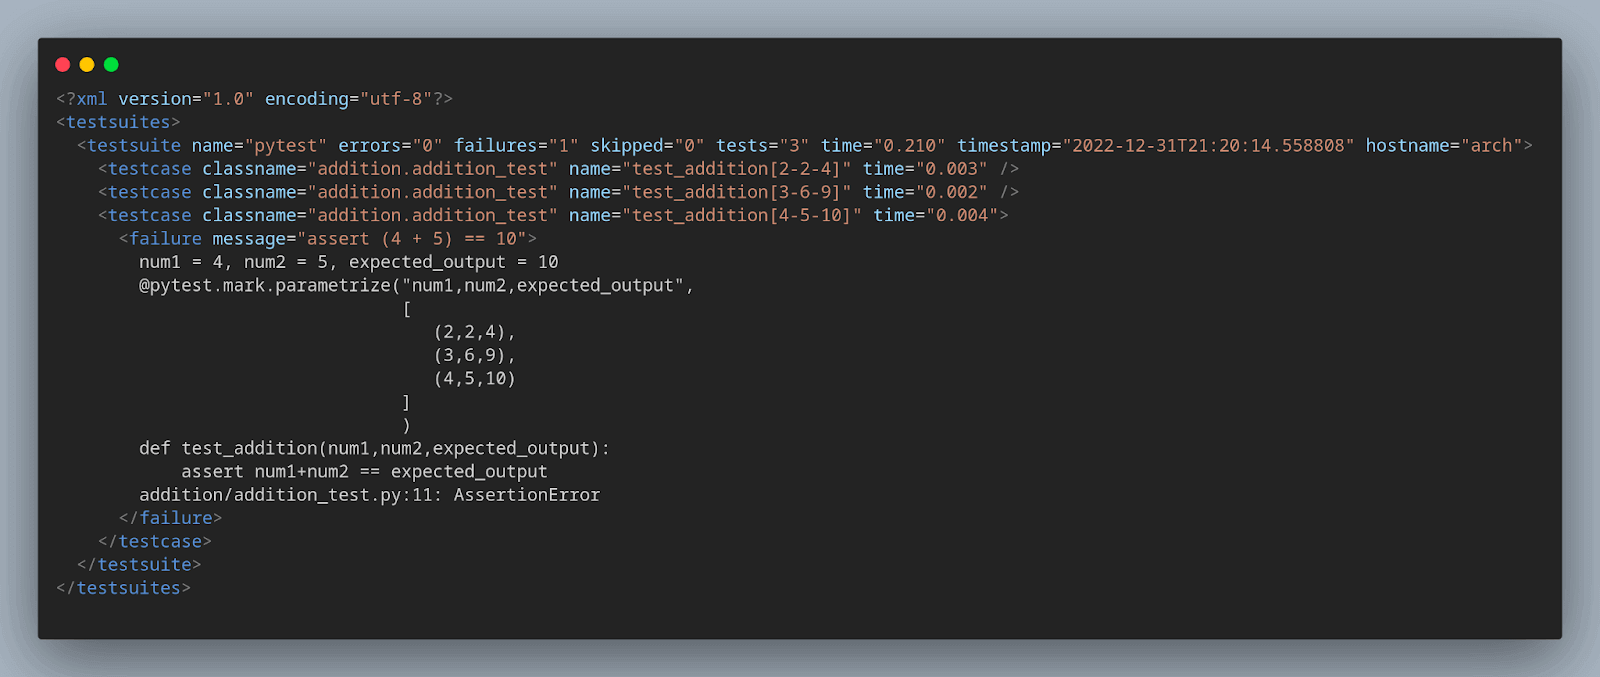
JUnit XML is a format for storing test execution results in an XML file. In Continuous Integration (CI) environments, pytest is commonly employed to establish a standardized format for storing and reporting test results.
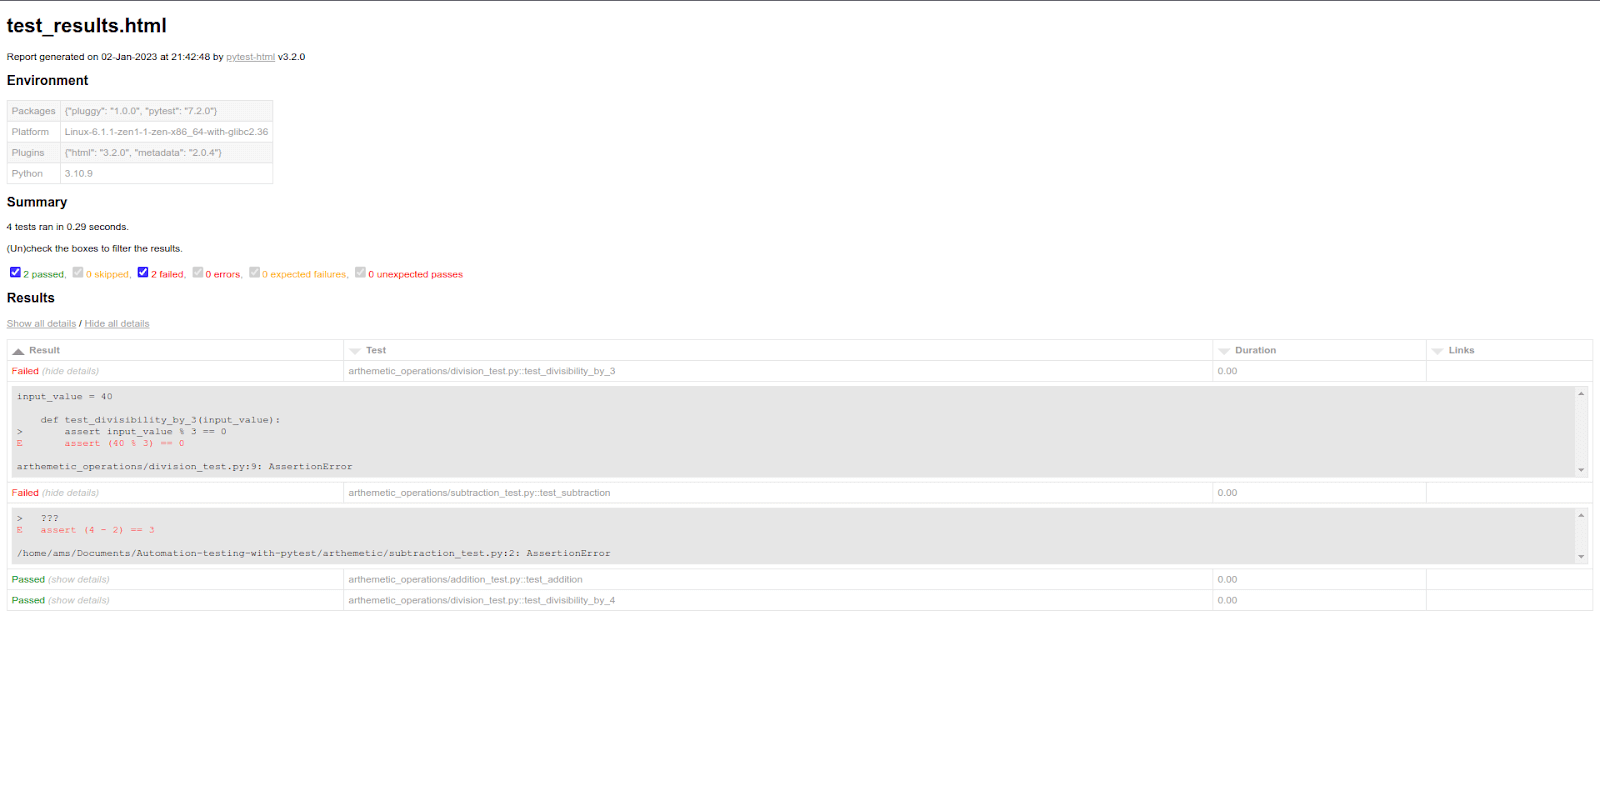
Additionally, you can generate HTML test reports using the pytest plugin Pytest-html. You can install the plugin by running the command pip install pytest-html on the terminal.
 $ pytest --html=test_results.html
This command uses pytest to run tests, and the --html flag is used to generate an HTML report named test_results.html.
pytest has a rich ecosystem of plugins that allows you to extend its functionality and integrate it with other testing tools and packages, such as coverage.py (for measuring test coverage) and tox (for creating and managing different environments to test their code).
This can make it easier to incorporate pytest into your existing testing workflow.
| Name | Summary | Requires |
|---|---|---|
| pytest-selenium | Provides an easy way to automate tests for web applications using the Selenium framework. | pytest (>=5.0.0) |
| pytest-playwright | Allows developers to automate tests for web applications using the Playwright automation library. | pytest |
| pytest-html | Generates HTML reports from test results, making it easy to visualize and analyze test results. It can help developers track issues and improve code quality. | N/A |
| pytest-flask | Provides a set of tools for testing Flask applications | pytest (>=5.2) |
| pytest-cov | Measures code coverage during testing. It allows developers to see how much of their code is being tested and identify areas that need improvement. | pytest (>=5) |
| pytest-repeat | Allows developers to repeat tests multiple times with different inputs. | pytest (>=3.6) |
| pytest-android | Tests the functionality and compatibility of your code on Android devices. | pytest |
| pytest-base-url | Performs URL-based testing | pytest (>=2.7.3) |
| pytest-assert-utils | Provides additional assertion utilities for writing more expressive and readable tests. | N/A |
| pytest-aws | Allows you to test code that interacts with Amazon Web Services (AWS) resources | N/A |
| pytest-accept | Generates test reports that document the results of the acceptance criteria. | pytest (>=6,<8) |
| pytest-adaptavist | Allows you to run your pytest tests in Adaptavist Test Management, a cloud-based test management platform. | pytest (>=5.4.0) |
| pytest-aiohttp | Allows you to test code that uses the aiohttp library for asynchronous HTTP requests. | pytest (>=6.2.4,<7.0.0) |
| pytest-adf | Writes Azure Data Factory integration tests. | pytest (>=3.5.0) |
| pytest-aio | Tests async Python code | pytest |
| pytest-bench | Allows you to measure the performance of your tests and compare the performance of different implementations or configurations. | N/A |
pytest has a strong and active community. It is an open-source project with a large and active community of contributors and users.
This means that you can easily get help and support when using pytest, and you can also contribute back to the project if you want to.
Fixtures are functions that execute code before and after each test, aiding in tasks like configuring the environment, opening/closing browsers, and cleaning up resources utilized during the test. This can help streamline your automation testing process and make it more efficient and reliable.
It is defined using the @pytest.fixture decorator, and can be passed as arguments to test functions.
For this tutorial on what is pytest, consider a simple example showing the use of fixtures:
import pytest


@pytest.fixture
def input_value():
   input = 40
   return input


def test_divisibility_by_3(input_value):
   assert input_value % 3 == 0

def test_divisibility_by_4(input_value):
   assert input_value % 4 == 0
The tests access the fixture by mentioning the fixture name as the input parameter.
The two test functions, test_divisibility_by_3 and test_divisibility_by_4, use the input_value fixture as an input parameter. The first test checks if the input_value is divisible by 3, and the second test checks if it is divisible by 4.
When the tests are run, the fixture function input_value supplies the input to the tests. The input value will be 40 in this case. Then, each test function will be called with the input value as the input parameter.
If the input value is not divisible by 3 or 4, the corresponding assert statement will fail, and the test will fail. If the input value is divisible by both 3 and 4, both tests will pass.
One common use case for fixtures is in Selenium automation testing, which is to set up and tear down the web browser for each test. This can involve tasks such as launching the browser, navigating to a specific URL, and releasing the browser resources when the test execution is complete.
You can learn more about it through this blog on Fixtures in pytest.
pytest requires minimal boilerplate code, so you can focus more on writing the tests instead of spending time on setup and configuration. There is no need to define a separate class or include any setup or teardown methods.
The test itself is a simple function that uses the assert statement to check the result, as discussed in the previous examples of this tutorial on what is pytest.
pytest makes it easy to filter and select specific tests to run. This can be helpful when you want to focus on a specific subset of your test suite or when you want to exclude certain tests from the test run.
It provides several ways to filter and select tests:
- Test file and test function names
- Command-line arguments
You can specify the names of specific test files or test functions to run. For this tutorial on what is pytest, you can use the pytest arthemetic_test.py command to run all the tests in the specific test file (arthemetic_test.py).
$ pytest arthemetic_test.py
To run a specific test function, use the pytest command followed by the name of the test file and the name of the test function, separated by a double colon (::).
$ pytest arthemetic_test.py::test_addition
To run all the tests in test files that match a specific pattern, use the pytest command followed by the pattern:
$ pytest arthemetic_*.py
This will run all the tests in .py files that start with arthemetic_.
To run all the test functions that match a specific pattern, use the pytest command followed by the name of the test file and the pattern, separated by a double colon:
$ pytest arthemetic_test.py::test_*This will run all the test functions in the arthemetic_test.py file that start with test_.
You can use command-line arguments to specify which tests to run.
Use the -k option to run tests that match a specific string.
$ pytest -k "add"
This will run all the tests with a name containing the string add.
import pytest


@pytest.mark.add
def test_addition():
   assert (1 + 1) == 2


@pytest.mark.sub
def test_subtraction():
   assert (4 - 2) == 3


@pytest.mark.div
def test_divisibility_by_3():
   assert 9 % 3 == 0


@pytest.mark.div
def test_divisibility_by_4():
   assert 8 % 4 == 0
pytest.mark is a built-in pytest feature that allows us to mark test functions with arbitrary names or keywords, called "markers". Markers provide a way to categorize and select tests based on certain criteria. We will learn more about this later.
In this tutorial on what is pytest, we have marked the test functions with pytest.mark.add, pytest.mark.sub, and pytest.mark.div, respectively. These markers are arbitrary names that we use to represent certain categories of tests.
For example, if you have test functions that check additional operations, you can mark them with pytest.mark.add. Similarly, you can mark test functions for subtraction and divisibility operations with pytest.mark.sub and pytest.mark.div, respectively.
Markers are useful because they let you select or exclude specific tests during test execution. For instance, if you only want to run tests that check divisibility, you can use the command pytest -m div to run only the tests that have been marked with pytest.mark.div. This will skip all other tests and only run the ones that check divisibility by 3 and 4.
$ pytest -m div
You can also use the -x flag to stop the test run after the first failure.
$ pytest -x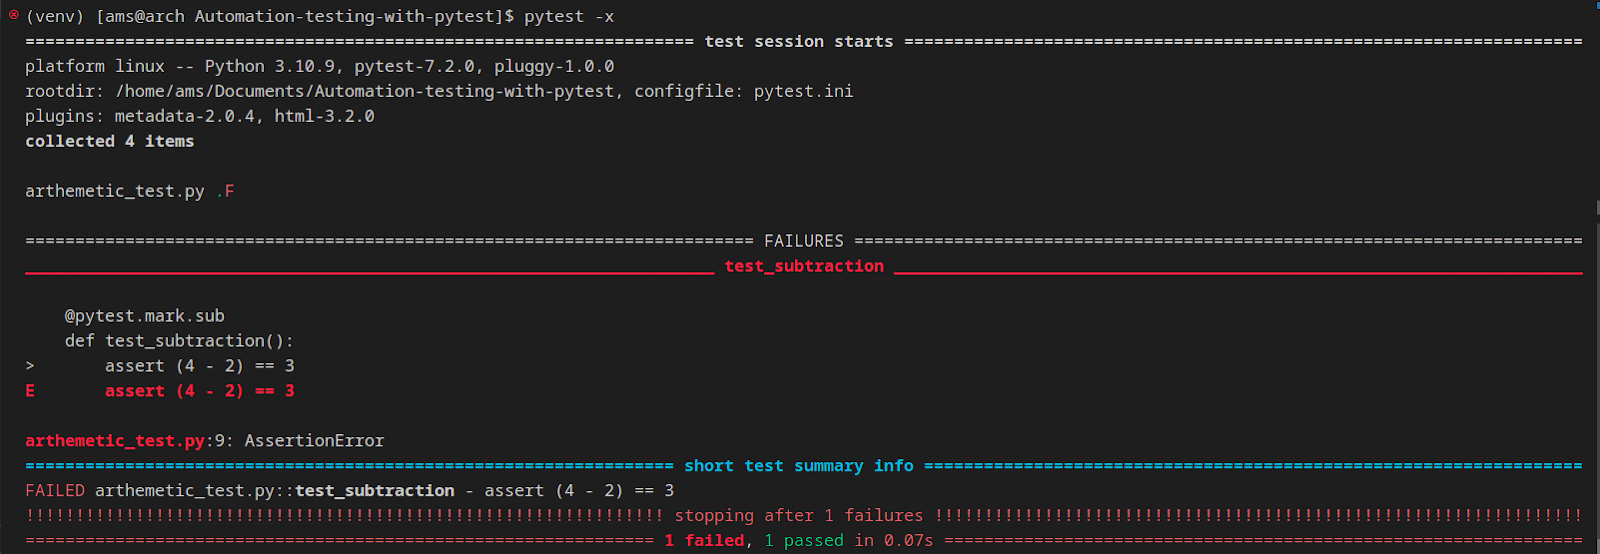
Environment Setup
To install pytest, you need to have Python and its package manager pip installed in your system. In this section of what is pytest tutorial, let’s see how to set up an environment for pytest testing.
- Download and install Python: You can download the latest version of Python from the Python website. Follow the instructions on the website to download and install Python on your system.
- Check the installation: Once Python is installed, you can check the version of Python that you have installed by opening a terminal and running the following command: $ python --version
- Install pip: pip is the recommended tool for installing and managing Python packages. It is included by default in Python 2.7.9 and later and Python 3.4 and later. If you are using an earlier version of Python, you will need to install pip manually. To install pip, open a terminal and run the following command: $ python -m ensurepip --default-pip
- Check the installation: Once pip is installed, you can check the version of pip that you have installed by running the following command: $ pip --version
This should display the version of Python that you have installed.


This will install pip and its dependencies on your system.
This command displays the version of the pip that you have installed.

That's it! You should now have Python and pip installed on your system, and you can use them to install pytest.
- Install the latest version of pytest: Type the following command in your command line: $ pip install pytest
- Verify the installation: Type the following command in the terminal: $ pytest --version

You can also install a specific version of pytest by specifying the version number in the command:
$ pip install pytest==7.2.0
If the package was installed successfully, the previous command would show you which pytest version was installed. In our case, we installed the latest version of Pytest.
Pre-requisites
Are you prepared to explore the realm of automated testing using pytest? Excellent! Before diving in, it's important to have a few prerequisites in place to ensure a seamless and fruitful learning journey.
- Familiarity with any programming language: pytest is a testing framework for Python, so it's helpful to have some experience with programming in general. While you don't need to be an expert in Python (or any other language), having a basic understanding of how programming works will make it easier to understand and use pytest.
- Knowledge of programming concepts: pytest relies on certain programming concepts, such as functions, variables, and loops. If you're familiar with these concepts, you'll have an easier time learning how to use pytest.
- Python and pip: To use pytest, you'll need to have Python and pip (the Python package manager) installed on your computer. If you don't have these tools installed, you'll need to follow the installation instructions for your operating system before you can start using pytest.
- A text editor: You will need a text editor to write your Python code and test functions. You can use any text editor you like, such as Sublime Text, Atom, or Visual Studio Code.
With these prerequisites in mind, you're now ready to start learning about pytest and how to use it to write and run automated tests for your code. In future chapters of this what is pytest tutorial, we'll dive deeper into how you can write your first test case, as well as best practices for using it effectively.
How does pytest identify the test files and test methods?
pytest will automatically discover test files in the current directory and subdirectories. It can identify test files based on their file names, which follow the pattern test_*.py or *_test.py.
For this tutorial on what is pytest, a file named test_addition.py would be recognized as a test file, while a file named addition.py would not be recognized as a test file.
Within a test file, pytest looks for test functions or methods. A test function is a function that starts with test_ or test, and a test method is a method that starts with test, in a class that starts with Test.
For this what is pytest tutorial, let’s consider a simple test file (test_addition.py) that tests addition:
import pytest


def test_addition():
   assert 1 + 1 == 2


class TestAddition:
   def test_adding_two_positive_numbers(self):
       assert 1 + 1 == 2
   def test_adding_two_negative_numbers(self):
       assert -1 + -1 == -2
Here, the function test_addition and the methods test_adding_two_positive_numbers and test_adding_two_negative_numbers in the class TestAddition are all identified as test functions (or test methods) by pytest.
$ pytest test_addition.py
Running first automation script using pytest
Utilizing Selenium automation testing with pytest enables you to develop scalable tests that cater to various testing types, such as cross-browser testing, database testing, Pytest API testing, and more.
In this section of the tutorial on what is pytest, we will learn about running your first automation script using Python and pytest.
Here are the prerequisites for running the pytest automation script:
- Python
- pytest
- Selenium>=4.0.0
- pytest-selenium

In software development, effectively managing dependencies is of utmost importance. Dependencies refer to external packages utilized in a project to enable specific functionalities. However, keeping track of dependencies, their versions, and installation commands can be challenging, particularly in large projects. This is where requirements.txt comes into the picture.
What is requirements.txt?
requirements.txt is a text file that contains a list of dependencies and/or their versions required to run a Python project. It is a standard format used in Python to manage dependencies.
The file is placed in the project's root directory and specifies the exact versions of the required packages. Doing so guarantees that all individuals involved in the project utilize identical versions of the packages, thus mitigating any potential conflicts arising from version discrepancies.
How to create requirements.txt?
Creating a requirements.txt file is an easy task. Open the command prompt and navigate to the project directory. Then run the following command:
$ pip freeze > requirements.txtThis command creates a list of all the installed packages and their versions and saves them in a file named requirements.txt. It is important to note that this file contains all the packages installed on the system, not just the packages required for the project.
In Python projects, this file is commonly employed to establish a virtual environment or ensure the accurate installation of project dependencies on another machine. Therefore, it is recommended to create a virtual environment for each project to avoid conflicts.
In the next section of what is pytest tutorial, let’s look at the virtual environment and how to set it up.
What is a virtual environment?
A virtual environment is a self-contained directory that contains a specific version of Python, along with all the required packages for a project. By using a virtual environment, the project's dependencies can be isolated from other projects on the same system, avoiding version conflicts and other issues.
Creating a virtual environment is easy. Open the command prompt and navigate to the project directory. Then run the following command:
$ python -m venv envThis command creates a new virtual environment named env in the current directory. Once the environment is created, it can be activated by running the following command:
$ source env/bin/activate
This command activates the virtual environment and changes the system's default Python interpreter to the one in the environment. From now on, any packages installed will be installed in the virtual environment, avoiding conflicts with other projects.
When working on a project, it is recommended to activate the virtual environment before starting any work. This ensures that all the necessary dependencies are available and avoids version conflicts with other projects. When the project is complete, the virtual environment can be deactivated using the following command:
$ deactivateHow to use a requirements.txt file?
Using a requirements.txt file is simple. Once the file is created, it can be shared with other developers and/or placed in the project's version control system. To install the required packages, run the following command on the terminal:
$ pip install -r requirements.txtpip install requirements.txt looks for a Python package named requirements.txt. But no such package exists. We intend that pip install opens the text file and reads the packages from there. The -r flag allows pip install to open requirements.txt and install the packages inside of it.
This command installs all the packages listed in the requirements.txt file. It is important to note that this command installs the exact versions of the packages listed in the file. If a package is not found or is incompatible with the current system, it throws an error.
What is pytest-selenium?
It is a pytest plugin that allows you to run Selenium tests with pytest. It provides fixtures for configuring an instance of the Selenium WebDriver and interacting with the WebElements in the DOM. Here we use version >= 4.0.0. We are currently utilizing 'pytest-selenium' version 4.0.0 or later.
Demonstration: Selenium automation testing using pytest
Having covered the fundamental aspects of setting up Selenium in Python, it's time to delve into practical test scenarios. In this Selenium pytest tutorial, we will execute two test scenarios on a local Selenium Grid. Here are the specific details:
Test Scenarios (To-Do Web Application)
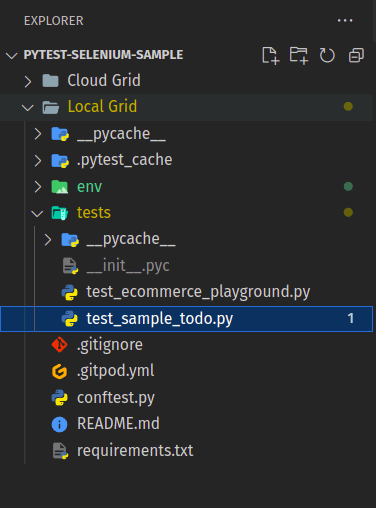
Project Setup
Shown below is the directory structure:
Implementation
import pytest
from selenium.webdriver.common.by import By
import sys


@pytest.mark.usefixtures('driver')
class TestLink:


   def test_title(self, driver):
       """
       Verify click and title of page
       :return: None
       """
       driver.get('https://lambdatest.github.io/sample-todo-app/')
       driver.implicitly_wait(10)
       driver.find_element(By.NAME, "li1").click()
       driver.find_element(By.NAME, "li2").click()


       title = "Sample page - lambdatest.com"
       assert title == driver.title


   def test_item(self, driver):
       """
       Verify item submission
       :return: None
       """
       driver.get('https://lambdatest.github.io/sample-todo-app/')
       sample_text = "Happy Testing at LambdaTest"
       email_text_field = driver.find_element(By.ID, "sampletodotext")
       email_text_field.send_keys(sample_text)


       driver.find_element(By.ID, "addbutton").click()


       li6 = driver.find_element(By.NAME, "li6")
       sys.stderr.write(li6)
       assert sample_text in li6

Code Walkthrough
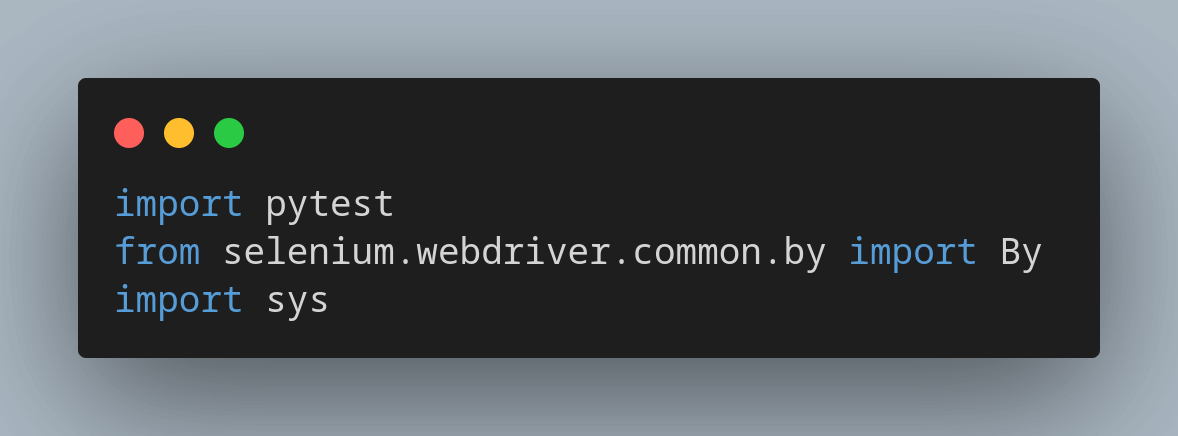
Step 1
Import the required modules, including pytest and Selenium.
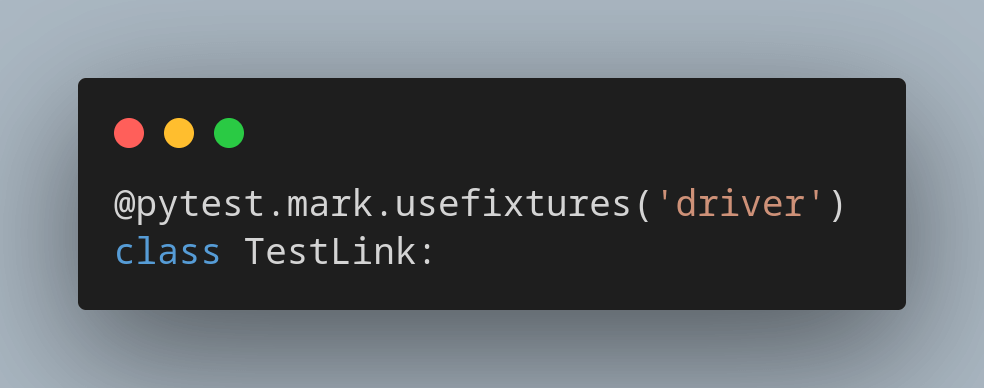
Step 2
The class TestLink is defined and decorated with @pytest.mark.usefixtures('driver'), which informs pytest to use the driver fixture when executing the tests in this class. This fixture provides an instance of the Selenium WebDriver for the tests.
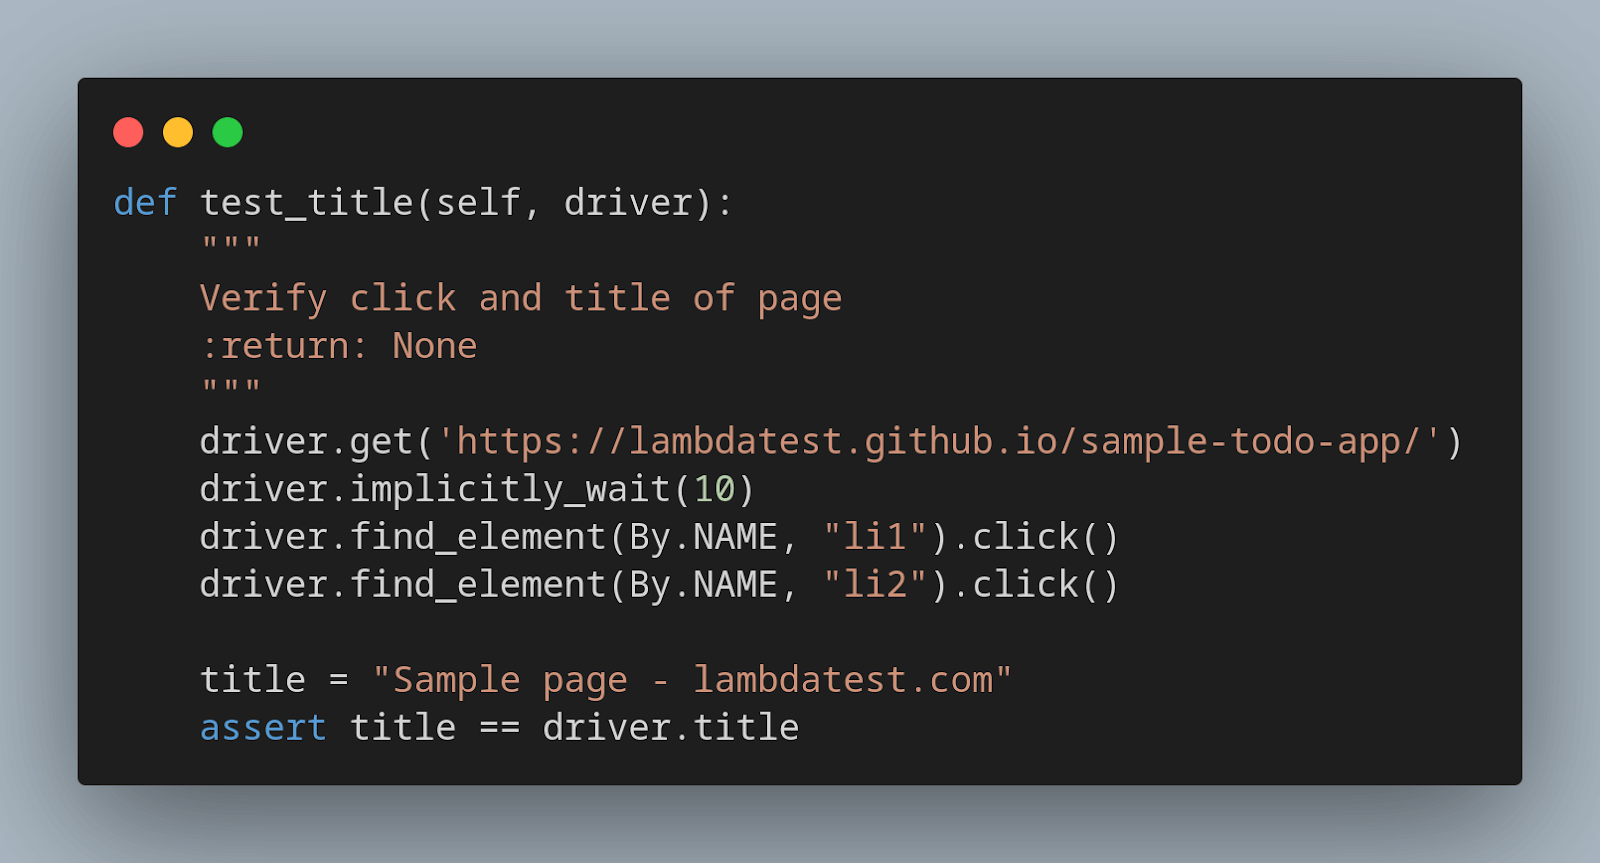
Implementation (test_title)
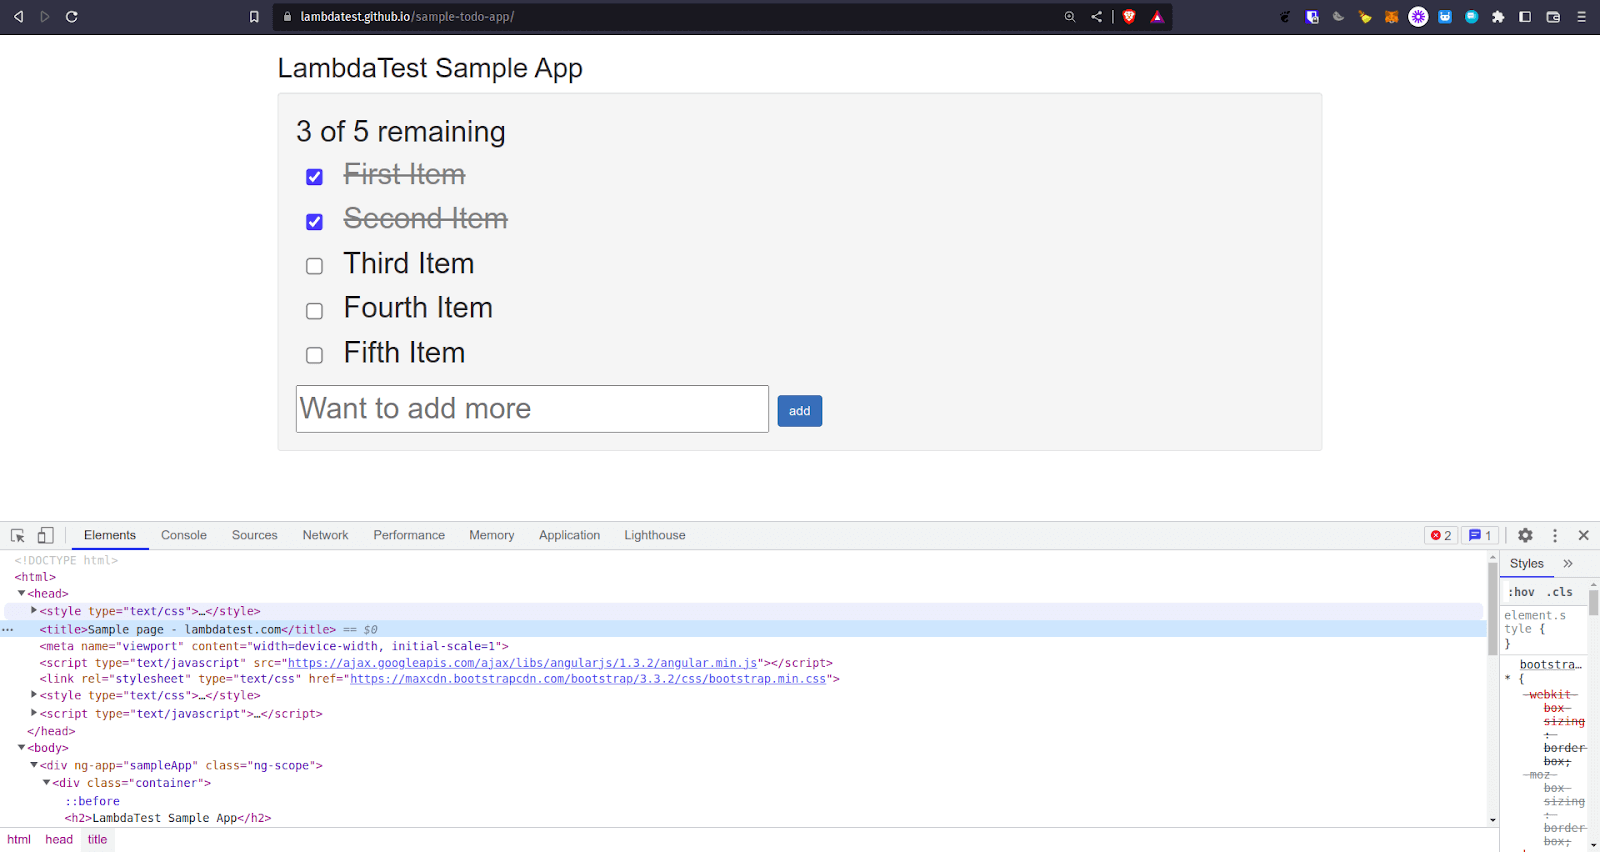
The test_title method uses the instantiated WebDriver to navigate to a sample to-do list web page, click on two items in the list, and verify that the title of the page is correct.
Step 3
The get() method is used to navigate to the specified URL, the To-Do app in this case.

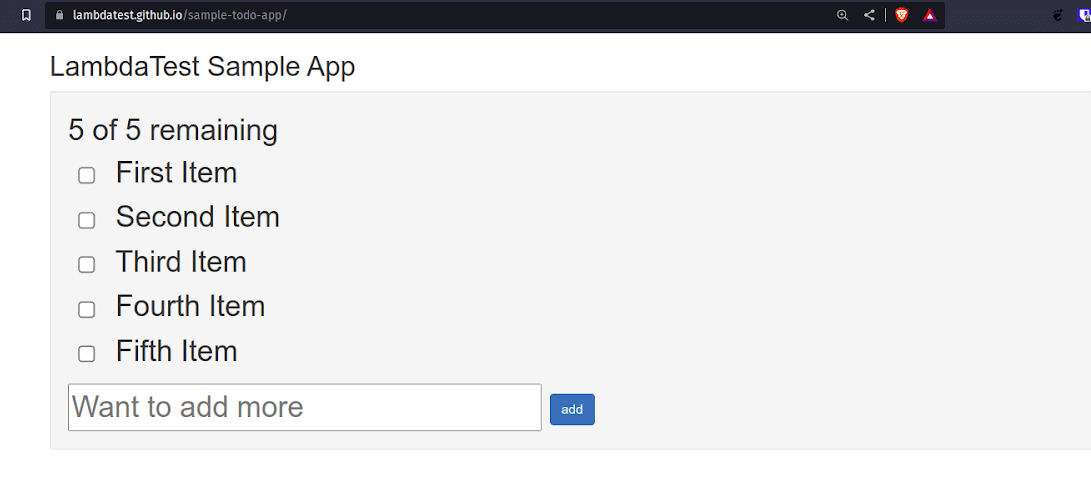
Step 4
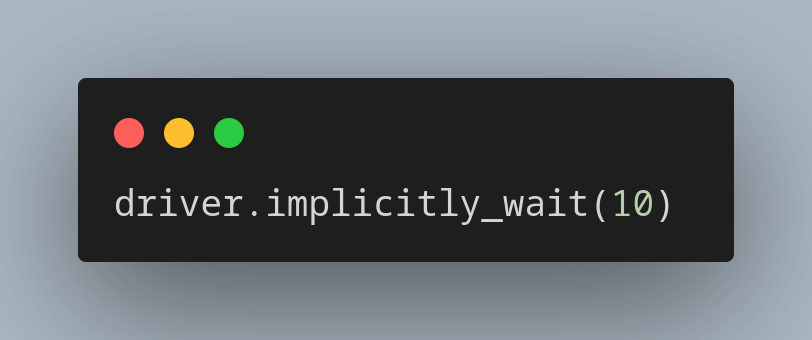
The implicitly_wait(10) method sets an implicit wait time of 10 seconds. It informs the driver to poll the DOM for a certain amount of time when trying to find an element if it is not immediately available. The driver will wait for 10 seconds before throwing a NoSuchElementException if it cannot find the element.Implicit waits allow the driver to wait only until the element is available and then continue with the test execution.
The implicit wait will continue to be applied throughout the course of the code unless it is explicitly changed or reset.
Step 5
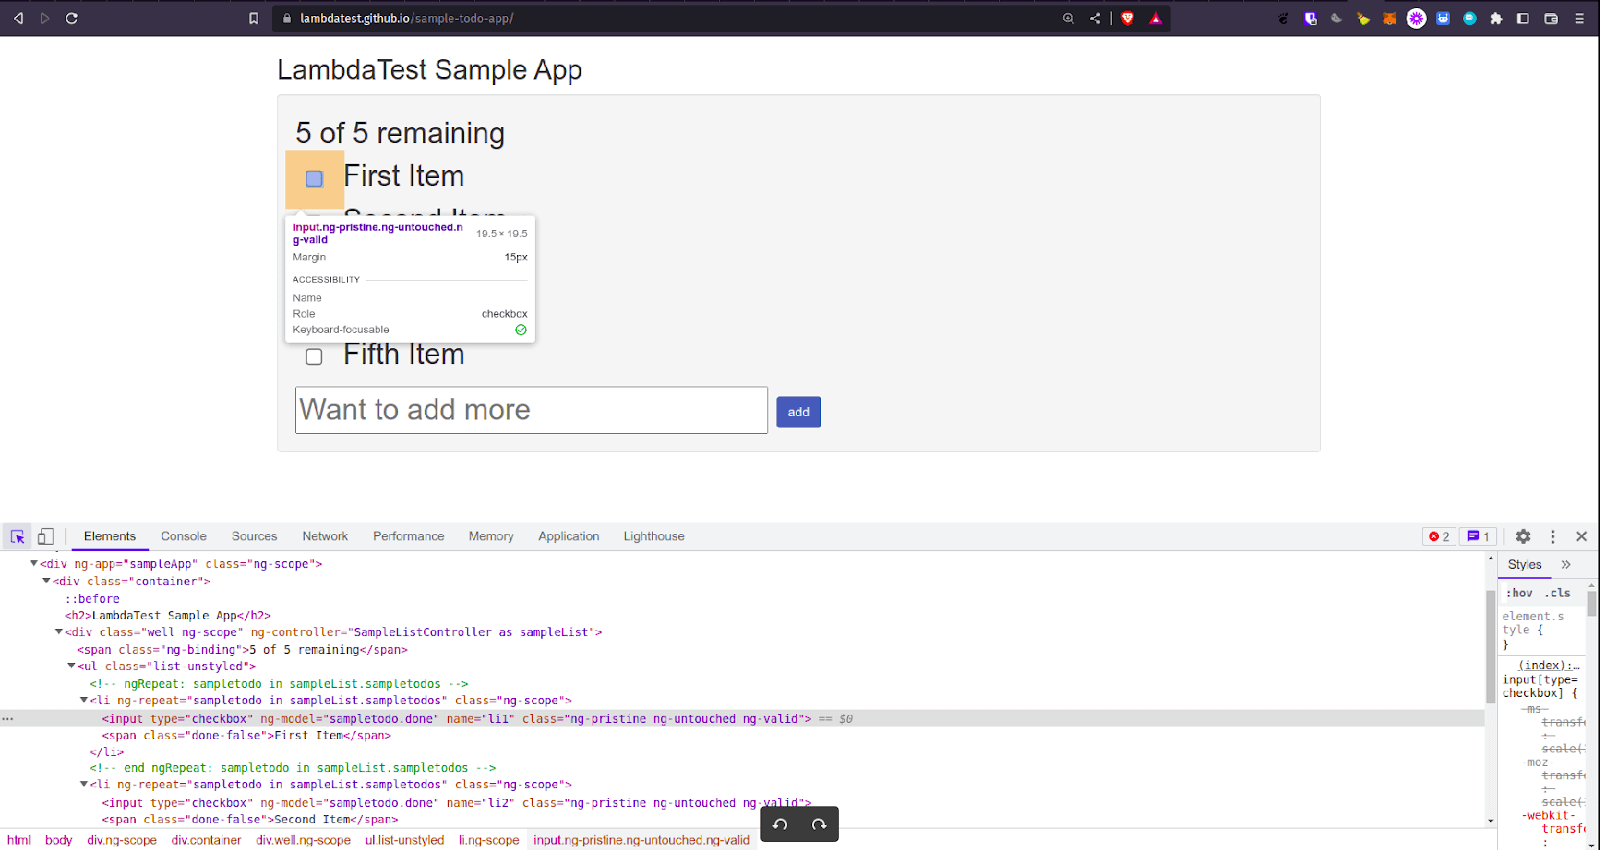
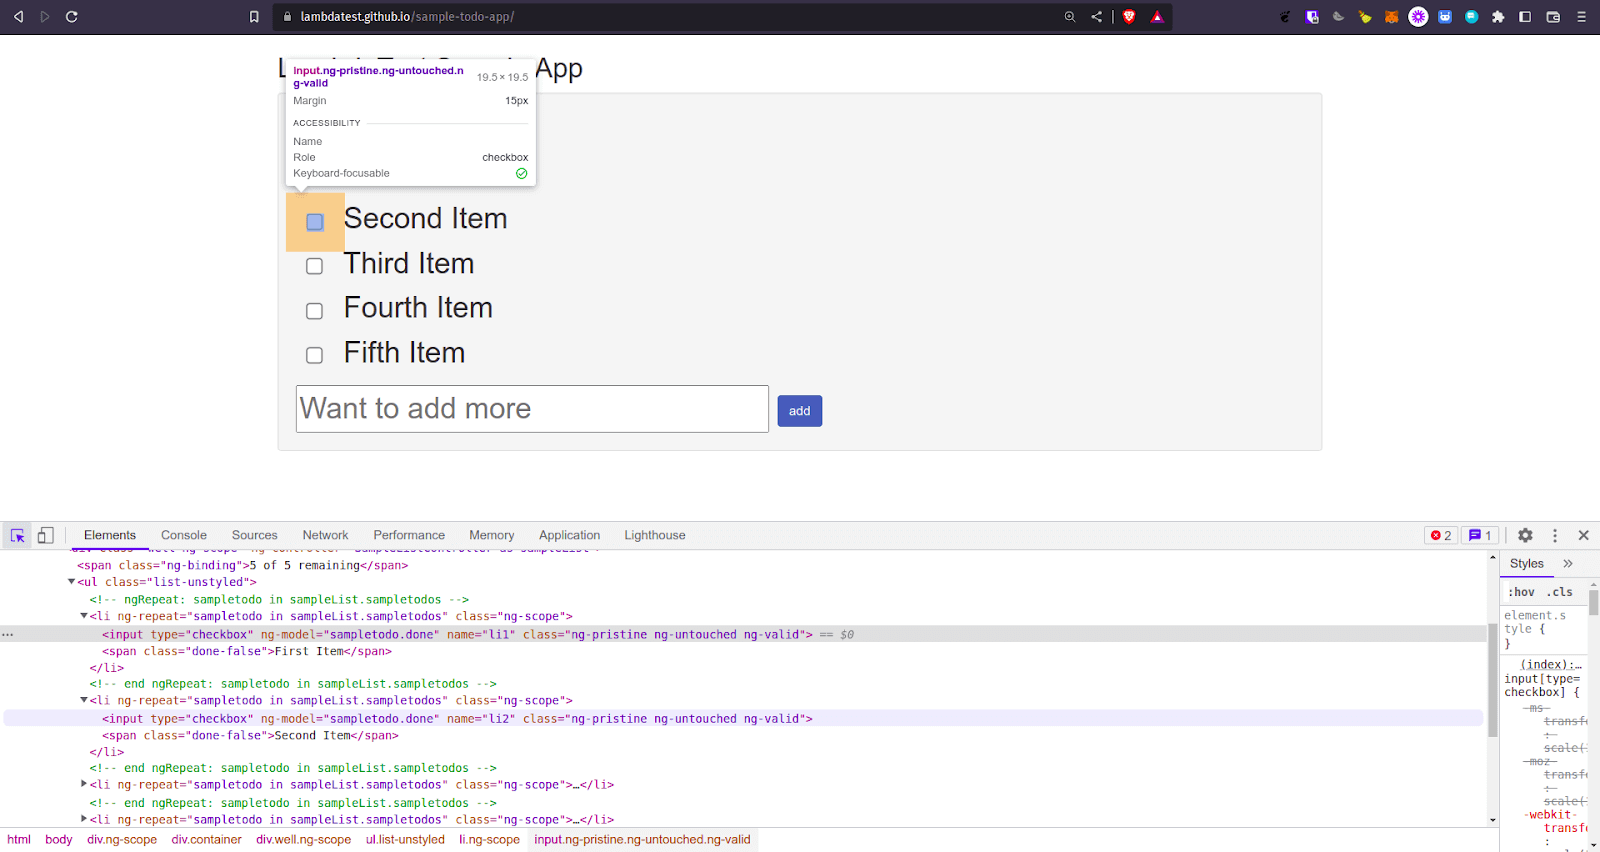
The find_element() method in Selenium with the By.NAME locator strategy is used to locate an element on the page based on its name attribute, li1 and li2, in this case. The click() method is used to simulate a mouse click on the elements li1 and li2.

Step 6
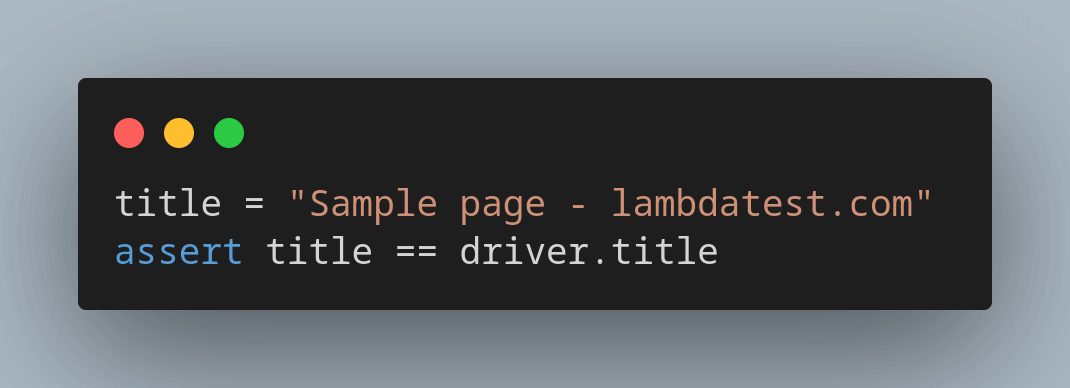
Check the title and raise an assertion error if it does not match, indicating that the test has failed.
Implementation (test_item)
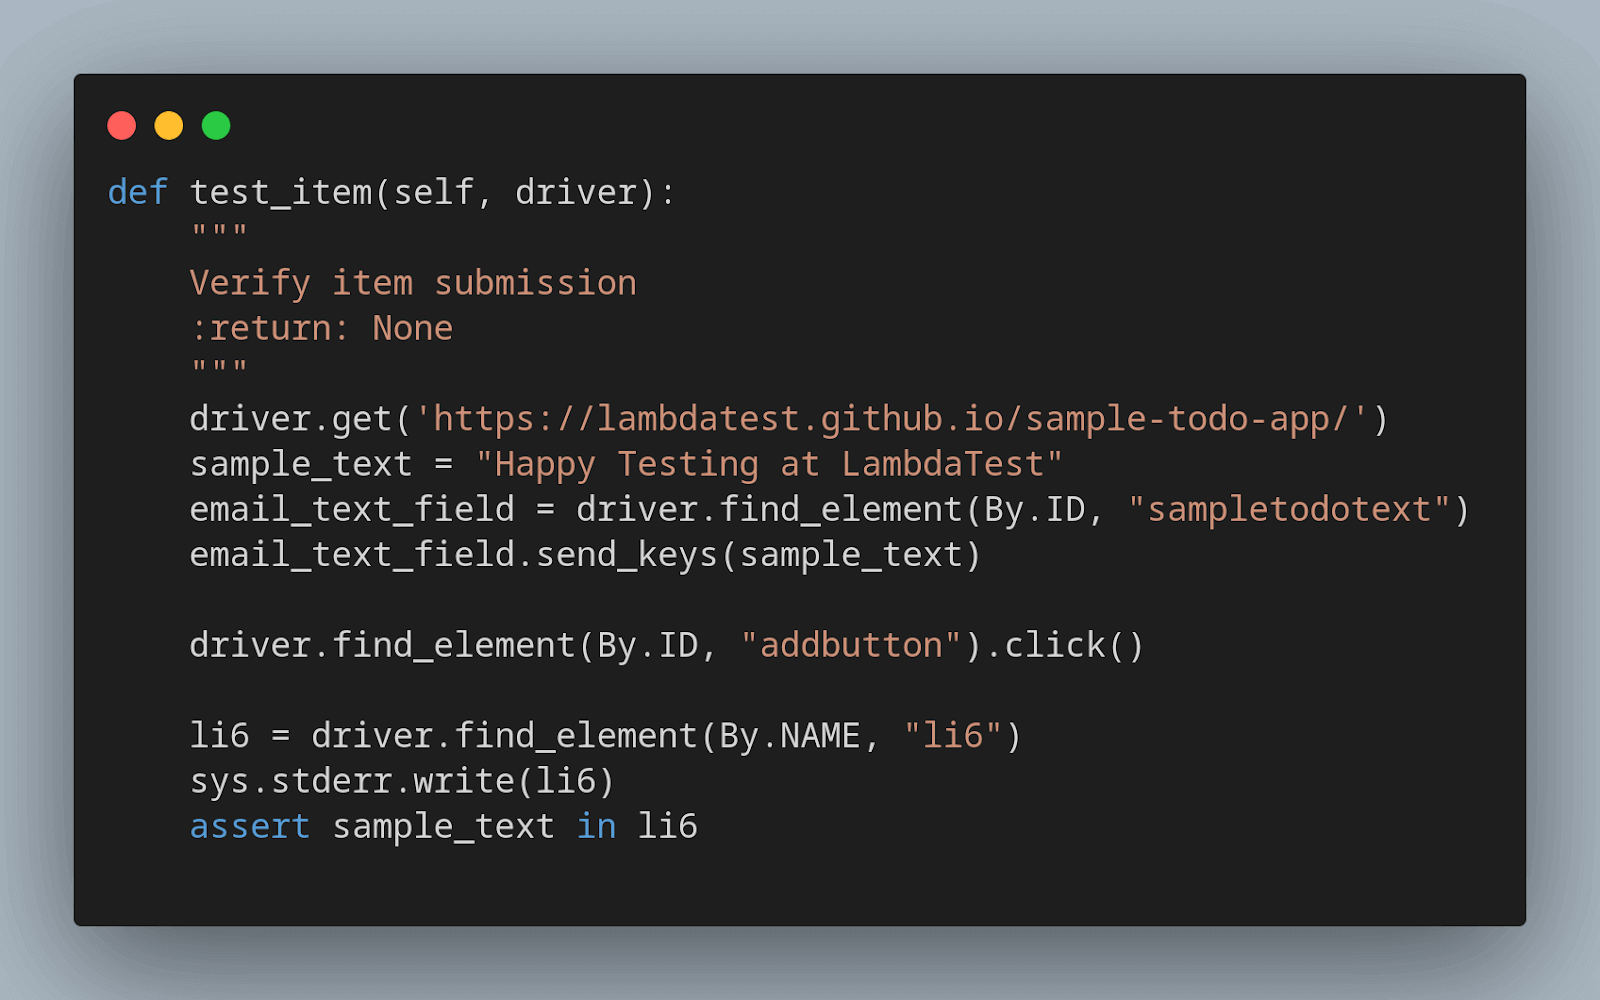
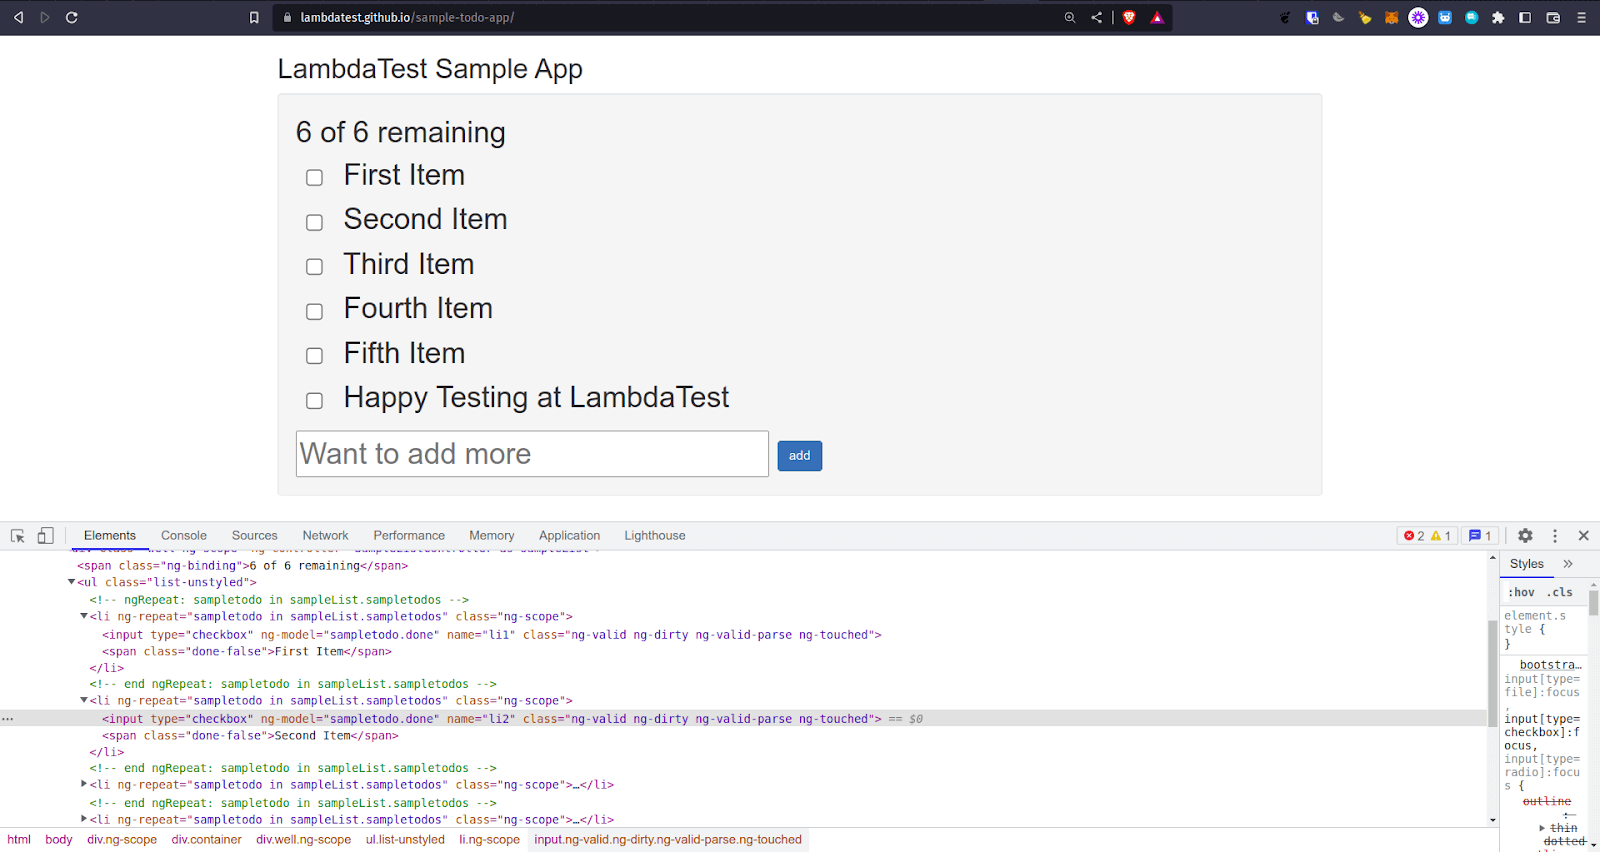
The test_item() method uses the instantiated WebDriver to navigate to the same sample To-Do list web page, add a new item to the list, and verify that the item was added correctly.
Step 7
The get() method is used to navigate to the specified URL, the To-Do app in this case.

Step 8
A string variable named sample_text is defined with the value Happy Testing at LambdaTest.

Step 9
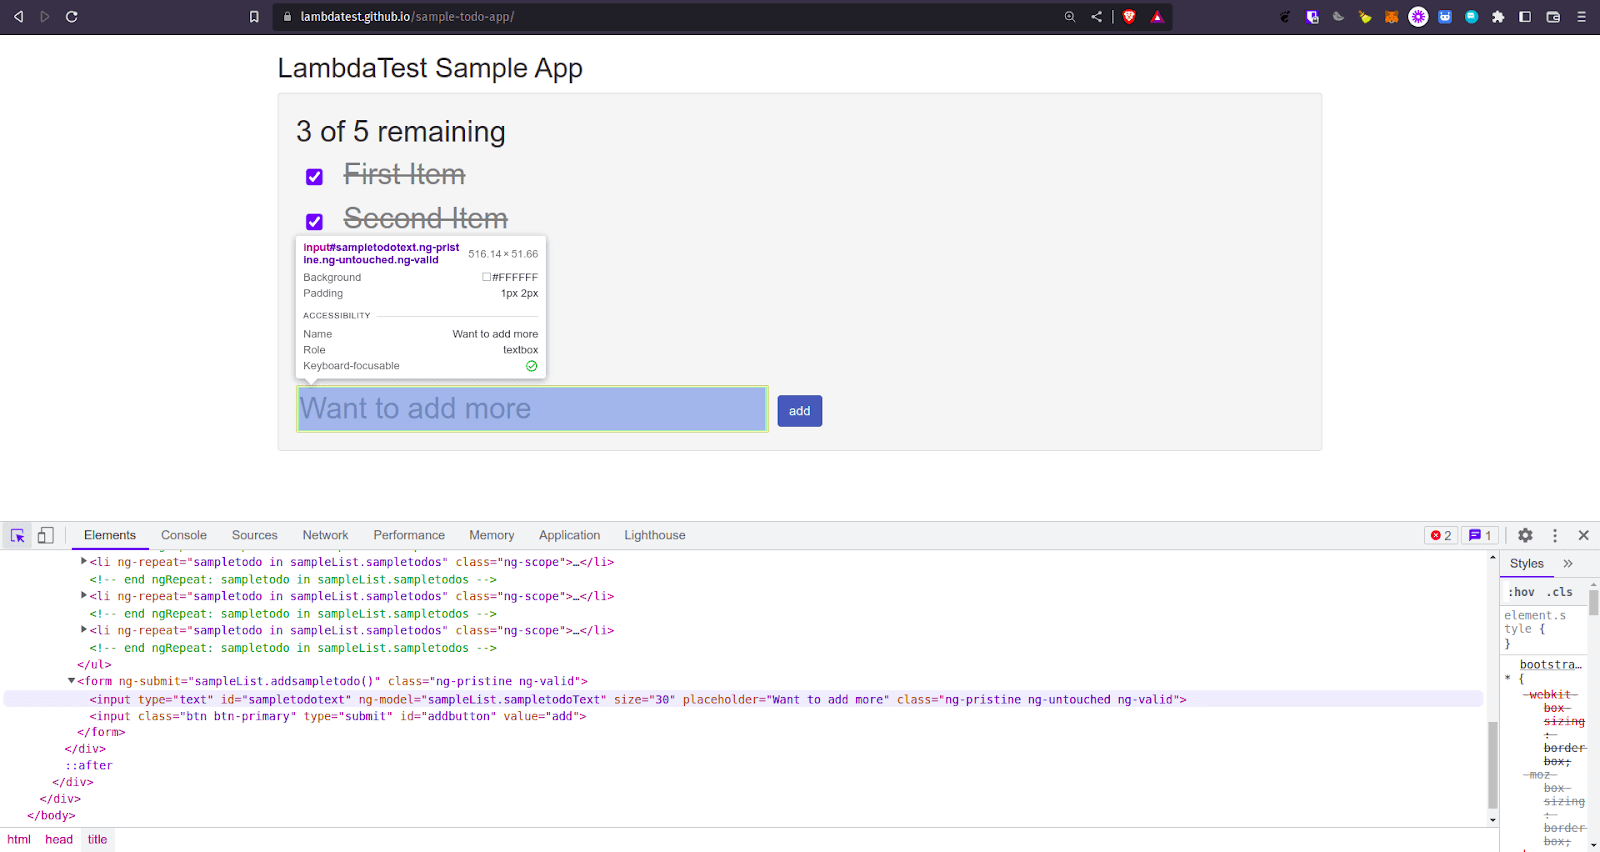
The find_element() method with the By.ID locator strategy is used to locate an element on the page based on its id attribute, sampletodotext in this case. The found text field is then stored in a variable named email_text_field.

Step 10
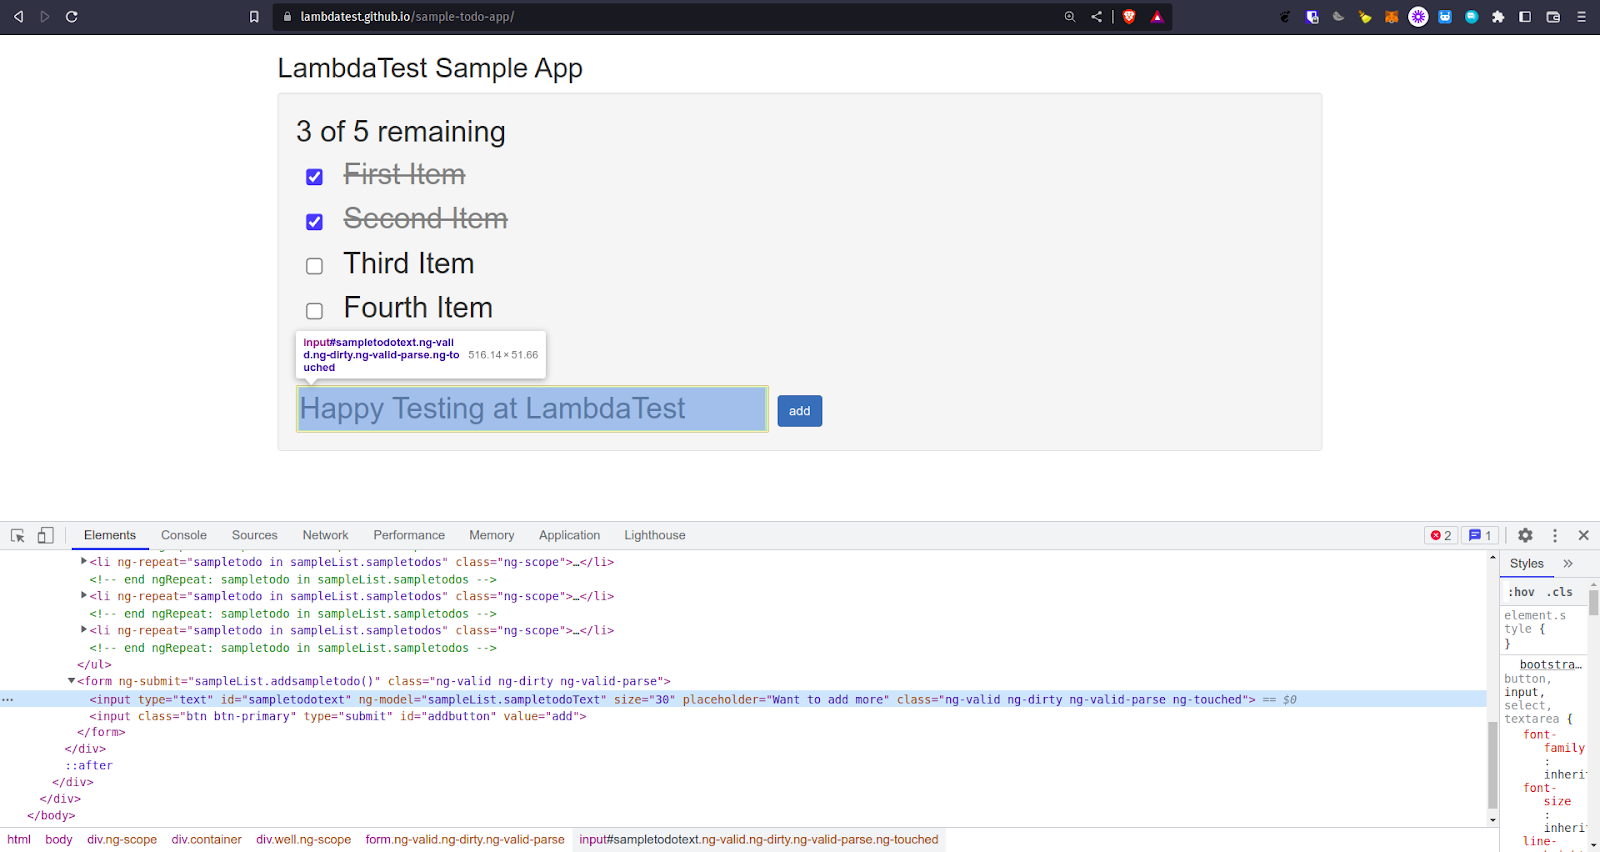
The text in the sample_text variable is entered into the text field using the send_keys method in Selenium.

Step 11
The find_element() method with the By.ID locator strategy is used to locate an element on the page based on its id attribute, addbutton in this case. The add button is clicked using the click() method in Selenium.

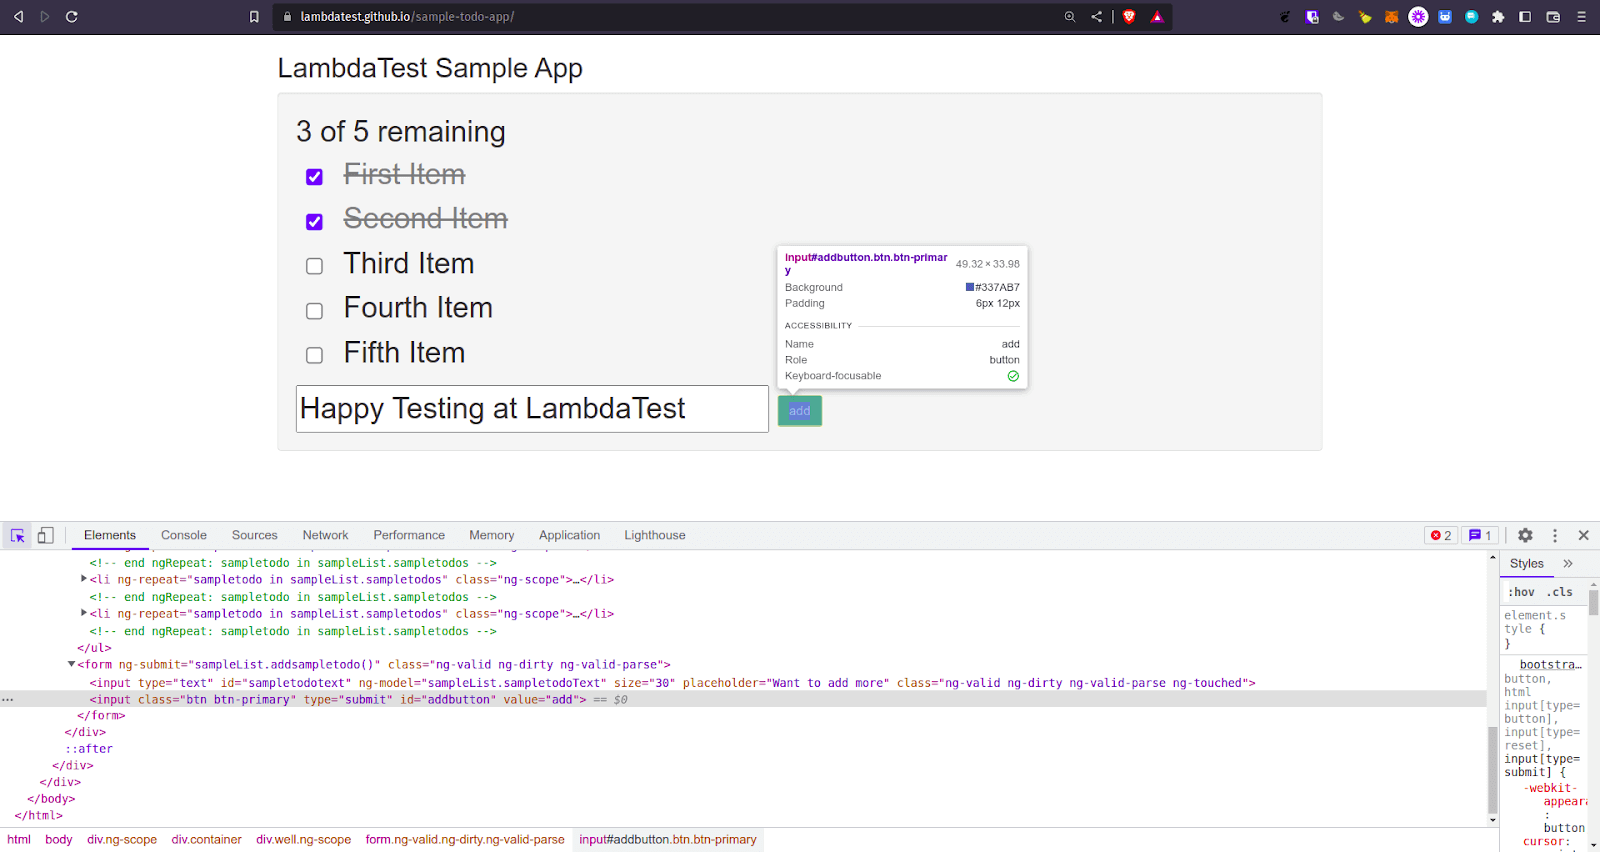
Step 12
The find_element() method with the By.NAME locator strategy is used to locate an element on the page based on its name attribute, li6 in this case. The found element is stored in a variable named li6.
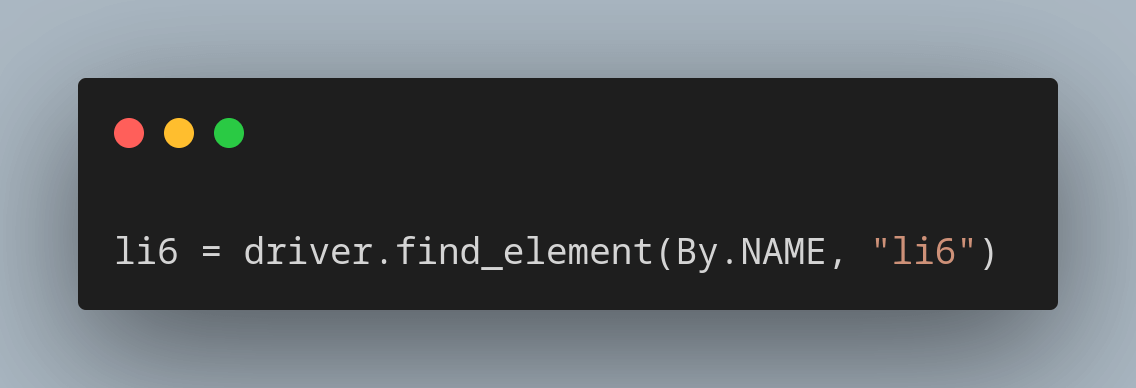
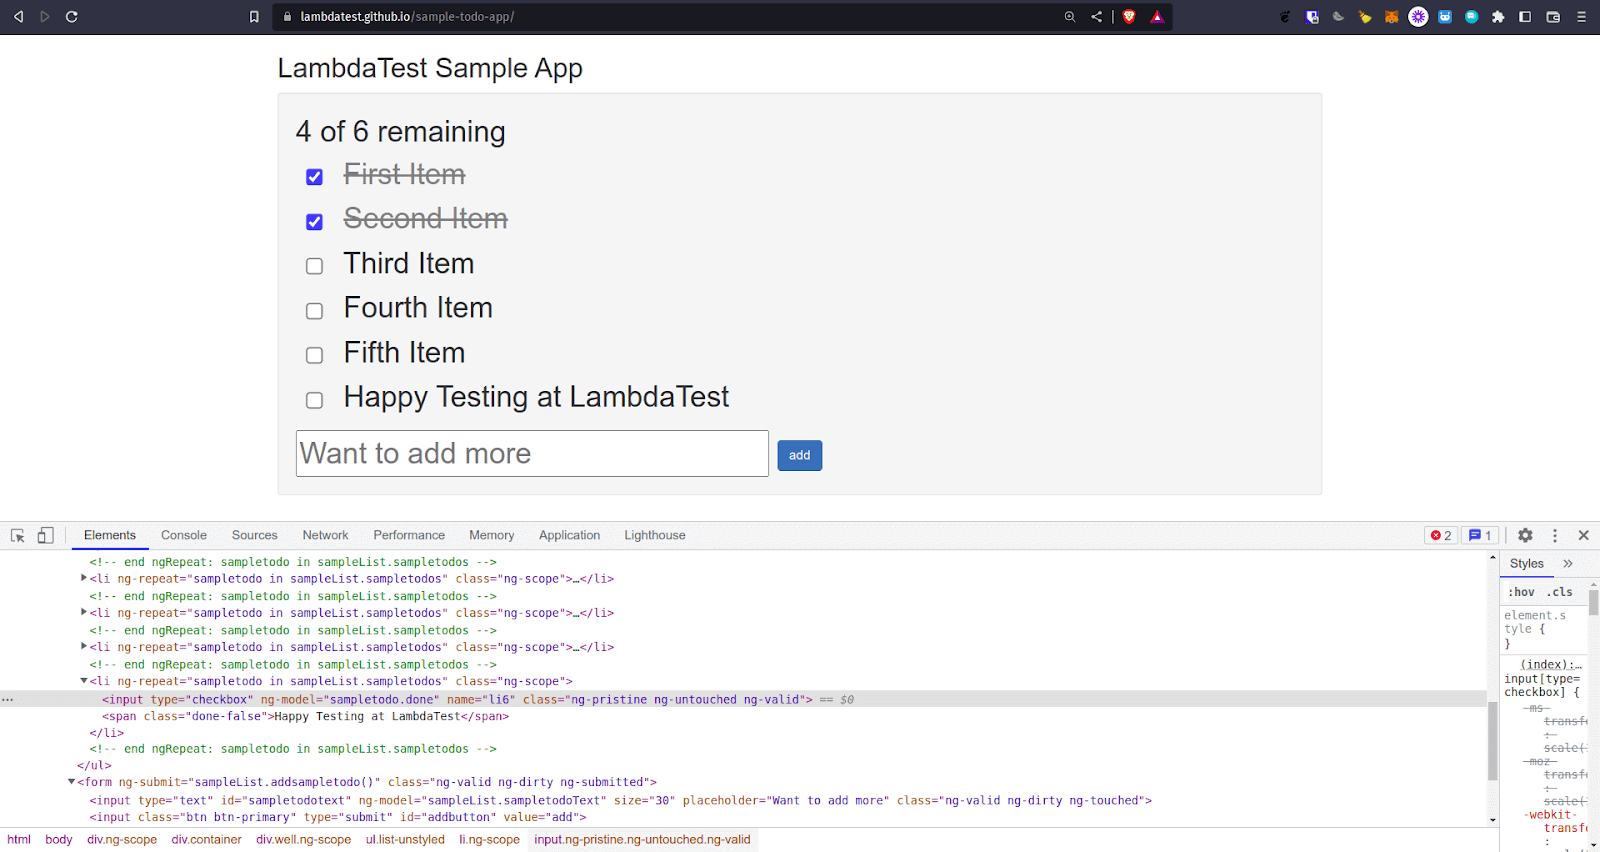
Step 13
The sys.stderr.write(li6) is used for debugging purposes to write the value of the li6 variable to the standard error stream.
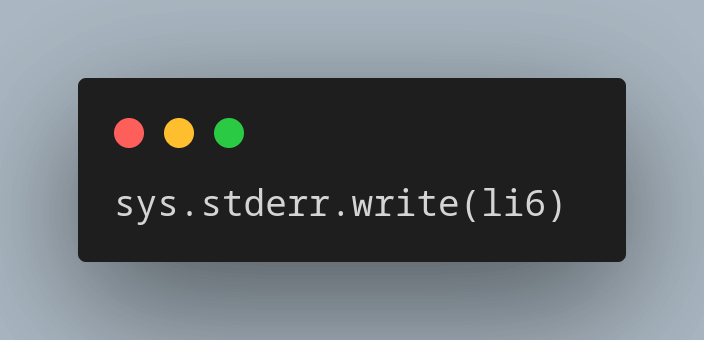
Step 14
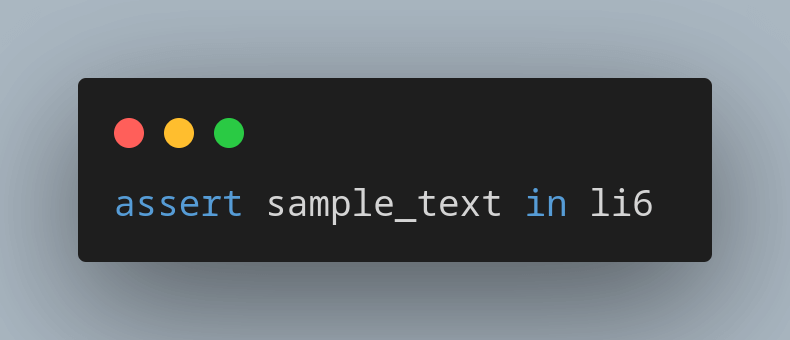
The assert statement is used to verify that the text of the newly added to-do item contains the text in the sample_text variable. If the condition in the assert statement is not met, an AssertionError will be raised, and the test will fail.
Running multiple tests from a specific file
In this section of what is pytest tutorial, we will see how to run multiple tests from a specific file. One of the features of pytest is the ability to run multiple tests in a single command.
Running multiple tests in pytest is a useful way to test specific areas of your code. There are several ways to run multiple tests in pytest, depending on your needs.
In the process of writing automated tests, it is typical to have multiple test files containing different test cases. However, there are situations where you may only need to execute specific tests from a particular file instead of running all the tests within that file. pytest simplifies the process of running multiple tests from a specific file.
To run multiple tests from a specific file, you can specify the file name on the command line followed by the names of the test methods you want to run, separated by double colons (::).
$ pytest tests/LocalGrid/test_sample_todo.py::TestLink::test_title
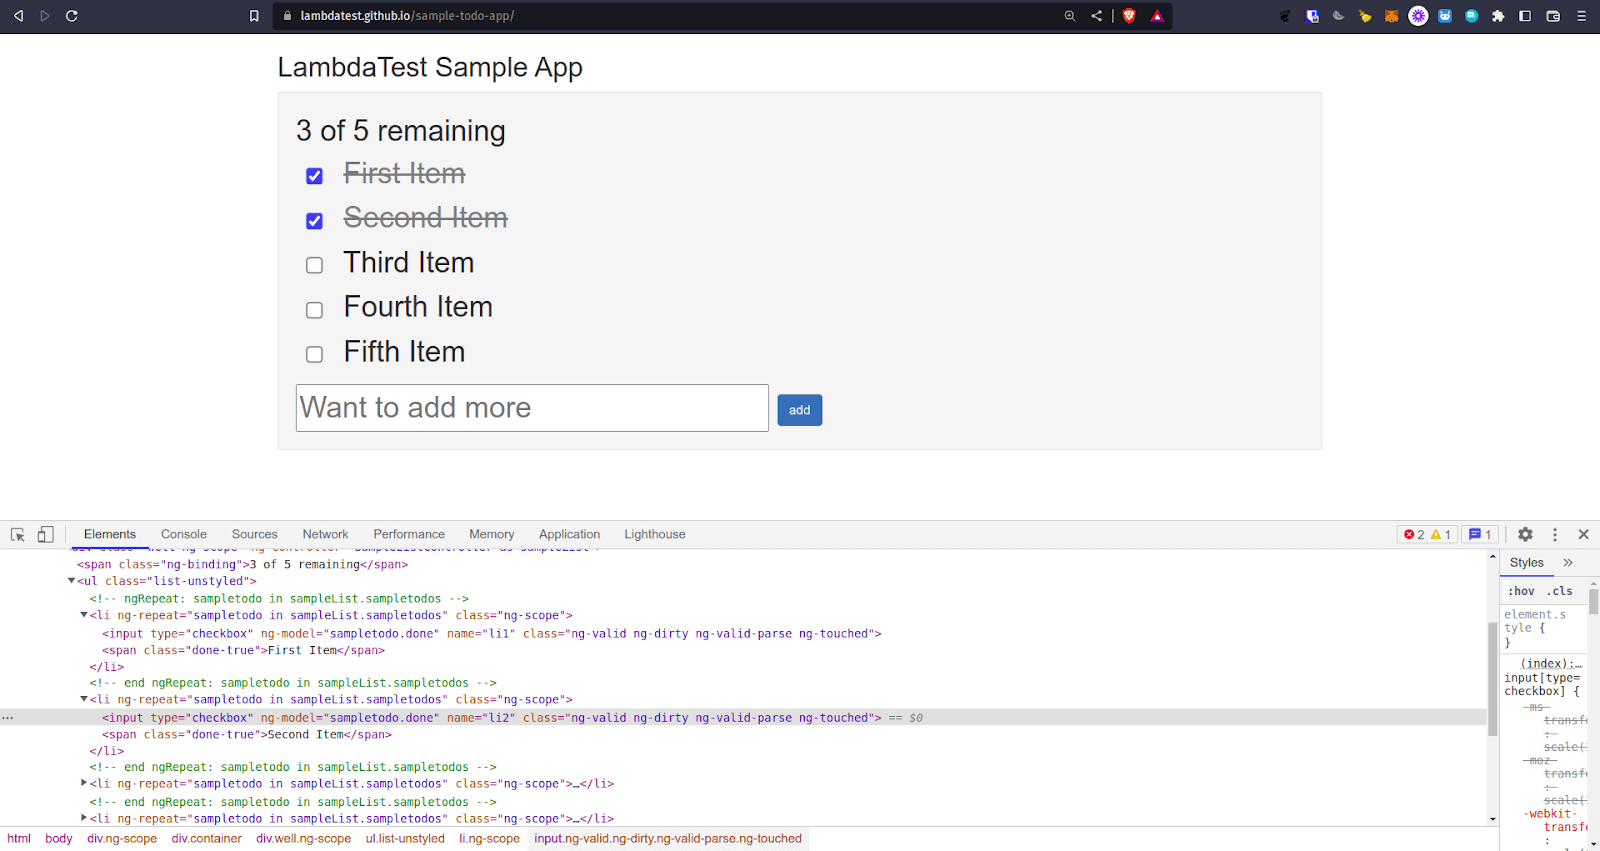
This command specifies the file (test_sample_todo.py), the class (TestLink), and the method (test_title) to run.
$ pytest tests/LocalGrid/test_sample_todo.py::TestLink::test_item
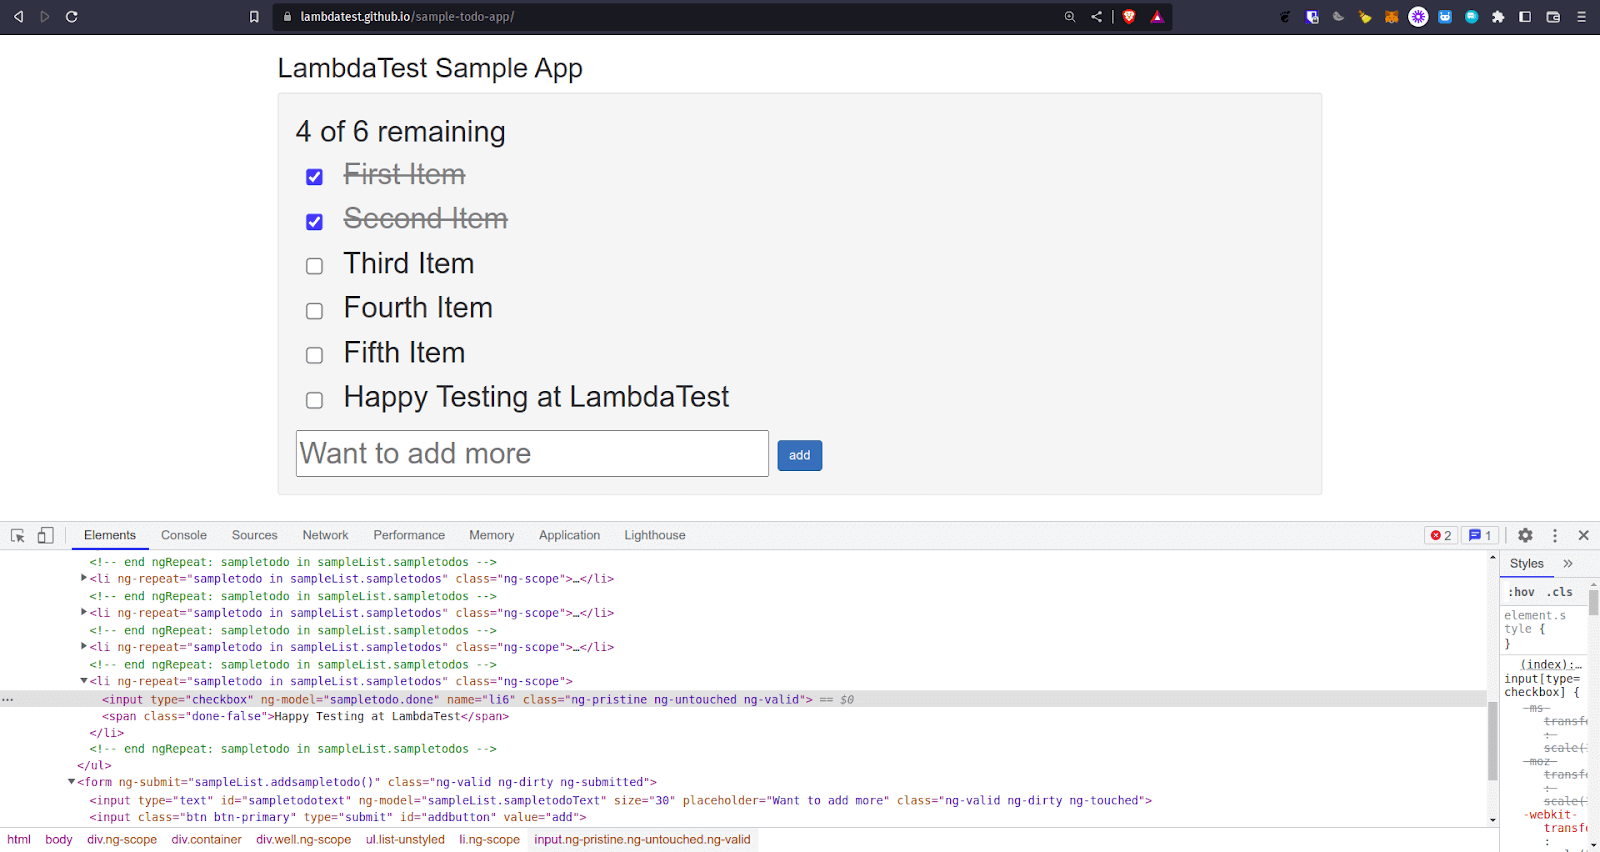
This command specifies the file (test_sample_todo.py), the class (TestLink), and the method (test_item) to run.
You can use command line arguments to fine-tune which tests pytest runs and make it easier to focus on specific areas of your code.
It's important to note that pytest will only run tests discovered during the test collection phase. This means that if you have a test method that is not named with the prefix test or is not located in a test file, pytest will not run it.
Running multiple test files
When developing an application, it's common to have multiple test files, each containing a set of tests that verify different aspects of the application's functionality. pytest provides several ways to run multiple test files, allowing you to execute tests across different test suites and workflows easily.
In the code provided below, two test files use pytest to test the functionality of different web applications. The first test file (test_sample_todo.py) contains two tests called test_title and test_item. The second test file (test_ecommerce_playground.py) contains two tests called test_text and test_register.
Importing the necessary packages

The test_text function verifies that a specific text is present on a web page. The test opens a web page using the Selenium WebDriver, waits for 10 seconds for the page to load, and then checks if a specific text is present on the page. If the text is not present, the test will fail.

This decorator marks the test function to use the driver fixture, which sets up a Selenium WebDriver instance for the tests to use.

A test function called test_text is defined that takes the driver fixture as a parameter.

Navigates the WebDriver to the URL of the website being tested.

Implicit wait time for the WebDriver to 10 seconds. This means that if an element is not immediately available on the page, the WebDriver will wait up to 10 seconds for it to become available.

A variable is set to the expected text that should be present on the page.

The find_element method is used to search for an element on the page using an XPath expression. It then checks that the text of the element matches the expected text. If this assertion is true, the test passes, and if it is false, the test fails.

The test_register function tests the registration process on a website by filling in a registration form and checking if the registration was successful.
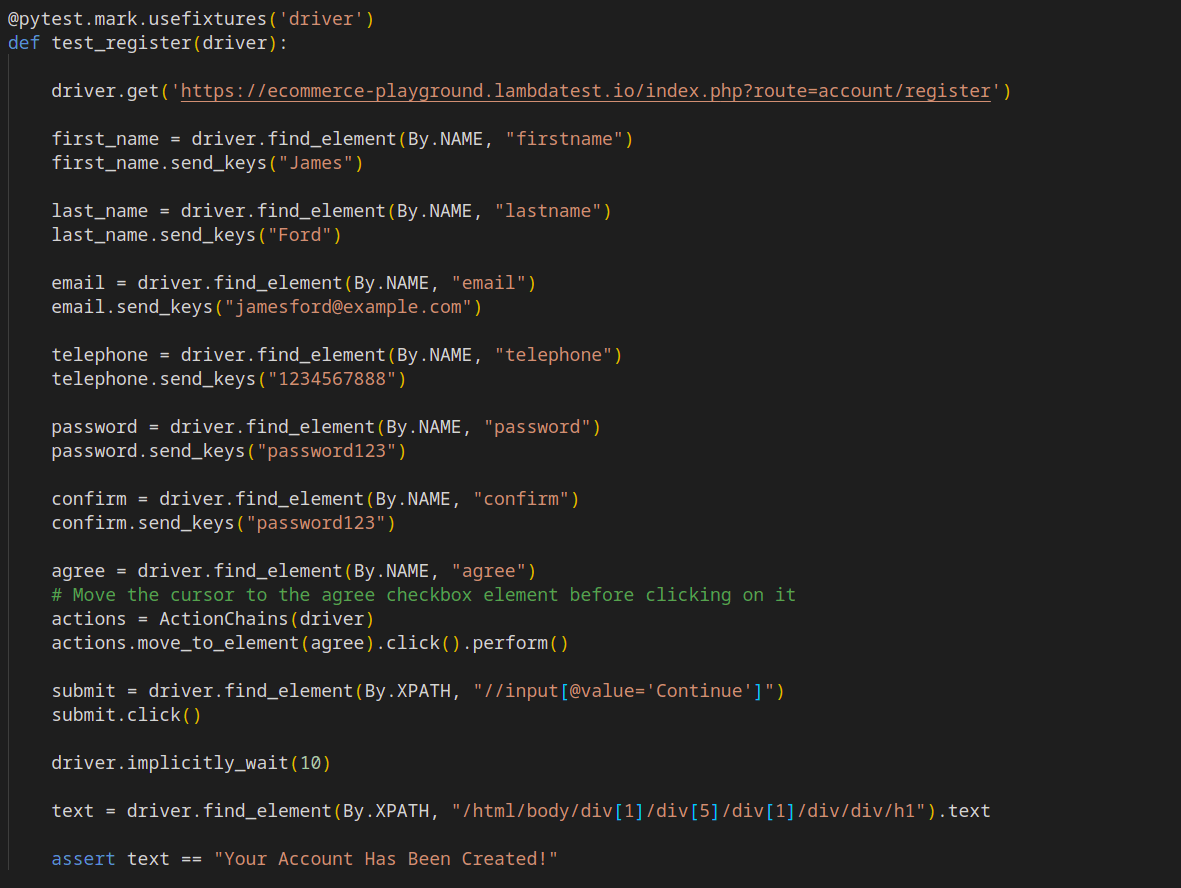
The below several lines fill in the required information fields for the registration form using the send_keys method to simulate typing into the fields.
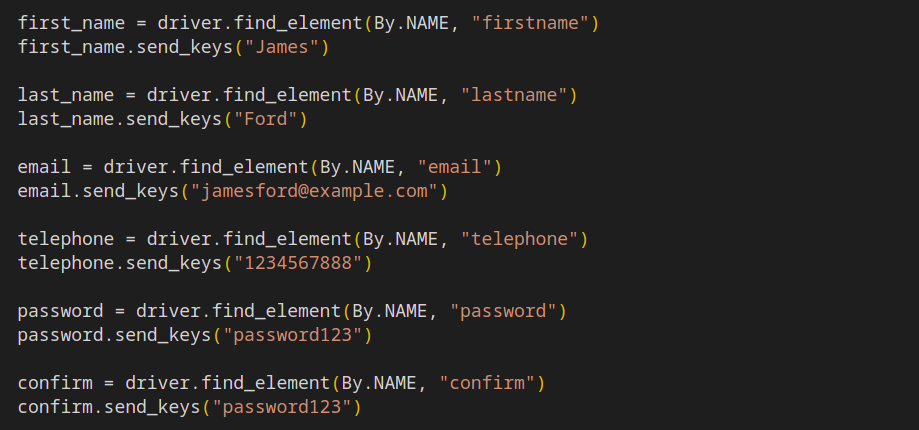
Locate the "agree" checkbox element on a webpage using Selenium's find_element method.

Once the element is located, an instance of ActionChains is created to perform a series of mouse actions on the element.
Here, the mouse is moved to the "agree" checkbox element using the move_to_element method, which simulates hovering over the element. Then the click method is called to simulate a click on the element, followed by the perform method to execute the actions.

The submit button is located using the find_element method, which uses the XPath of the submit button and simulates a click operation.

The driver waits implicitly for 10 seconds. Then, we find an element on the page with an XPath selector /html/body/div[1]/div[5]/div[1]/div/div/h1, which corresponds to the header on the page that displays the success message after creating a new account.
We then extract the text of this element using the .text method and store it in the text variable.
Finally, we use an assert statement to check whether the value of the text is equal to the expected string "Your Account Has Been Created!". If this assertion is true, the test passes, and if it is false, the test fails.

You can run multiple test files at once by specifying the file names on the command line, separated by commas.
$pytest tests/LocalGrid/test_sample_todo.py tests/LocalGrid/test_ecommerce_playground.pyThis will run all the test methods in both the test_sample_todo.py and test_ecommerce_playground.py files.
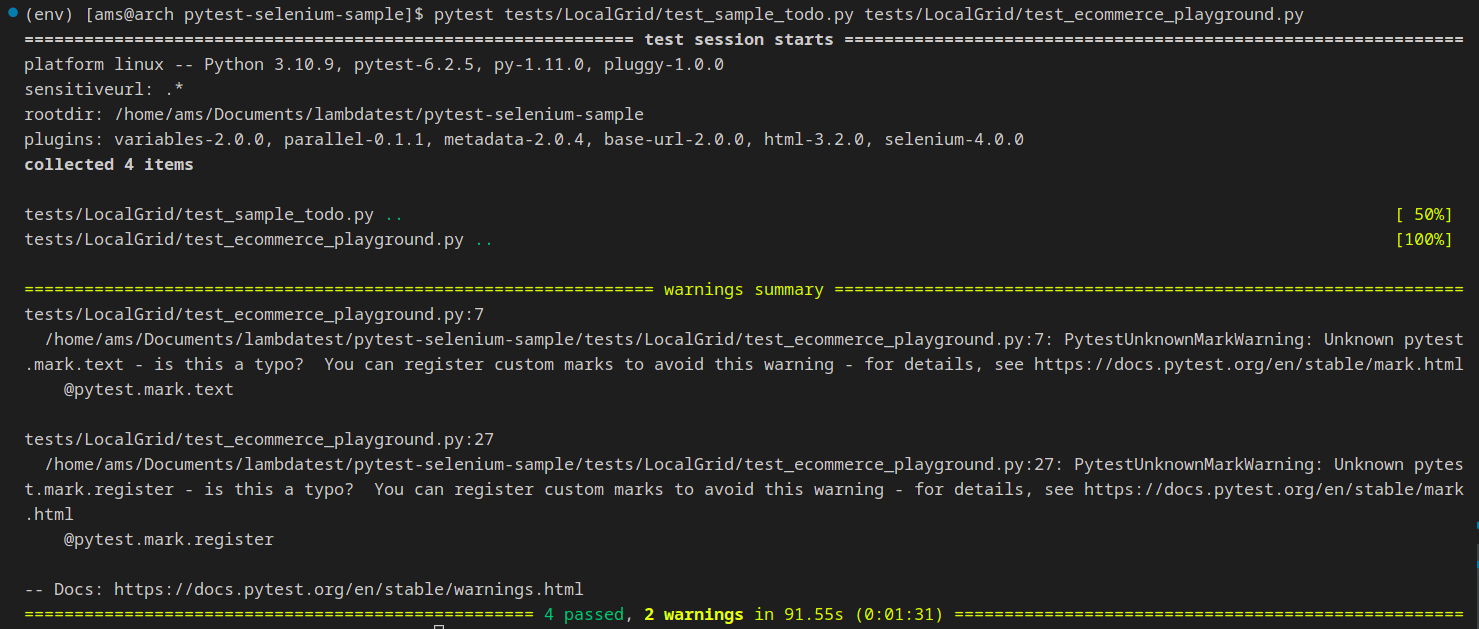
It's also possible to mix and match individual test methods and test files.
$ pytest tests/LocalGrid/test_sample_todo.py::test_titletests/test_ecommerce_playground.py::test_textThis will run the test_title test in the class TestLink of the test_sample_todo.py file, and the test_text test in the test_ecommerce_playground.py file.
You can specify individual test methods, multiple test files, or a combination of both on the command line to run the tests you need. By using these options, you can easily organize and run your tests to ensure that your code is working as expected.
Running a subset of the entire test
When working on a large project with a significant number of test files and test cases, running all of the tests every time can be challenging. In such cases, running only a subset of the entire test suite can be useful.
pytest provides two ways to do this:
- Grouping test names by substring matching
- Grouping tests by markers
Substring matching of test names
Grouping test names by substring matching is a technique used to organize and classify tests based on specific patterns within their names. This can be useful for various purposes, including identifying related tests, finding tests that relate to a specific feature or component of the application, and ensuring that tests follow a consistent naming convention.
The most basic way to filter tests by name is to use the -k option, followed by a string, which informs pytest to run only the tests whose names contain the specified substring. For this tutorial on what is pytest, we have a test class named TestLink with two test methods, test_title and test_item. Suppose we want to run only the test_title method. We can use the -k option followed by the name of the test method to filter the tests by name:
$ pytest tests/LocalGrid/test_sample_todo.py -k "title"This command will run only the test cases that have "title" in their name. In this specific case, only the test_title method will be executed.

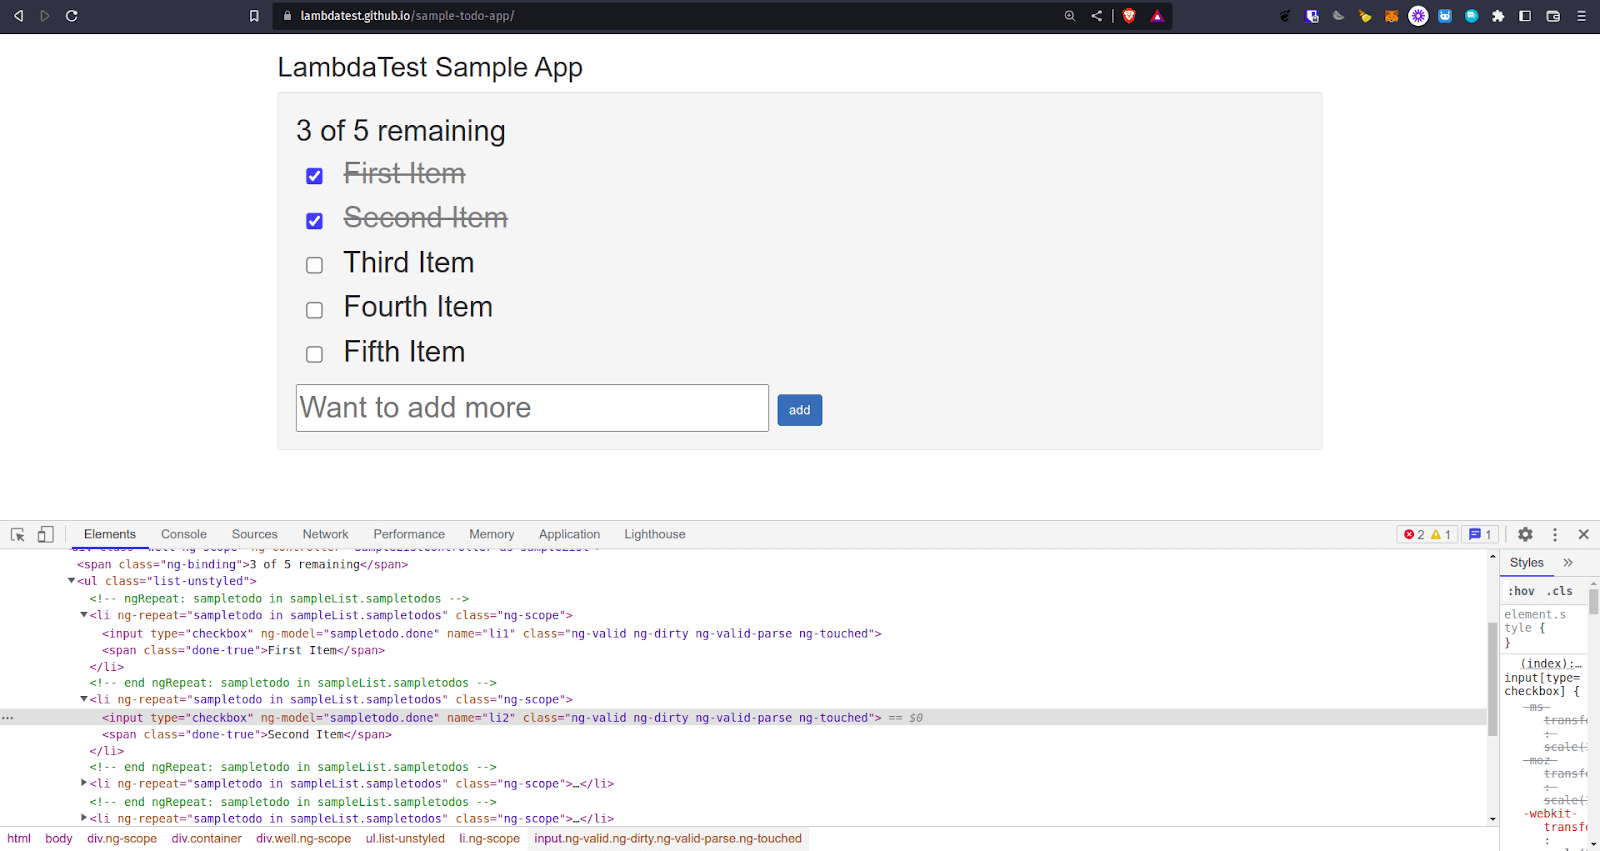
Conversely, if we want to run only the test case that includes the substring "item", we can run the following command:
$ pytest tests/LocalGrid/test_sample_todo.py -k "item"This will execute only the test_item method.

Grouping tests by markers
Markers in pytest are a way of organizing tests and applying attributes to them. You can use markers to categorize tests as per their functionality and to apply some conditions to them. Markers make it easier to run specific tests based on their grouping, and it's an efficient way to execute the right test at the right time.
Additionally, markers can be used for things like skipping certain tests, adding dependencies, and customizing fixtures. Overall, using markers helps better structure your test suite and provides more control over your test execution.
For this tutorial on what is pytest, the code example below,
@pytest.mark.usefixtures('driver'), is a marker that informs pytest to use the driver fixture for each test function in the TestLink class. The driver fixture is defined elsewhere, and it provides a Selenium WebDriver instance that is used to interact with the web page being tested.
import pytest
from selenium.webdriver.common.by import By
import sys


@pytest.mark.usefixtures('driver')
class TestLink:


def test_title(self, driver):
"""
Verify click and title of page
:return: None
"""
driver.get('https://lambdatest.github.io/sample-todo-app/')
driver.implicitly_wait(10)
driver.find_element(By.NAME, "li1").click()
driver.find_element(By.NAME, "li2").click()


title = "Sample page - lambdatest.com"
assert title == driver.title


def test_item(self, driver):
"""
Verify item submission
:return: None
"""
driver.get('https://lambdatest.github.io/sample-todo-app/')
sample_text = "Happy Testing at LambdaTest"
email_text_field = driver.find_element(By.ID, "sampletodotext")
email_text_field.send_keys(sample_text)


driver.find_element(By.ID, "addbutton").click()


li6 = driver.find_element(By.NAME, "li6")
# sys.stderr.write(li6)
# assert sample_text in li6
$ pytest -m driverThis will run only the class TestLink, since it has been associated with the driver marker.
How to run your Selenium test on the cloud?
So far, in this what is pytest tutorial, we have seen how to run Selenium tests using pytest on a local grid. In this section of the tutorial on what is pytest, we will be running the test on a cloud grid like LambdaTest.
With LambdaTest cloud grid, you can easily scale your test infrastructure up or down as needed without additional hardware or maintenance. Moreover, you don't have to maintain the infrastructure. LambdaTest is a digital experience testing cloud that exponentially increases your browser coverage by running your Python automation testing scripts with Selenium on a cloud of 3000+ desktop and mobile environments.
You can follow the LambdaTest YouTube Channel and stay updated with the latest tutorials around Selenium testing, Cypress testing, CI/CD, and more.
Prerequisites to run your first Selenium test on the cloud
In this section of what is pytest tutorial, we will use the existing configuration file (conftest.py) that references LT_USERNAME and LT_ACCESS_KEY environment variables.

You can find this information under LambdaTest Dashboard, Automation, or User Settings. Copy the values and set them as your local machine's environment variables.
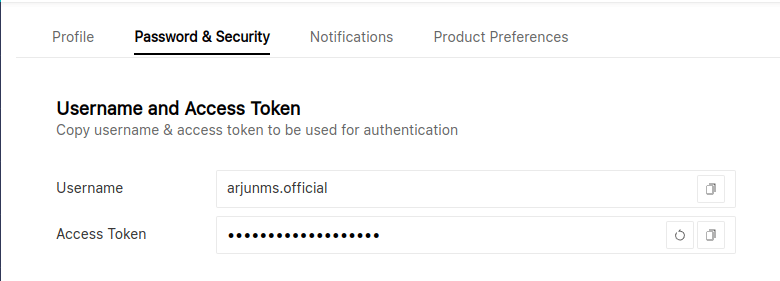
For Selenium testing on the cloud using LambdaTest, you should perform the following steps:
Step 1: Signing Up for LambdaTest
To get started with LambdaTest, you will need to sign up for an account. Once you have signed up for an account, you must verify your email address and set up your account.
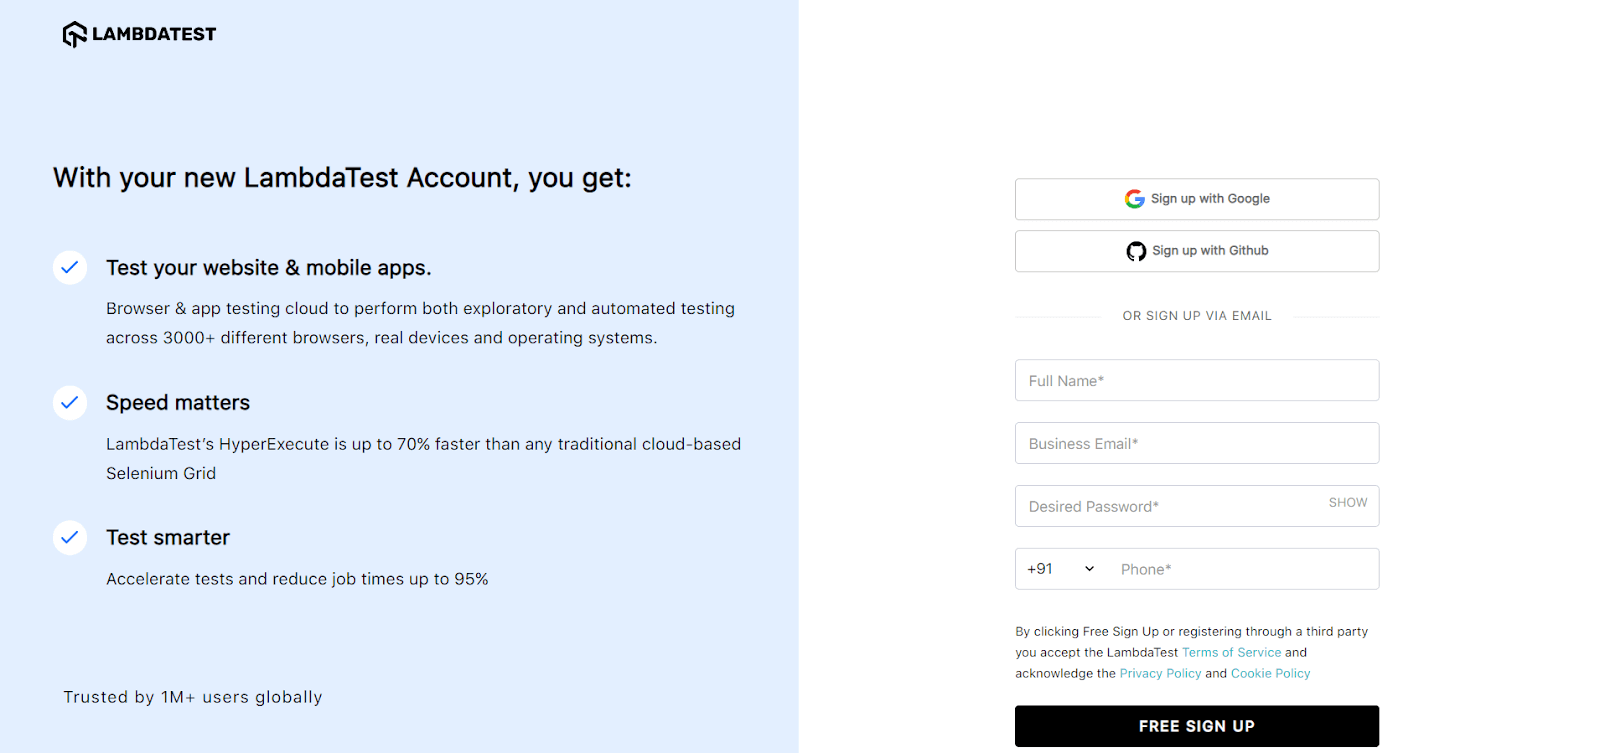
Step 2: Configuring your Test Environment
Before you can run your Selenium tests on the LambdaTest cloud grid, you will need to configure your test environment. This involves setting up your desired capabilities, which specify the browser, version, and operating system you want to use for your tests.
You can configure your desired capabilities using the LambdaTest Desired Capabilities Generator.
Step 3: Writing your Selenium Test
Once you have configured your test environment, you can write your first Selenium test. You will need to use a Selenium WebDriver to interact with the browser and perform actions such as clicking buttons and filling out forms.
Running your Selenium test on the cloud
Running your Selenium tests on the LambdaTest cloud grid is a straightforward process that involves the following steps:
Step 1: Clone the LambdaTest pytest-selenium-sample repository and navigate to the code directory as shown below:
$ git clone https://github.com/LambdaTest/pytest-selenium-sample
$ cd pytest-selenium-sample
Step 2: In your project folder, create a virtual environment.
$ python -m venv envStep 3: Activate the environment.
$ source env/bin/activate
Step 4: Install the required packages from the cloned project directory:
$ pip install -r requirements.txtStep 5: Set LambdaTest Username and Access Key in environment variables.
For Linux/macOS:
$ export LT_USERNAME="YOUR_USERNAME"
$ export LT_ACCESS_KEY="YOUR ACCESS KEY"
$ export TEST_EXECUTION_MODE="Cloud"
For Windows:
$ set LT_USERNAME="YOUR_USERNAME"
$ set LT_ACCESS_KEY="YOUR ACCESS KEY"
$ set TEST_EXECUTION_MODE="Cloud"
Step 6: This involves updating the test capabilities in the Python script. The script should include information about the browser, browser version, and operating system, as well as the LambdaTest Selenium grid capabilities. These details are passed via a capabilities object.
The capabilities object is defined in the code provided as follows:
capabilities = {
"build": "your build name",
"name": "your test name",
"platformName": "Windows 10"
"browserName": "Chrome",
"browserVersion": "latest",
}
You can use our built-in Desired Capability Generator to create capabilities that meet the requirements of your test.
Step 6: To execute the test, run the following command in your terminal/cmd:
$ pytest tests/CloudGrid/test_sample_todo.py -v
Your test results will be visible on the test console (or command-line interface if you're using terminal/cmd) and on the LambdaTest automation dashboard. The LambdaTest Automation Dashboard provides a comprehensive overview of your automation tests, including text logs, screenshots, and video recordings.
Analyzing your Test Results
After you have run your Selenium test on the LambdaTest cloud grid, you can analyze your test results using the LambdaTest dashboard. The dashboard provides detailed information about your test results, including the number of tests passed, failed, and skipped.
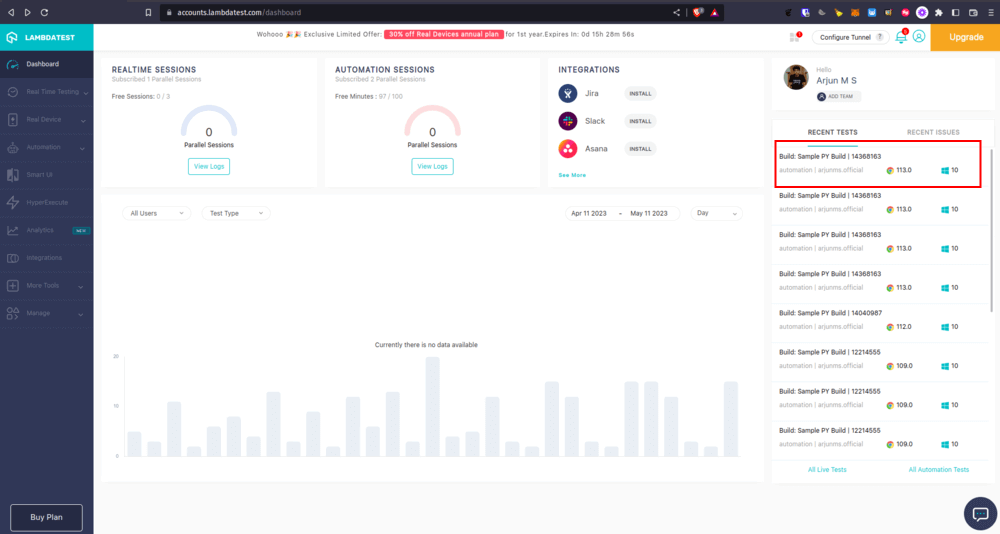
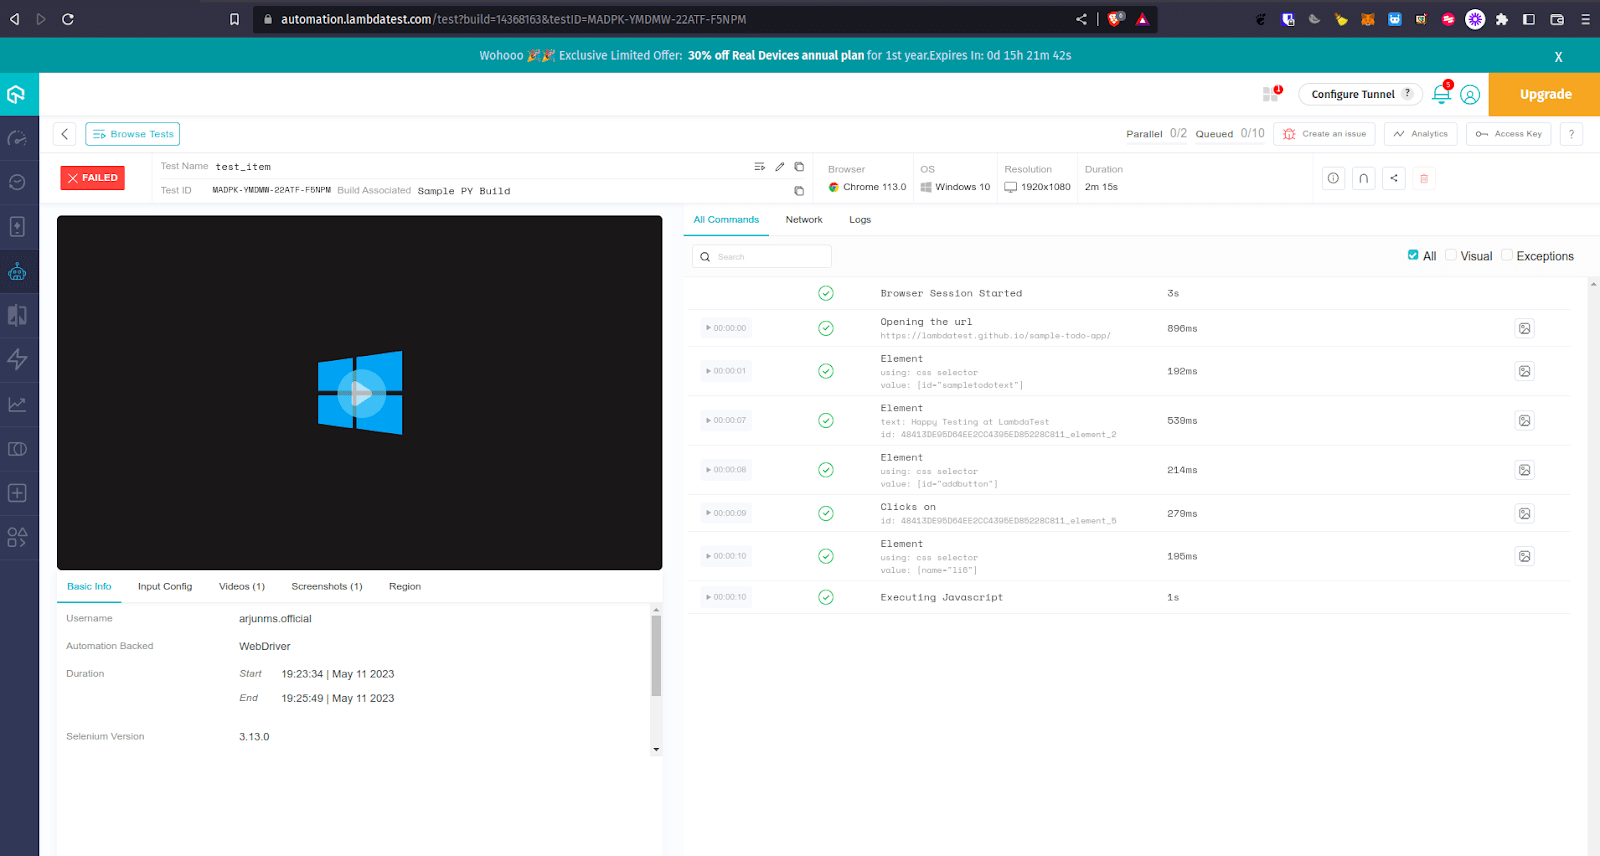
If you aspire to excel in automation testing and enhance your Python skills, participating in a Selenium Python 101 certification program is an excellent step to initiate your journey toward becoming an automation testing expert. This program will provide you with a strong foundation in utilizing Selenium Python for testing purposes and open doors to a promising career in this field.
Conclusion
In this Selenium Python tutorial on what is pytest, we provided a concise overview of Selenium Python testing and the widely used pytest framework. We exemplified the usage of pytest with Selenium, utilizing the LambdaTest To-Do App URL for demonstration purposes.
pytest follows specific naming conventions for test methods and test files, enabling the automatic discovery of test modules and methods. With the availability of fixtures and classes, pytest proves to be an excellent framework for automation testing, including cross-browser testing. You should now feel confident in conducting Selenium Python testing using pytest. If you have any doubts, don't hesitate to reach out to us.
On this page
- Overview
- What is pytest?
- Why use pytest?
- Environment Setup
- Pre-requisites
- How does pytest identify the test files and test methods?
- Running first automation script using pytest
- Demonstration: Selenium automation testing using pytest
- How to run your Selenium test on the cloud?
- Frequently Asked Questions (FAQs)
Frequently asked questions
- General
Author's Profile

Arjun M S
Arjun M S is Campus Lead at Tinkerhub a highly curious being who is passionate about learning new skills & a self-motivated computer science engineer with a keen interest in coding. He has also built SQL Ease, an AI-powered SQL query generator app, has been an incredible journey that has so far received more than 5K+ visits. You can follow him on twitter
Reviewer's Profile

Himanshu Sheth
Himanshu Sheth is a seasoned technologist and blogger with more than 15+ years of diverse working experience. He currently works as the 'Lead Developer Evangelist' and 'Director, Technical Content Marketing' at LambdaTest. He is very active with the startup community in Bengaluru (and down South) and loves interacting with passionate founders on his personal blog (which he has been maintaining since last 15+ years).
Did you find this page helpful?
More Hubs
Try LambdaTest Now !!
Get 100 minutes of automation test minutes FREE!!

 Christmas Deal is on: Save 25% off on select annual plans for 1st year.
