- Automation
- Home
- /
- Learning Hub
- /
- Pytest API Testing: With Demostration
- -
- April 12 2023
Pytest API Testing: With Demostration
This pytest API testing tutorial demonstrates how to use Request Library in a test API and a real API, highlighting the most important points for you to learn about pytest API testing using Python.
OVERVIEW
In the world of software development, APIs (Application Programming Interfaces) play a crucial role in enabling communication between different software components. API testing is an essential part of the software development process that ensures the API functions as intended, meets the required specifications, and handles errors gracefully.
In addition to testing the technical aspects of APIs, such as the HTTP protocol and response codes, developers and testers also rely on APIs for testing different parts of the business logic. This includes testing different scenarios and edge cases to ensure that the API handles them appropriately. By testing the business logic through APIs, developers and testers can ensure that the application is functioning correctly as a whole, which can help to improve the overall quality and reliability of the software.
Pytest is a popular Python testing framework that offers a simple and flexible way to write and run API tests. With its rich set of features and plugins, pytest makes it easy to create comprehensive test suites and generate detailed reports.
This tutorial on pytest API testing serves as a go-to guide for API testing using pytest. It provides a step-by-step approach to setting up and writing API tests using pytest. This pytest API testing tutorial covers a range of topics, from installing pytest and its dependencies to configuring test environments and making HTTP requests.
In addition to the basics, this Selenium pytest tutorial also shows some tools and libraries that can be used with pytest Python to test an API. In addition, it shows some of the main HTTP statuses codes to give you an initial view of common codes that you should know when testing an API.
This pytest API testing tutorial also demonstrates how to use Request Library in a test API and in a real API used by the market, highlighting the most important points for you to learn about pytest API testing using Python.
By the end of this tutorial on pytest API testing, you will have a solid understanding of how to use pytest for API testing. You will be equipped with the knowledge to create comprehensive and reliable API test suites.
Whether you are a seasoned API tester or just getting started, the learnings of this tutorial will help improve your testing skills and ensure the quality of your APIs.
Let's get started!
What is API Testing?
API (Application Programming Interface) testing is a crucial component of software development that involves testing the functionality, reliability, performance, and security of an application's APIs. APIs allow different software components to communicate and exchange data, and API testing involves sending requests to the API and validating its response to ensure it meets the expected results.
API testing is essential because APIs are the backbone of modern applications, enabling communication between different software components. Any issues with APIs can significantly impact the application's functionality and performance. Additionally, APIs are often exposed to external users and third-party applications.
To test an API, we can run several types of testing, including:
- Functional testing: Validates the functionality of the API, such as its ability to handle requests and return the expected response.
- Performance testing: Evaluates the performance of the API under different load conditions, such as high traffic and concurrent requests.
- Integration testing: Ensures that the API works seamlessly with other software components, such as databases and third-party applications.
- Security testing: Verifies the security of the API, such as checking for vulnerabilities and ensuring compliance with security regulations.
Run Python Test Scripts across 3000+ browsers & devices. Try LambdaTest Now!
Best Practices of API Testing
To perform effective API testing, QAs should follow some best practices, such as:
- Defining clear and specific test cases and scenarios.
- Using automated testing tools to increase efficiency and reduce the risk of human error.
- Testing API endpoints individually and in combination.
- Using realistic data and scenarios in tests.
- Monitoring API performance and response time.
- Validating API responses against expected results.
HTTP Response Status Codes
HTTP response status codes are three-digit numbers representing the outcome of a client's request to a web server. These status codes provide essential information about the server's response to the client's request, such as success or failure and the reason for the result. By understanding these codes, developers can more effectively troubleshoot and debug API-related issues.
There are several categories of HTTP response status codes, each representing a different type of response. The most common categories are 1xx, 2xx, 4xx, and 5xx, with each representing a different type of response.
- 1xx represents informational responses.
- 2xx represents successful responses.
- 4xx represents client errors.
- 5xx represents server errors.
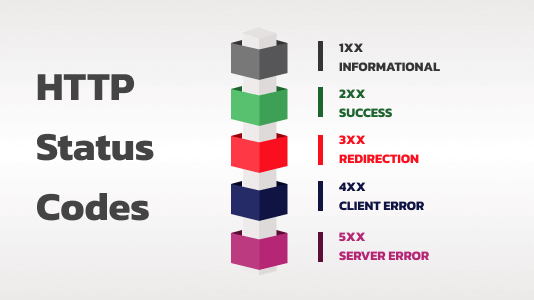
Below are listed the most common HTTP response status codes:
| STATUS CODE | MEANING |
|---|---|
| 100 | Indicates that the server has received the client's request and is processing it. |
| 101 | Means that the server is switching protocols. |
| 102 | Means that the server is processing a large request and will send a response as soon as possible. |
| 200 | Indicates that the server successfully processed the request, and the response is being sent back to the client. |
| 201 | Indicates that the server successfully created a resource. |
| 204 | Means that the server processed the request but has no content to return. |
| 400 | Indicates that the client sent an invalid request to the server. |
| 401 | Means that the client is unauthorized to access the resource. |
| 404 | Means that the requested resource is not available on the server. |
| 500 | Indicates that an internal server error occurred while processing the client's request. |
| 503 | Means that the server is temporarily unavailable. |
| 504 | Means that the server did not receive a timely response from another server while attempting to complete the request. |
To understand all the existent HTTP response status codes, look at this video:
Subscribe to the LambdaTest YouTube channel to learn more about Selenium testing, Cypress testing, and much more.
Understanding HTTP response status codes is critical to building and testing APIs effectively. By knowing the meaning of each code, developers and testers can more easily identify and resolve any issues that may arise during API development and testing.
Why use pytest for API Testing?
Python is a well-known programming language with excellent readability and a cross-platform language. Python is constantly being updated and has excellent community support. Currently, 3.11 is the latest version of Python. According to Stack Overflow Trends, Python has gained prominence over the years and has become the most popular programming language.
It is also one of the most used programming languages for test automation, given a wide range of libraries and frameworks. If you want to understand more about Python, you can check out this Python automation testing tutorial.
Pytest is a powerful testing framework for Python. The best advantages of pytest are that it is:
- Easy to use
- Highly flexible
- Efficient
- Parameterization
- Detailed reporting
- Plugin-support
- Assertion introspection
- Fixtures
- Well-documented
- Large and active community
Pytest is an excellent choice for API testing in Python. It helps to simplify test creation and reporting, reducing the time and effort required for testing and improving the overall quality of your API.
API Testing Tools and Libraries
There are many tools and libraries available for API testing. These tools and libraries make writing and running automated tests for APIs easier, ensuring their functionality, reliability, and security.
Here are some of the most popular API testing tools and libraries:
Requests
Requests is a popular Python library for making HTTP requests. It can be used to test APIs by sending HTTP requests to API endpoints and validating the responses.
Requests provide a simple and intuitive interface for making requests and handling responses, making it easy to write test cases and scenarios for pytest API testing.
Robot Framework
Robot Framework is a versatile and powerful automation testing framework used for API testing. With its keyword driven testing approach, it provides an intuitive syntax for defining tests and allows for efficient test execution.
Additionally, it supports data-driven testing, enabling testers to use different sets of test data to identify any issues that may arise due to unexpected data or other factors.
Robot Framework is highly customizable and can be extended with custom libraries and plugins. It seamlessly integrates with Python libraries, making it a flexible and adaptable tool for API testing. Its ability to be customized to meet the specific needs of individual testing teams and projects makes it an excellent choice for API testing.
Overall, Robot Framework provides testers with a comprehensive set of tools and features that can help them improve the quality and reliability of their APIs while reducing the time and effort required to write and execute tests.
Tavern
Tavern is an open-source Python library designed for testing RESTful APIs. It offers a range of features such as assertions, data-driven testing, support for different authentication methods, and data formats.
With Tavern, testers can define custom assertions that compare response data to expected values to ensure the API is functioning as expected. Additionally, data-driven testing enables testers to use different sets of data to verify the API's behavior under different conditions.
Tavern's support for various authentication methods and data formats, including HTTP Basic Authentication, OAuth2, and JSON and YAML data formats, makes it easy for testers to simulate different types of user authentication and write and execute tests using their preferred data format.
Furthermore, Tavern can be easily customized with plugins, allowing testers to tailor it to their specific needs. The flexibility and adaptability of Tavern make it a highly customizable tool for testing RESTful APIs that can help testers improve the quality and reliability of their APIs.
Django Test Client
Django Test Client is a built-in testing client in the Django web framework that can be used for API testing. Django Test Client provides a range of features for creating and running test cases, such as test fixtures and test runners.
It can be used to test APIs with different protocols, such as HTTP and REST, and provides a range of options and plugins for customizing tests.
You can learn more about testing Django apps through this pytest Django tutorial.
Karate
Karate is a framework for API testing based on the Cucumber framework. It provides several features to create and execute test cases, including assertions, test fixtures, and data-driven testing. Karate also supports different authentication methods, data formats, and plugins for customizing tests.
Testify
Testify is a Python testing framework that can be used for API testing. It offers a variety of features to develop and execute test cases, which enable developers to write efficient and reliable tests. Testify can be used to test APIs with different protocols, such as HTTP and REST, and provides a range of options and plugins for customizing tests.
Mamba
Mamba is a testing framework for Python that can be used for API testing. With Mamba, you can effortlessly create and run test cases by leveraging its extensive set of features.
These features empower developers to write robust and scalable tests, ensuring the quality of their codebase. Mamba also supports different authentication methods, data formats, and plugins for customizing tests.
VCR.py
VCR.py is a Python library that can be used for recording and replaying HTTP interactions, which is useful for API testing. VCR.py provides a simple and easy-to-use interface for recording and replaying HTTP interactions, handling cookies and headers, and formatting and coloring responses. VCR.py can be used with other Python testing frameworks.
In conclusion, many tools and libraries are available for API testing in Python, each with its own set of features and capabilities.
These tools and libraries make writing and running automated tests for APIs easier, ensuring their functionality, reliability, and security. QAs can choose the tool or library that best fits their needs and preferences and use it to write comprehensive and reliable test suites for their APIs.
Requests Library
There are many tools and libraries to use in Python API testing. In this pytest API testing demonstration, we have used the Requests library. In this section of the pytest API testing tutorial, we will explain more about this library.
This widely used Python library, Requests, enables developers to send HTTP requests to web services and effortlessly receive responses, making it a favored option for building and testing APIs.
Not only does it simplify the process of making HTTP requests, but it also provides developers with numerous features and options to customize HTTP requests and responses, ensuring a tailored and efficient experience.
Additionally, the library is user-friendly, making it an excellent choice for novice and experienced developers.
Benefits of using the Requests library for pytest API testing
In this section of the pytest API testing tutorial, let’s see the benefits of using the Requests library for pytest API testing.
- Simple and easy-to-use interface
Requests provide a simple and easy-to-use interface for making HTTP requests and handling responses. The library is well-documented and has a wide range of examples and tutorials available online, making it easy for developers to get started.
- Cross-platform support
Requests is a cross-platform library that can be used on different operating systems, such as Windows, macOS, and Linux. This makes it a versatile and flexible choice for building and testing APIs on different platforms.
- Customizable options
Requests provide a range of customizable options for working with HTTP requests and responses, such as setting headers, handling cookies, and parsing response data. This allows developers to fine-tune requests and responses based on the needs of the API being tested or built.
- Support for various authentication methods
Requests support different authentication methods, such as basic authentication, digest authentication, and OAuth. This makes it easy to test and build APIs that require authentication.
Code Sample
Here's a code example that demonstrates how to use Requests to make a GET request to an API:
import requests
# Define the API endpoint URL
url = 'https://jsonplaceholder.typicode.com/posts/1'
# Make a GET request to the API endpoint
response = requests.get(url)
# Check the response status code
if response.status_code == 200:
    # Print the response content
    print(response.json())
else:
    # Handle the error
    print('Error: {0}'.format(response.status_code))
In this example, we imported the Requests library and defined the API endpoint URL. We then make a GET request to the API using the requests.get() function, which returns a response object. We checked the status code of the response to make sure the request was successful and then printed the response content using the response.json() function.
Demonstration: Using a Testing API
In this section of the pytest API testing tutorial, we will demonstrate how to use the Requests library to automate tests with pytest Python.
Reqres.in is a platform that allows testing an API. The platform hosts a REST API that is readily available to respond to requests. In API testing, it is common to use fake data to simulate different scenarios and test the API's behavior under various conditions. This helps to ensure that the API is reliable and performs as expected in different situations. With fake data provided, QAs no longer need to waste time creating tedious sample data.
The Reqres.in API also provides real responses and supports various HTTP methods, including GET, POST, PUT, and DELETE. Reqres.in is always available, providing 24/7 free access. Also, Reqres.in can use real response codes and the freedom to test as much as desired.
The next sections of the pytest API testing tutorial will provide all the information to set up the project, then create the code to test the APIs.
Project Setup
All the configuration and codes prepared in this pytest API testing tutorial will be used to demonstrate how to create and run an API test using pytest Python.
To start our coding, we need to proceed with the following steps to prepare the environment.
Step 1: Download and Install Python
Step 2: Install Requests and pytest libraries
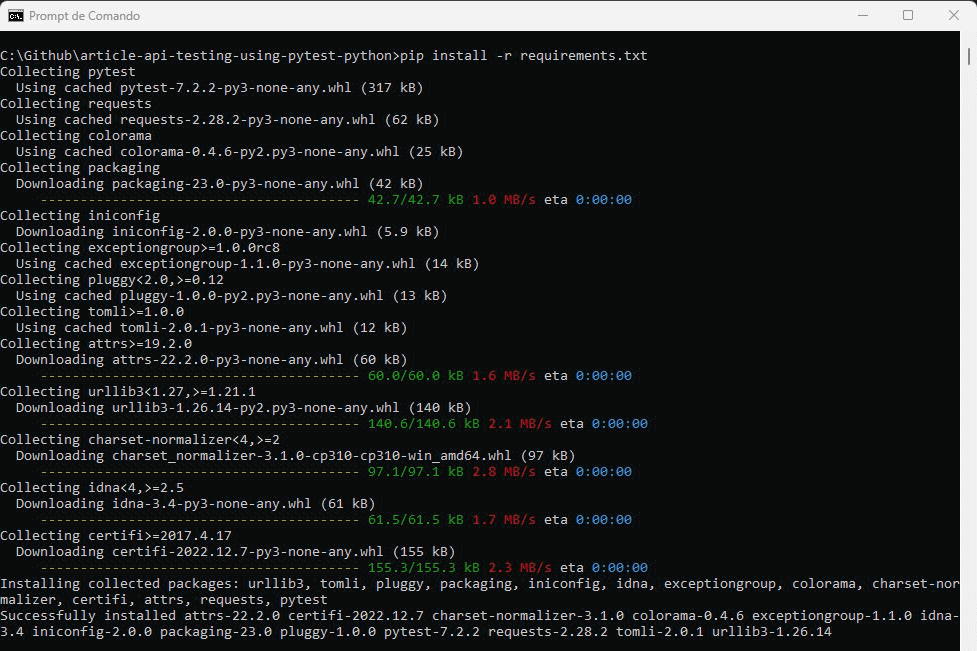
Both libraries can be installed simply using the pip install manager. pip is a package management system used to install/manage packages and libraries written in Python
A "requirements.txt" file was generated to simplify the installation process of all the requested libraries.
pip install -r requirements.txt
After executing the command, your cmd should seem like shown in the picture below:
Step 3: Download and Install Visual Studio Code
Visual Studio Code (VSC) will be the IDE we will use in this blog. However, you are free to use your preferable IDE!
Step 4: Configure pytest in Visual Studio Code
We need to configure pytest to be our test runner in Visual Studio Code.
Test Scenarios
These are the test scenarios that we will cover in this section of the pytest API testing tutorial:
|
Get a List of Users
The first endpoint that we will test is the Get List of Users. You can see the API documentation below.
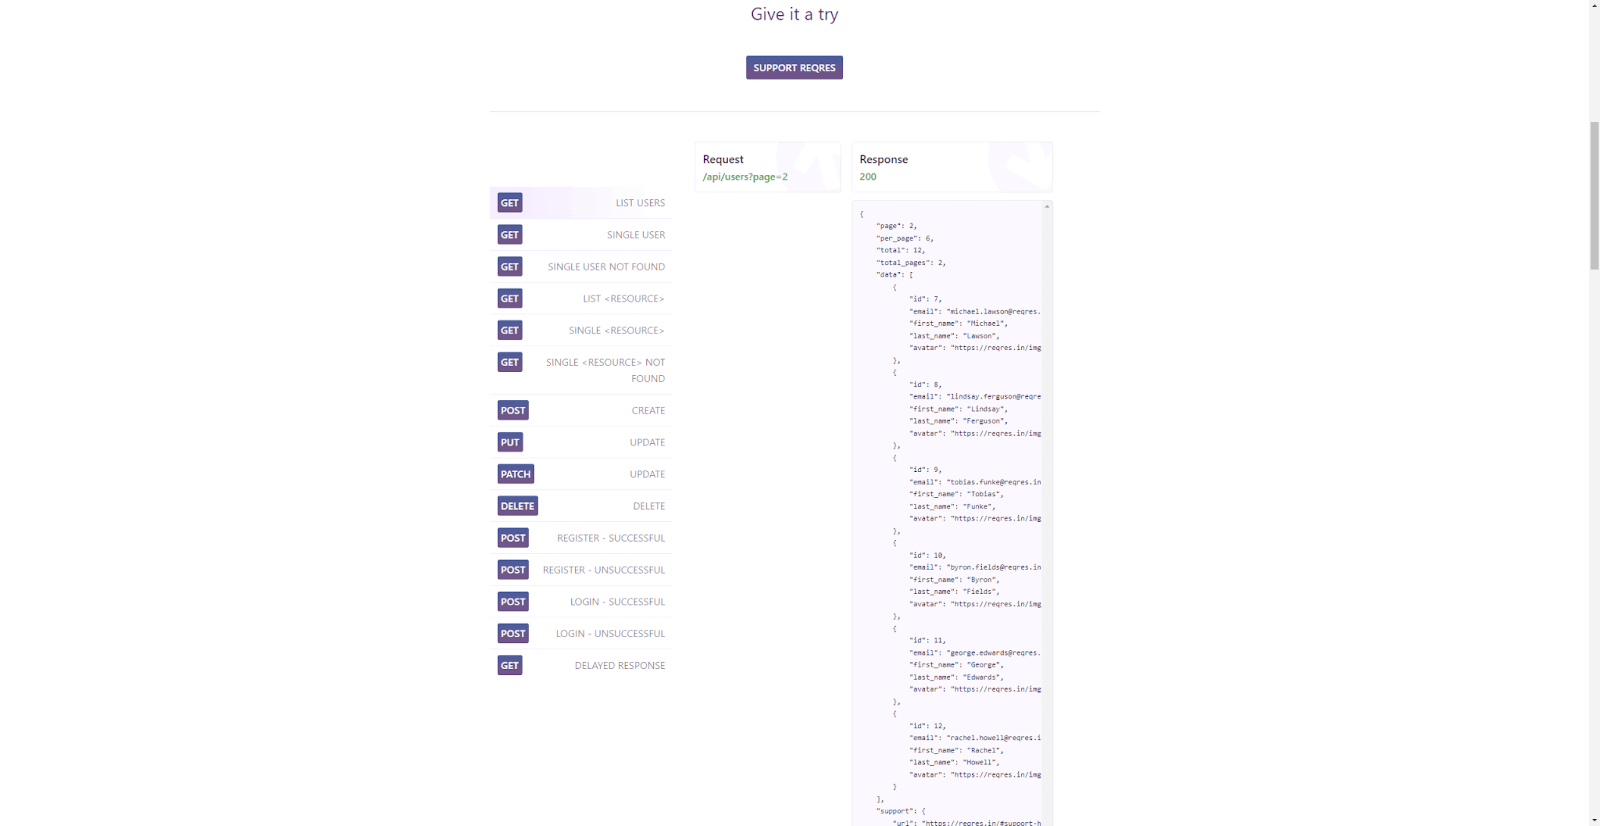
Implementation:
import requests


def test_get_list_of_users():
    url = "https://reqres.in/api/users"
    response = requests.get(url)
    assert response.status_code == 200
Code Walkthrough:
Step 1: To start using the Requests library, you should import it.
import requests
Step 2: Anytime you want to create a test to be run by pytest, you have to create a new function with a name that starts with “test_” for pytest to understand that this is a test case.
def test_get_list_of_users():
Step 3: Inside the test, you should set the URL of the endpoint you are going to test.
url = "https://reqres.in/api/users"
Step 4: Also, you need to call the suitable method from the Requests library. In this case, we will call the .get() method, given that it is a GET endpoint. As a parameter of the .get() method, you should pass the “url” you defined in the previous step. You should store the response to the request in a variable. In our case, we are naming it as “response”.
response = requests.get(url)
Step 5: To finish our test, we should check if the response to the request is as expected. We should use the “assert“ statement to compare the response.status_code with the expected status code, which in this case is 200.
assert response.status_code == 200
To see the result of the test we already created, we can just run the below command in the cmd.
pytest
The result shows that the test case was executed and passed, as expected.

Create a New User
The next endpoint that we will test is the Create a New User. You can see the API documentation below.
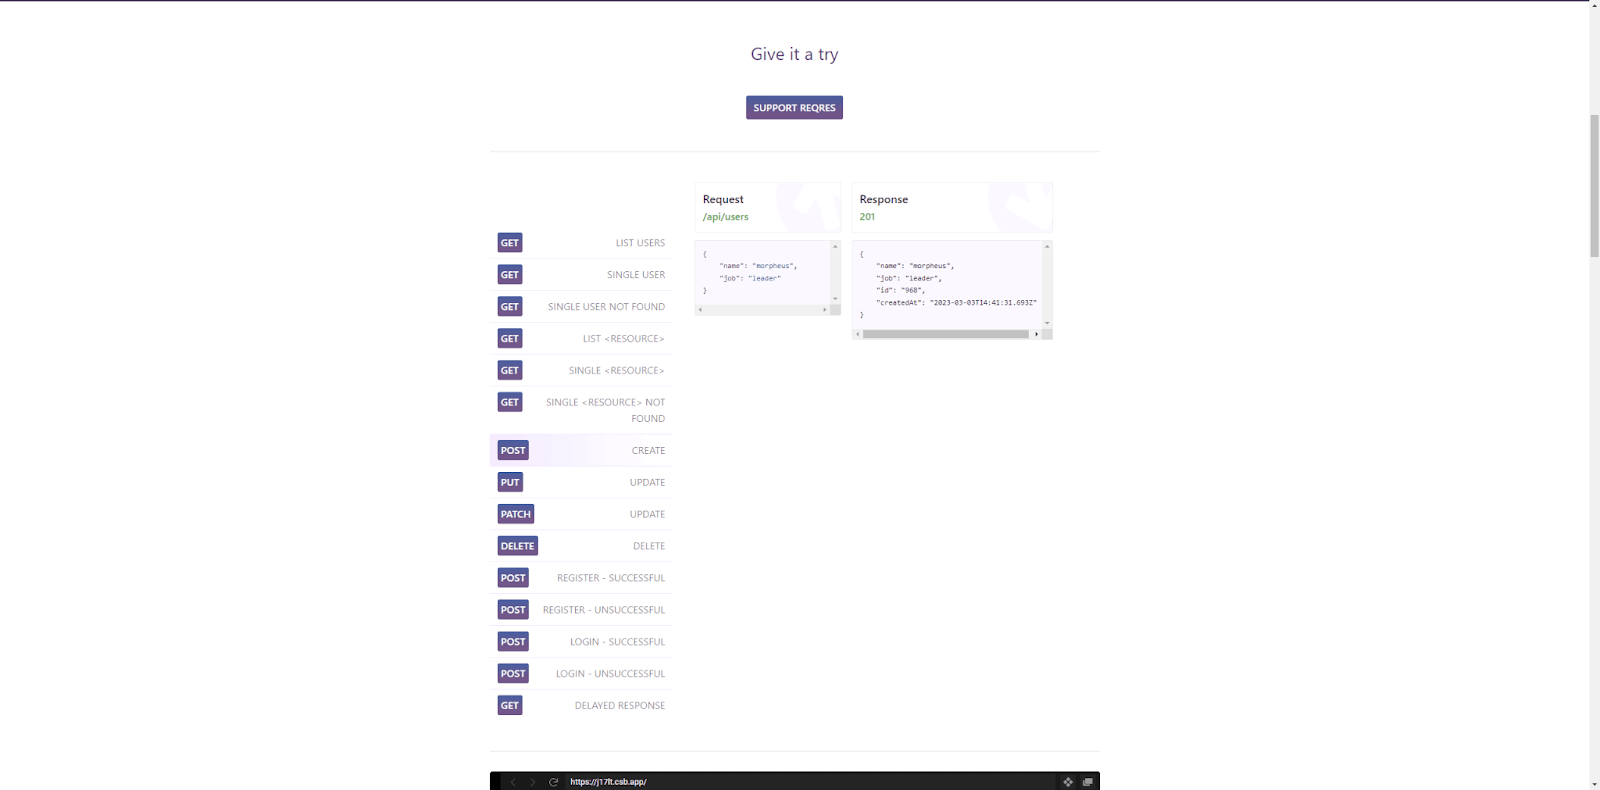
Implementation:
def test_create_new_user():
    url = "https://reqres.in/api/users"
    data = {
        "name": "Paulo Oliveira",
        "movies": ["I Love You Man", "Role Models"]
    }
    response = requests.post(url, data=data)
    assert response.status_code == 201
Code Walkthrough:
Step 1: Create a new function with a name that starts with “test_”.
def test_create_new_user():
Step 2: Inside the test, you should set the URL of the endpoint you are going to test.
url = "https://reqres.in/api/users"
Step 3: You should create a JSON payload that fits what is expected by the API documentation. You should inform the user name and a list of movies to create a new user. You should store this in a variable. In our case, it was named data.
data = {
        "name": "Paulo Oliveira",
        "movies": ["I Love You Man", "Role Models"]
    }
Step 4: Also, you need to call the suitable method from the Requests library. In this case, we will call the .post() method, given that it is a POST endpoint. As a parameter of the .post() method, you should pass the “url” you defined in Step 2 and the data you need to send to the API that, in our case, is stored in the data variable. You should set the “data” parameter with the “data” variable. You should store the response to the request in a variable. In our case, we are naming it as “response” again.
response = requests.post(url, data=data)Step 5: To finish our test, we should check if the request response is 201 as expected.
assert response.status_code == 201To see the result of the test we already created, we can just run the below command in the cmd.
pytestThe result shows that the two test cases were executed and passed, as expected.

Update User
The next endpoint that we will test is the Update User. You can see the API documentation below.
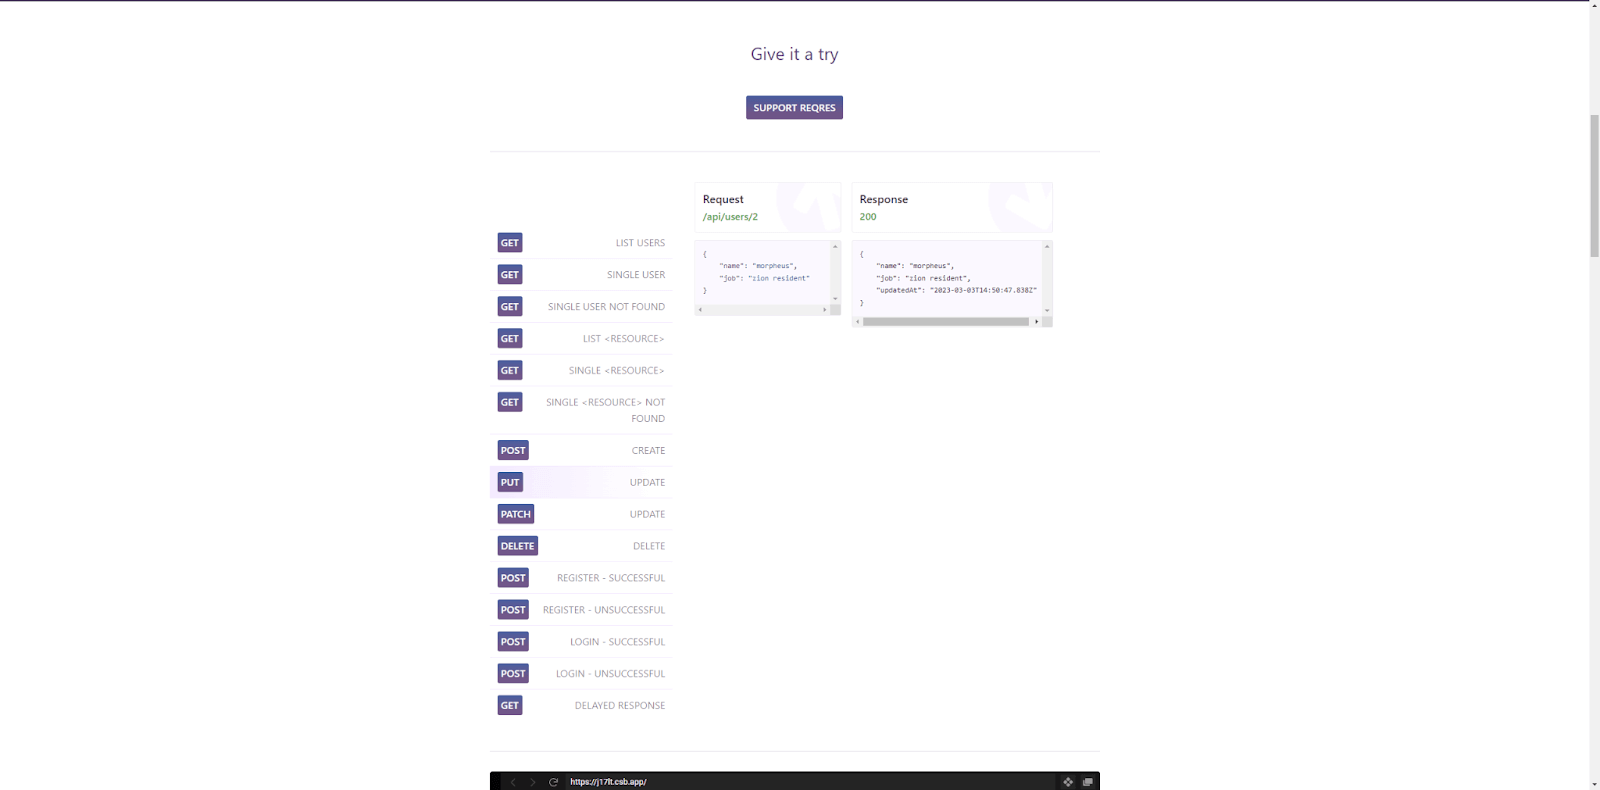
Implementation:
def test_update_user():
    url = "https://reqres.in/api/users/2"
    data = {
        "name": "Paulo Updated"
    }
    response = requests.put(url, data=data)
    assert response.status_code == 200
Code Walkthrough:
Step 1: Create a new function with a name that starts with “test_”.
def test_update_user():Step 2: Inside the test, you should set the URL of the endpoint you will test. Differently from the other URLs, in this case, we have to inform the id of the user we want to update. For example, we could use the id 2.
url = "https://reqres.in/api/users/2"Step 3: You should create a JSON payload that fits what is expected by the API documentation. To update a user, you should inform the API of what you want to update. In this example, we want to update just the user name. You should store this in a variable. In our case, it was named as data again.
data = {
        "name": "Paulo Updated"
    }
Step 4: Also, you need to call the suitable method from the Requests library. In this case, we will call the .put() method, given that it is a PUT endpoint. As a parameter of the .put() method, you should pass the “url”, and the data you need to send to the API. Finally, you should store the response to the request in a variable.
response = requests.put(url, data=data)Step 5: To finish our test, we should check if the request response is 200 as expected.
assert response.status_code == 200To see the result of the test we already created, we can just run the below command in the cmd.
pytestThe result shows that the three test cases were executed and passed, as expected.

Delete User
To finish this first demonstration, the last endpoint that we will test is the Delete User. You can see the API documentation below.
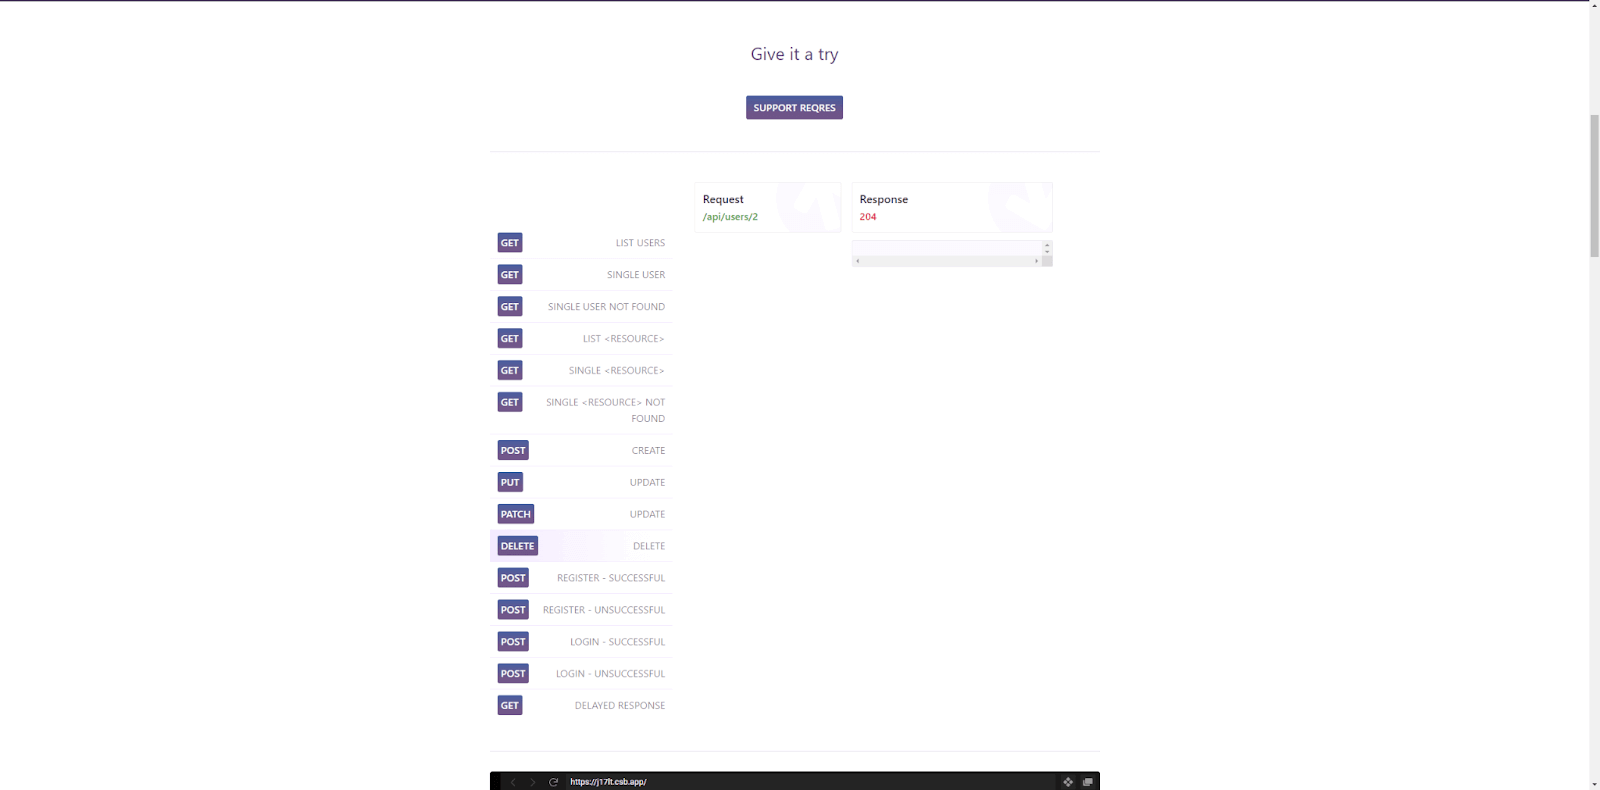
Implementation:
def test_delete_user():
    url = "https://reqres.in/api/users/2"
    response = requests.delete(url)
    assert response.status_code == 204
Code Walkthrough:
Step 1: Create a new function with a name that starts with “test_”.
def test_delete_user():Step 2: Inside the test, you should set the URL of the endpoint you will test. As in the Update User, here we have to inform the id of the user we want to delete. For example, we could use the id 2.
url = "https://reqres.in/api/users/2"Step 3: You need to call the suitable method from the Requests library. In this case, we will call the .delete() method, given that it is a DELETE endpoint. As a parameter of the .delete() method, you should pass only the “url” of the endpoint. You should store the response to the request.
response = requests.delete(url)Step 4: To finish our test, we should check if the request response is 204 as expected.
assert response.status_code == 204To see the test result we already created, we can just run the below command in the cmd.
pytestThe result shows that the four test cases were executed and passed, as expected.

Demonstration: Using a Real API
In this last section of the pytest API testing tutorial, we will demonstrate how to use the Requests library to automate tests with pytest Python using a real API that will be the LambdaTest API.
LambdaTest is a digital experience testing cloud platform that helps developers and testers ship code faster. Cloud-based cross browser testing platforms like LambdaTest provides an online browser farm of 3000+ browsers and operating systems to perform Selenium Python testing at scale.
Visit our support documentation to get started with Selenium Python testing and a list of Automation APIs for Selenium.
For this pytest API testing tutorial section, we opted to use the Build set of APIs within the Selenium Automation set offered by LambdaTest, which comprises four APIs. LambdaTest provides a diverse range of APIs for users to choose from.

Then, after running one test for the first time, you will have at least one build in your LambdaTest account. Then these APIs will return valid data, working fine as expected.
The following sections will provide all the information to set up the project, then create the code to test the APIs.
Project Setup
All the configurations done in the Project Setup section of the previous demonstration section will be used in this second project.
To use the LambdaTest API, you should follow the below steps:
Step 1: Create a LambdaTest account
The first step is to create a LambdaTest account.
Step 2: Get information from your LambdaTest profile
To be able to use LambdaTest API, you will need two pieces of information from your profile: your username and access token. You can get the “Username” and “Access Token” from your LambdaTest Profile Section.
Test Scenarios
These are the test scenarios that we will cover in this section of the pytest API testing tutorial:
|
Get LambdaTest All Builds
The first endpoint we will test is the Get All Builds. You can see the API documentation below.
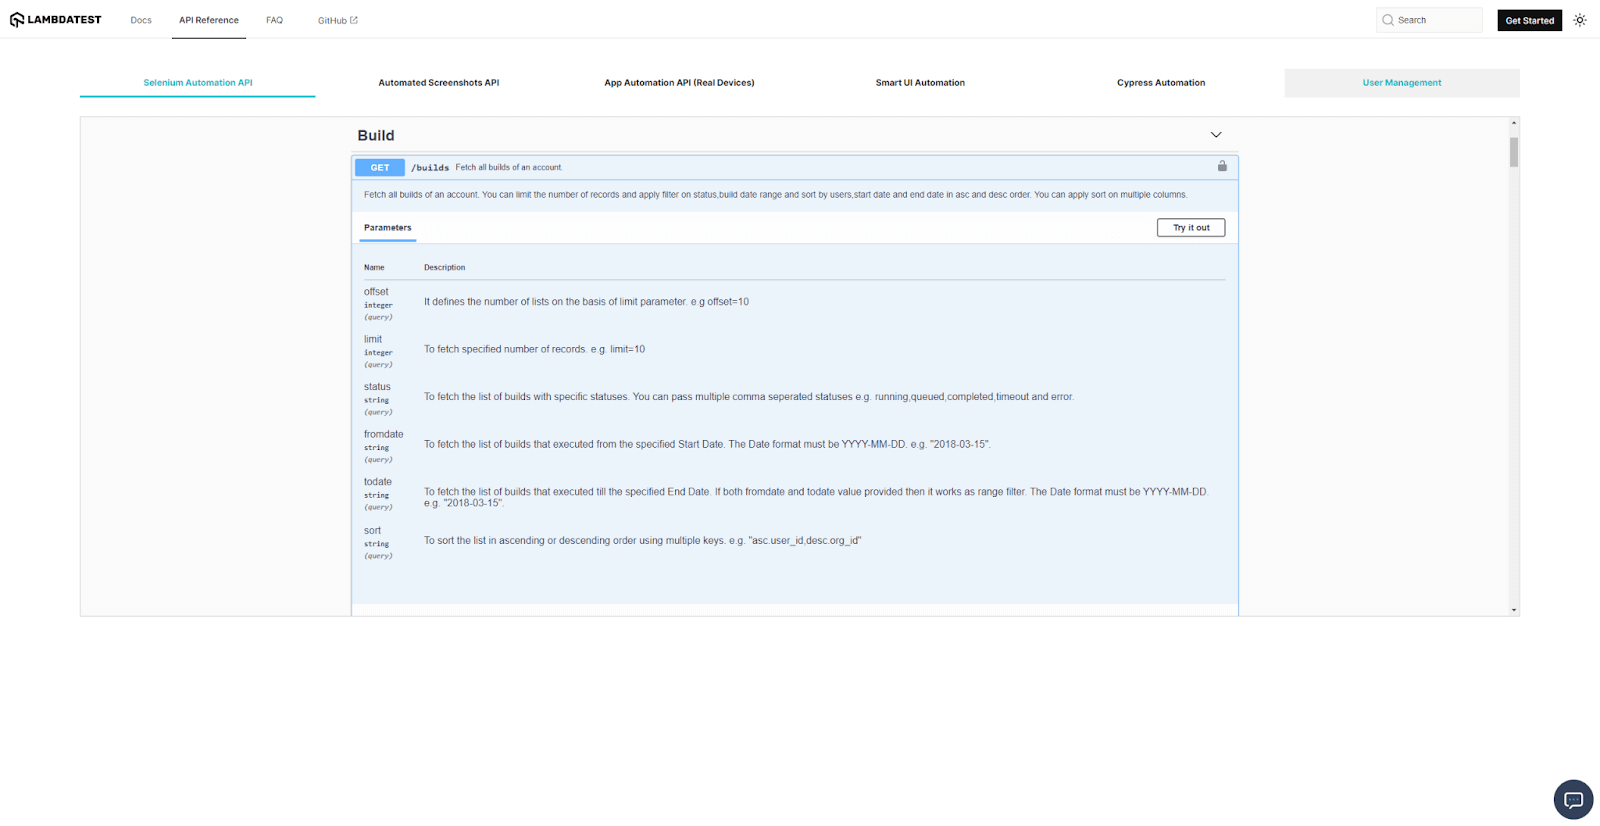
Implementation:
import requests


username = "your lambdatest username"
access_token = "your lambdatest access token"


def test_get_lambdatest_all_builds():
    url = "https://%s:%s@api.lambdatest.com/automation/api/v1/builds" % (username, access_token)
    headers = {"accept": "application/json"}
    response = requests.get(url, headers=headers)
    assert response.status_code == 200
Code Walkthrough:
Step 1: To start using the Requests library, you should import it.
import requestsStep 2: To start using LambdaTest API, you should use the information you got in the Project Setup section and fill in these two variables: username and access_token.
username = "LT_USERNAME"
access_token = "LT_ACCESS_KEY"
Step 3: Create a new function with a name that starts with “test_” for pytest to understand that this is a test case.
def test_get_lambdatest_all_builds():Step 4: Inside the test, you should set the URL of the endpoint you are going to test. We are going to use string interpolation to mount our URL. We can use %s twice in the exact place that should have your LambdaTest username and access token. The URL should look like the one below.
url = "https://%s:%s@api.lambdatest.com/automation/api/v1/builds" % (username, access_token)Step 5: LambdaTest API asks for a header called “accept” that should have the value “application/json”. You can provide this information by creating a JSON with this header option, and storing it on a variable, that in our case, is named “headers”.
headers = {"accept": "application/json"}Step 6: Also, you need to call the suitable method from the Requests library. In this case, we will call the .get() method, given that it is a GET endpoint. As a parameter of the .get() method, you should pass the “url” you defined in Step 2, and also the headers you need to send to the API that, in our case, is stored in the headers variable. You should set the “headers” parameter with the “headers” variable. You should store the response to the request in a variable. In our case, we are naming it “response” again.
response = requests.get(url, headers=headers)Step 7: To finish our test, we should check if the request response is as expected. We should use the “assert“ statement to compare the response.status_code with the expected status code, which in this case is 200.
assert response.status_code == 200To see the result of the test we already created, we can just run the below command in the cmd.
pytestThe result shows that the five test cases were executed and passed, as expected. 4 tests from the reqres.in suite that we previously created, and 1 for this LambdaTest suite.

Get LambdaTest Build
The second endpoint that we will test is the Get Specific Build Details. You can see the API documentation below.
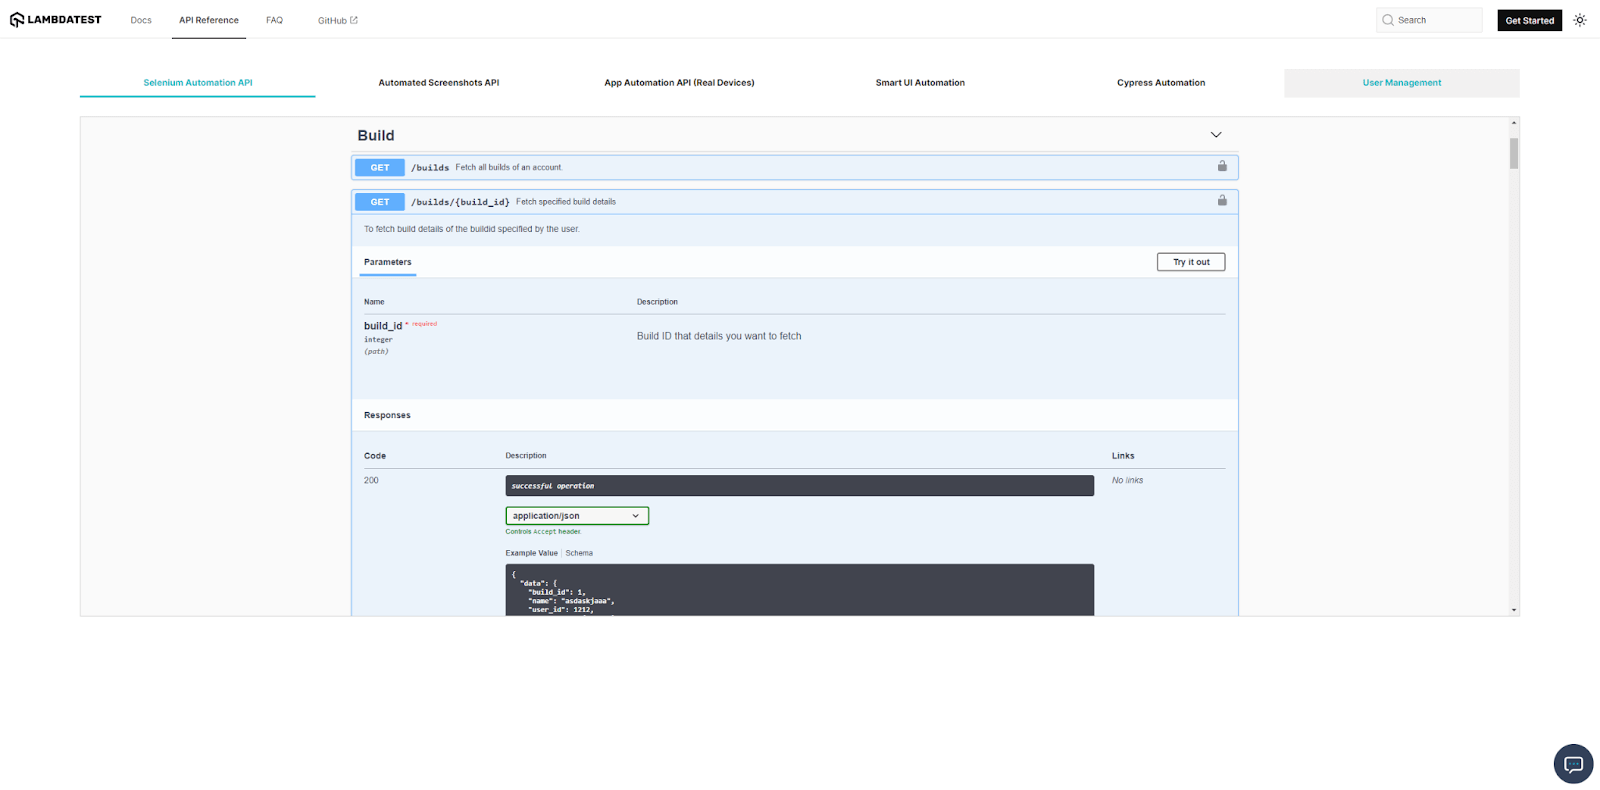
As shown in the documentation, we need to inform a build number. Before implementing this test, we will add a new line in the previous test and rerun it.
print(response.content)Adding this new line at the end of the last test, we will be able to see the content of the response when running the test. However, pytest limits the print just in failure test cases. To enable all prints, you should run the tests using the below command:
pytest -rPYou can see the result of the execution in the image below:
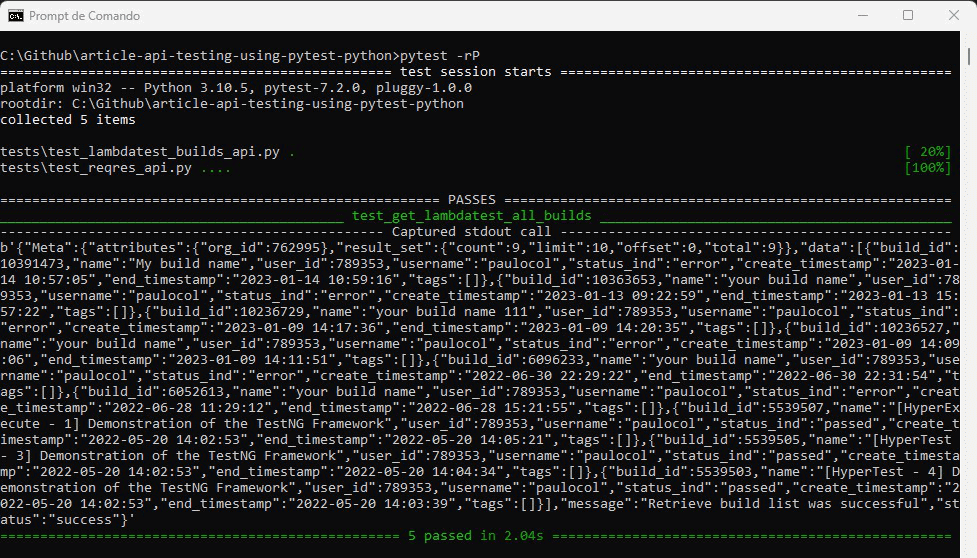
You can select any of the existing builds from this account. We will choose the first build to run the next test case: 16363653.
We can now remove the added line of code to not print the response content in all the executions we will do in this tutorial on pytest API testing.
Now we can start the implementation.
Implementation:
def test_get_lambdatest_build():
    url = "https://%s:%s@api.lambdatest.com/automation/api/v1/builds/10363653
" % (username, access_token)
    headers = {"accept": "application/json"}
    response = requests.get(url, headers=headers)
    assert response.status_code == 200
Code Walkthrough:
Step 1: Create a new function with a name that starts with “test_”.
def test_get_lambdatest_build():Step 2: Inside the test, you should set the URL of the endpoint you are going to test.
url = "https://%s:%s@api.lambdatest.com/automation/api/v1/builds/10363653
" % (username, access_token)
Step 3: Add the accept header.
headers = {"accept": "application/json"}Step 4: Also, you need to call the suitable method from the Requests library. In this case, we will call the .get() method, given that it is a GET endpoint. We should pass both parameters, url and headers, and store the response in a variable.
response = requests.get(url, headers=headers)Step 5: To finish our test, we should check if the request response is 200 as expected.
assert response.status_code == 200To see the result of the test we already created, we can just run the below command in the cmd.
pytestThe result shows that the six test cases were executed and passed, as expected. 4 tests from the reqres.in suite that we previously created, and 2 for this LambdaTest suite.

Update LambdaTest Build Name
The next endpoint we will test is the Update Build Name. You can see the API documentation below.
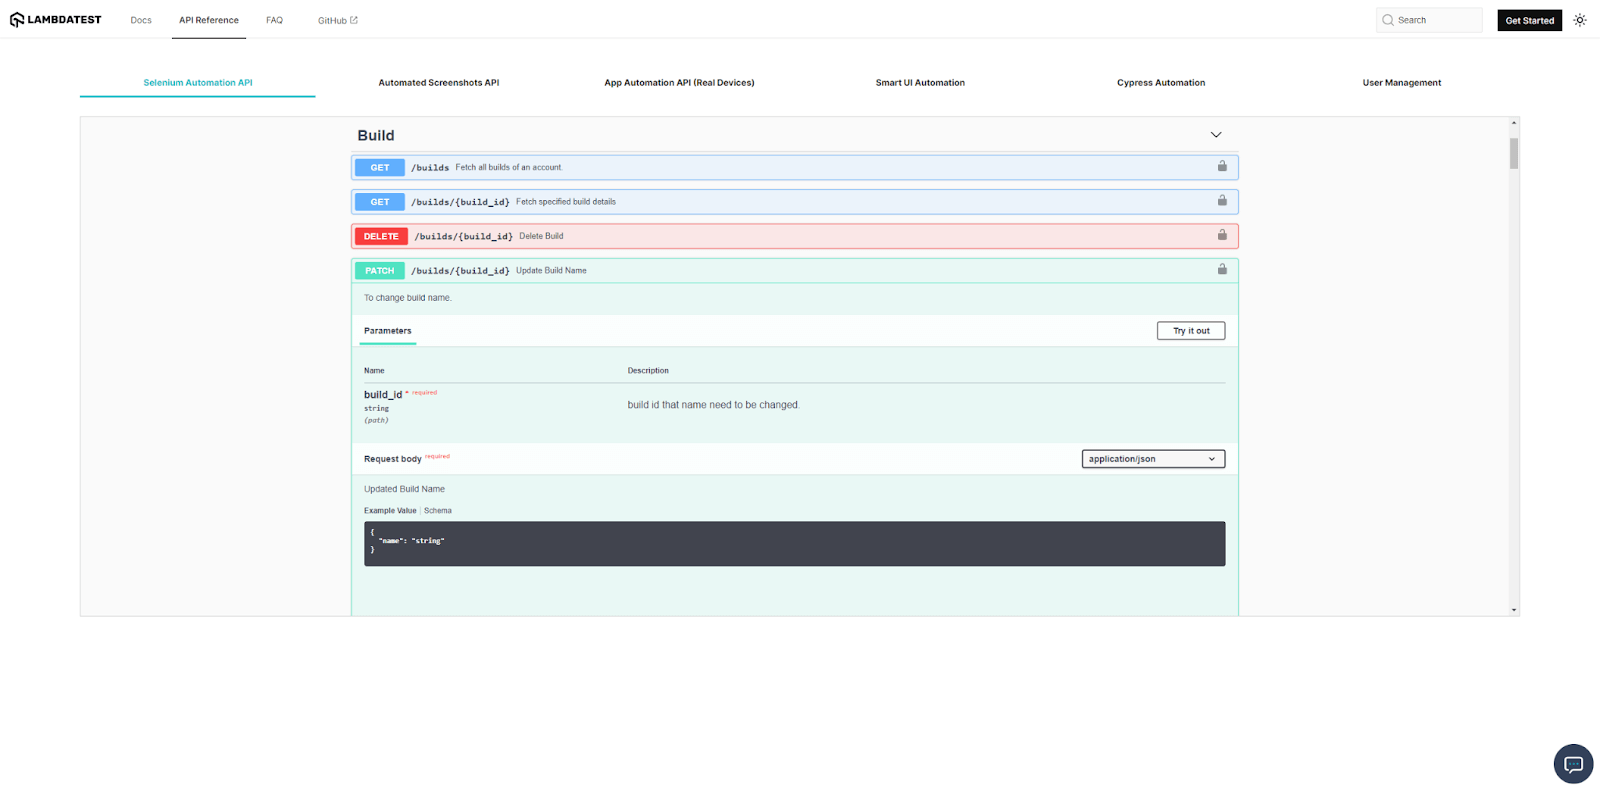
Implementation:
import json


def test_update_lambdatest_build_name():
    url = "https://%s:%s@api.lambdatest.com/automation/api/v1/builds/10363653" % (username, access_token)
    headers = {"accept": "application/json", "Content-Type": "application/json"}
    payload = {
        "name": "My build name"
    }
    response = requests.patch(url, headers=headers, data=json.dumps(payload))
    assert response.status_code == 200
Code Walkthrough:
Step 1: In this test, we will need to import the json library to be used in step 6.
import jsonStep 2: Create a new function with a name that starts with “test_”.
def test_update_lambdatest_build_name():Step 3: Inside the test, you should set the URL of the endpoint you are going to test.
url = "https://%s:%s@api.lambdatest.com/automation/api/v1/builds/10363653" % (username, access_token)Step 4: For this API, in addition to the “accept” header, we need to add the “Content-Type” header, also with the value “application/json”.
headers = {"accept": "application/json", "Content-Type": "application/json"}Step 5: You should create a JSON payload that fits what is expected by the API documentation. To update a build, you should inform the build name. You should store this in a variable. In our case, it was named “payload”.
payload = {
        "name": "My build name"
    }
Step 6: Also, you need to call the suitable method from the Requests library. In this case, we will call the .patch() method, given that it is a PATCH endpoint. We should pass all the parameters, url and headers, as before, and also the data value. In our case, we should use the json.dumps() method, which will convert the “payload” object into a JSON string. In the end, we need to store the response in a variable.
response = requests.patch(url, headers=headers, data=json.dumps(payload))Step 7: To finish our test, we should check if the request response is 200 as expected.
assert response.status_code == 200To see the result of the test we already created, we can just run the below command in the cmd.
pytestThe result shows that the seven test cases were executed and passed, as expected. 4 tests from the reqres.in suite that we previously created, and 3 for this LambdaTest suite.

Delete LambdaTest Build
The last endpoint that we will test is the Delete Build. You can see the API documentation below.
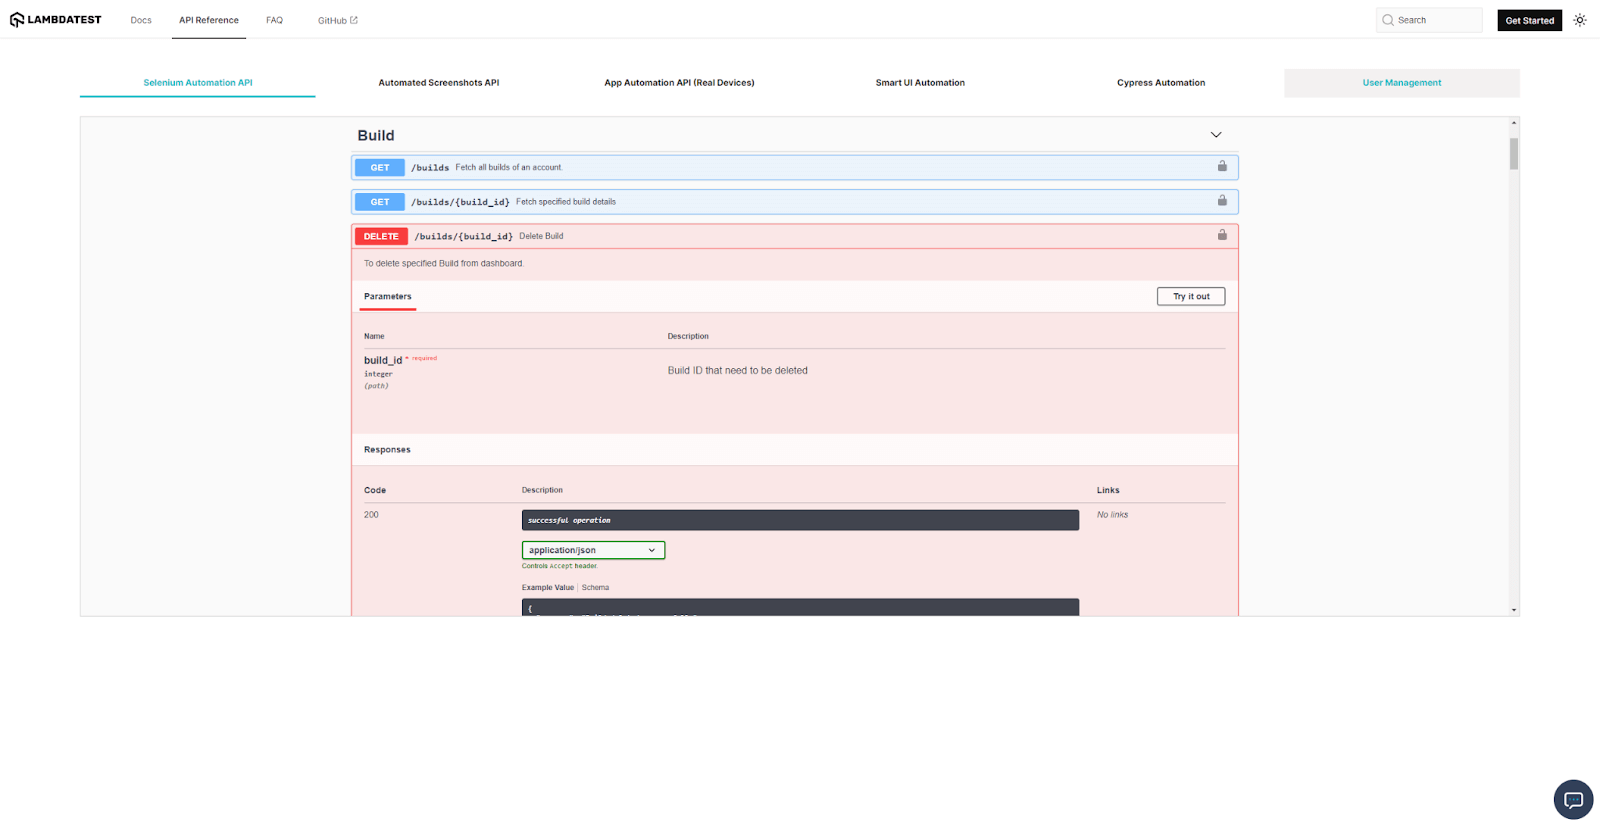
Implementation:
def test_delete_lambdatest_build():
    url = "https://%s:%s@api.lambdatest.com/automation/api/v1/builds/10363653" % (username, access_token)
    headers = {"accept": "application/json"}
    response = requests.delete(url, headers=headers)
    assert response.status_code == 200
Code Walkthrough:
Step 1: Create a new function with a name that starts with “test_”.
def test_delete_lambdatest_build():Step 2: Inside the test, you should set the URL of the endpoint you are going to test.
url = "https://%s:%s@api.lambdatest.com/automation/api/v1/builds/10363653" % (username, access_token)Step 3: Add the accept header.
headers = {"accept": "application/json"}Step 4: Also, you need to call the suitable method from the Requests library. In this case, we will call the .delete() method, given that it is a DELETE endpoint. We should pass both parameters, url and headers, and store the response in a variable.
response = requests.delete(url, headers=headers)Step 5: To finish our test, we should check if the request response is 200 as expected.
assert response.status_code == 200To see the result of the test we already created, we can just run the below command in the cmd.
pytestThe result shows that the eight test cases were executed and passed, as expected. 4 tests from the reqres.in suite that we previously created, and 4 for this LambdaTest suite.

Conclusion
In this go-to guide on pytest API testing, we learned that API testing is a crucial aspect of software development that ensures the API’s functionality, reliability, and security. Also, we saw that HTTP response status codes play a vital role in API testing as they provide important information about the status of requests and the data returned by APIs.
We introduced the Requests library, a powerful tool that simplifies the process of making HTTP requests in Python and provides benefits such as ease of use, compatibility, and a rich set of features.
We used Python and the Requests library to illustrate how to set up and perform tests on APIs through two demonstrations: using Reqres.in API and using LambdaTest APIs. By leveraging these tools and techniques, QAs can create robust and reliable tests that meet the needs of their users and stakeholders.
"You can also explore 35 Commonly Asked Pytest Interview Questions in 2023. Perfect for interview prep or boosting your Pytest knowledge."
Frequently asked questions
- General
Author's Profile

Paulo Oliveira
Paulo is a Quality Assurance Engineer with more than 15 years of experience in Software Testing. He loves to automate tests for all kind of applications (both backend and frontend) in order to improve the team’s workflow, product quality, and customer satisfaction. Even though his main roles were hands-on testing applications, he also worked as QA Lead, planning and coordinating activities, as well as coaching and contributing to team member’s development. Sharing knowledge and mentoring people to achieve their goals make his eyes shine.
Reviewer's Profile

Himanshu Sheth
Himanshu Sheth is a seasoned technologist and blogger with more than 15+ years of diverse working experience. He currently works as the 'Lead Developer Evangelist' and 'Director, Technical Content Marketing' at LambdaTest. He is very active with the startup community in Bengaluru (and down South) and loves interacting with passionate founders on his personal blog (which he has been maintaining since last 15+ years).
Try LambdaTest Now !!
Get 100 minutes of automation test minutes FREE!!

 Christmas Deal is on: Save 25% off on select annual plans for 1st year.
