How To Use Xpath In Selenium: Complete Guide With Examples
Ria Dayal
Posted On: November 18, 2021
![]() 599038 Views
599038 Views
![]() 24 Min Read
24 Min Read
This article is a part of our Content Hub. For more in-depth resources, check out our content hub on Selenium Locators Tutorial.
Selenium is a free, open-source test automation framework that can help us test an application across different platforms and browsers. However, to implement a framework using Selenium, the first step is to locate any web element. Now, when I started with my first Selenium automation framework, XPath proved to be a boon when it came to capturing web elements. Learn more about what Is Selenium?
Although XPath is not the only technique that Selenium offers to locate any element, XPath provides an option to search a web element dynamically, and hence, gives the flexibility to tweak any locator to support your requirement.
Choosing the right element locator is a critical aspect of effective test automation. It’s not just about functionality; it’s about efficiency and accuracy. To understand the preferences of the testing community, we conducted a social media poll with the question, “What is your favorite element locator in test automation?” The responses offer valuable insights into the most favored locator strategies.
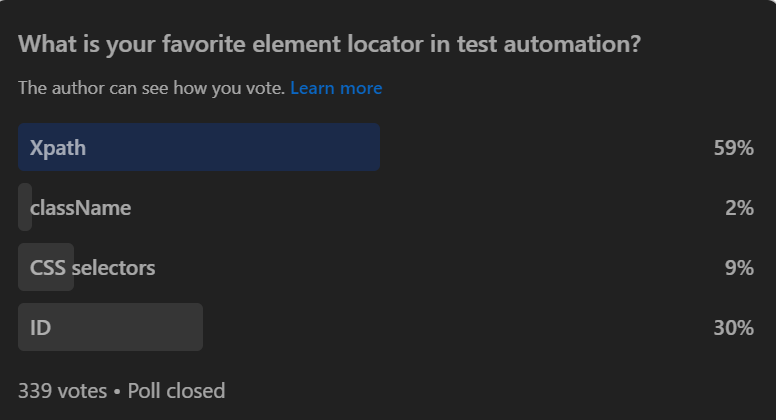
In this Selenium testing tutorial, we will learn about the types of XPath in Selenium and how to write basic and complicated XPath. We will also see how we can capture XPath of a few tricky web elements while performing Selenium automation testing.
Starting your journey with Selenium WebDriver? Check out this step-by-step guide to perform Automation testing using Selenium WebDriver.
Let’s get started!

TABLE OF CONTENTS
What is XPath?
XPath also known as XML Path Language. It is used to select nodes from the XML document. XPath is widely used due to its flexibility and its ability to move through the elements and attributes in the XML structure. XPath expressions are used to move through the XML document. They select the elements or attributes in the XML document based on their names, values, or positions in the XML document hierarchy.
You can also use XPath to extract data from the XML document or to check if an element or an attribute exists in the XML document.
What is XPath in Selenium?
XPath in Selenium is a powerful technique used to traverse and interact with the HTML structure of a web page. It provides a standardized way to navigate through both HTML and XML documents, allowing testers to precisely locate elements for automation purposes. This makes XPath an invaluable tool for writing robust and adaptable automation scripts.
The basic format of XPath in Selenium is explained below.
|
1 |
XPath = //tagname[@Attribute=’Value’] |
Here,
- //: denotes the current node
- tagname: denotes the tagname of the current node
- @: is the Select attribute
- Attribute: denotes the attribute of the node
- Value: denotes the value of the chosen attribute
If you are a Selenium 4 user, this Selenium WebDriver Tutorial for beginners and professionals will help you learn what’s new in Selenium 4 (Features and Improvements). However, Selenium 3 vs Selenium 4 comparison could be a good starting point to know more about the Selenium 4 framework. You can also go through the Selenium 4 tutorial to further deep dive into Selenium 4.
Types of XPath in Selenium
The XPath is the language used to select elements in an HTML page. XPath can be used to locate any element on a page based on its tag name, ID, CSS class, and so on. There are two types of XPath in Selenium.
- Absolute XPath
- Relative XPath
Absolute XPath
Absolute Xpath is the simplest form of XPath in Selenium. It starts with a single slash ‘/’ and provides the absolute path of an element in the entire DOM.
Let us understand writing an absolute XPath using the LambdaTest SignUp Page.
LambdaTest is a cloud-based cross browser testing tool that supports Selenium Grid, providing a solution to every obstacle you face while performing automation testing using your local machine. Selenium testing tools like LambdaTest offer an online Selenium Grid consisting of 2000+ browsers for you to perform automation testing effortlessly.
We will locate the LambdaTest page header highlighted in the below image using an absolute XPath in Selenium.
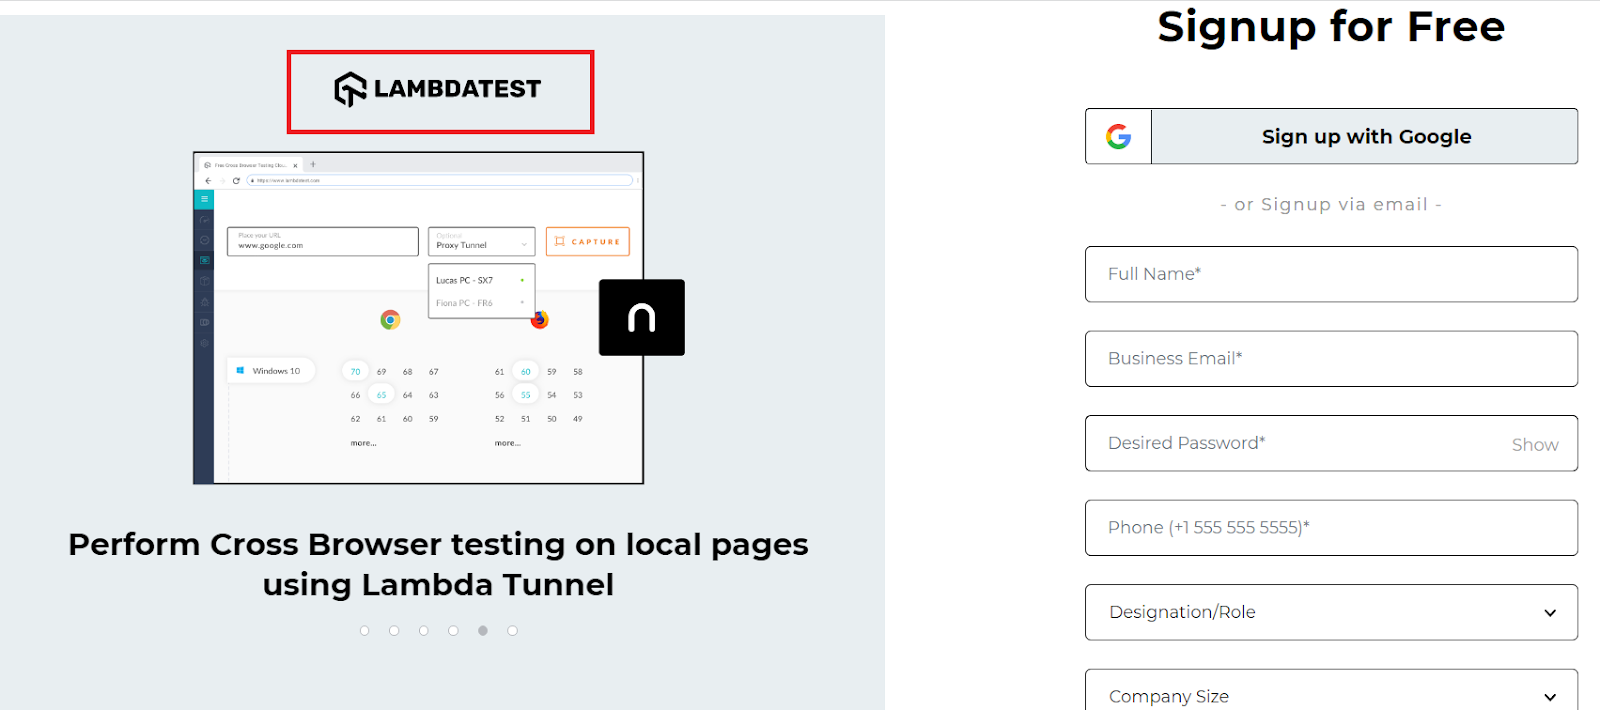
The below absolute XPath will help you locate the header as highlighted.
|
1 |
/html//div/div/div/div[1]/div/a/img |
In order to locate the element, you can simply do a right-click on the web element and click on Inspect. Then, in the Elements tab, you can start writing the locator.
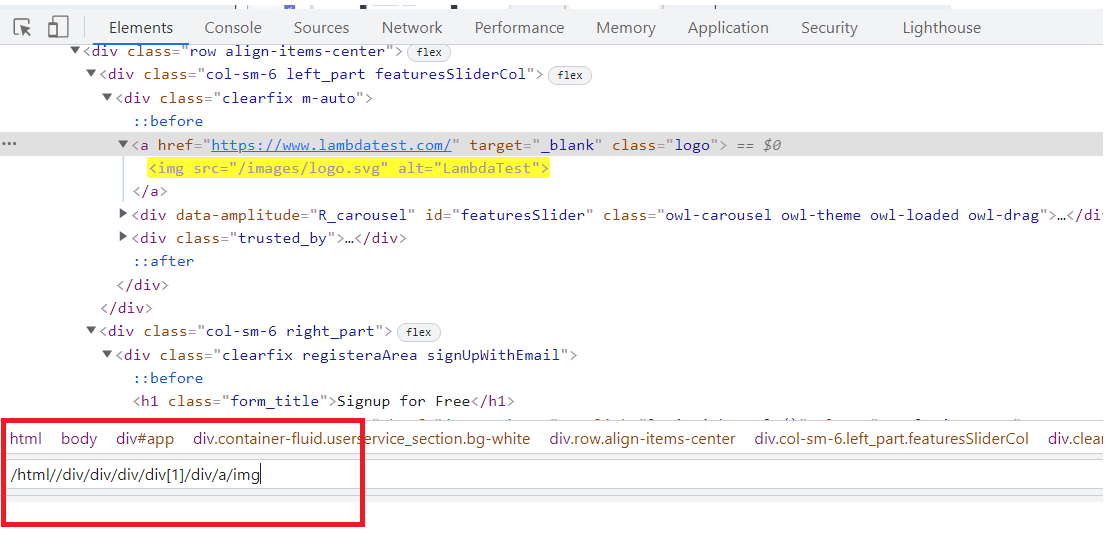
In this case, starting from the html tag, I have traversed one by one to the div, which contains the tag a and hence, the final img tag. Wasn’t it pretty simple?
However, even though it is simple, the biggest disadvantage of using absolute XPath is that they are very vulnerable to any changes in the DOM structure and, as a result, can bring you a lot of automation failures.
Just imagine if a single div tag from our example is removed, and alas, this locator stops working!!
Relative XPath
In the case of relative XPath in Selenium, the XPath expression starts from the middle of the DOM structure. It is represented by a double slash ‘//’ denoting the current node.
It is always preferred over an absolute XPath as it is not a complete path from the root element.
We will locate the same element as in the case of absolute XPath, i.e., the LambdaTest Sign Up page header.
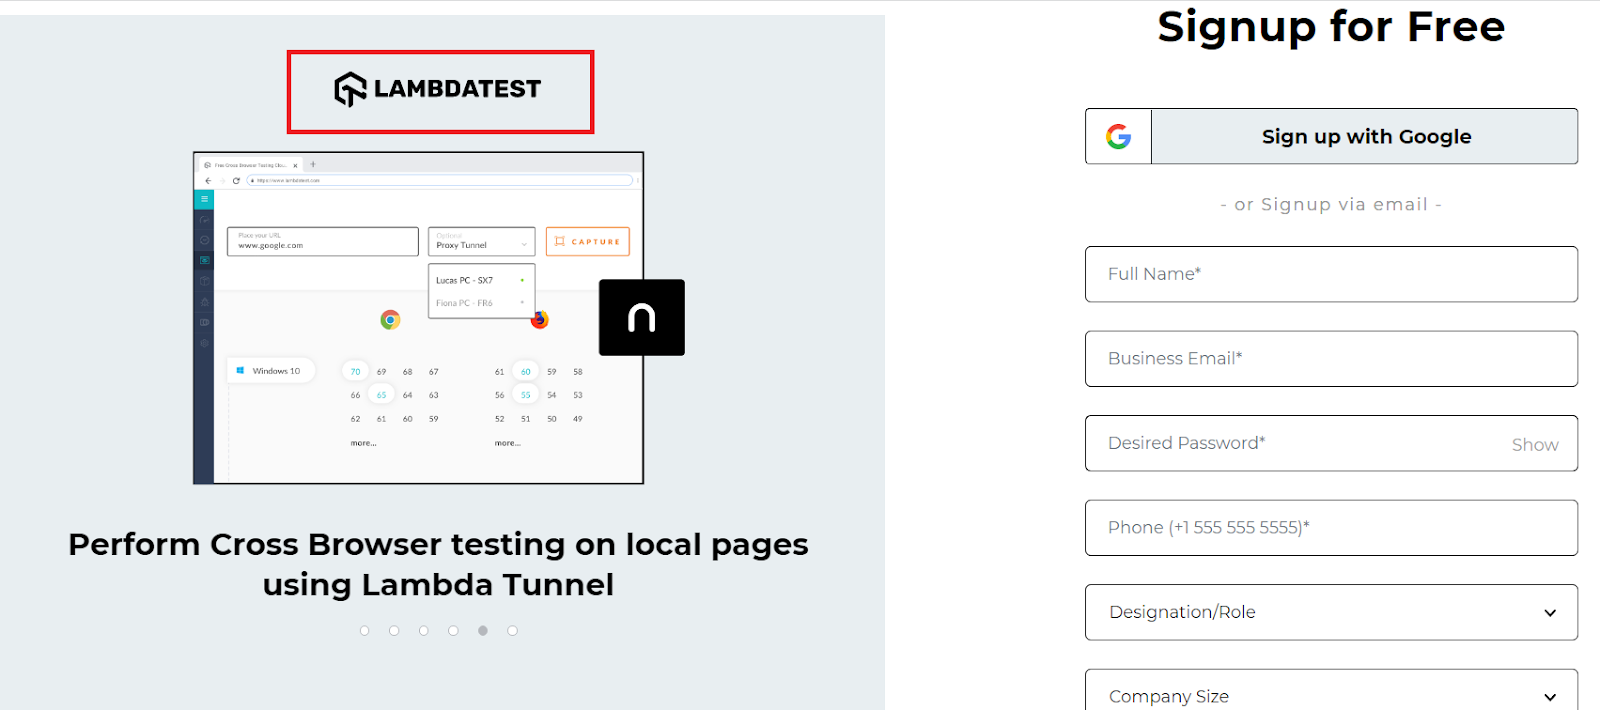
The Relative XPath of the highlighted web element will be:
|
1 |
//img[@alt='LambdaTest'] |
Here, I just used the corresponding img tag and its attribute alt to locate the title and wrote the corresponding relative XPath.
This certification is for anyone who wants to stay ahead among professionals who are growing their career in Selenium automation testing.
Here’s a short glimpse of the Selenium 101 certification from LambdaTest:
Also Read – What is Selenium?
How to write XPath in Selenium?
Now that you have seen Absolute and Relative XPaths in Selenium, let us see a few of the basic XPath examples.
Basic XPath in Selenium
This is the common and syntactic approach to writing the XPath in Selenium, which combines a tagname and attribute value.
Here are a few basic XPath examples in Selenium using the syntax:
|
1 |
XPath = //tagname[@Attribute=’Value’] |
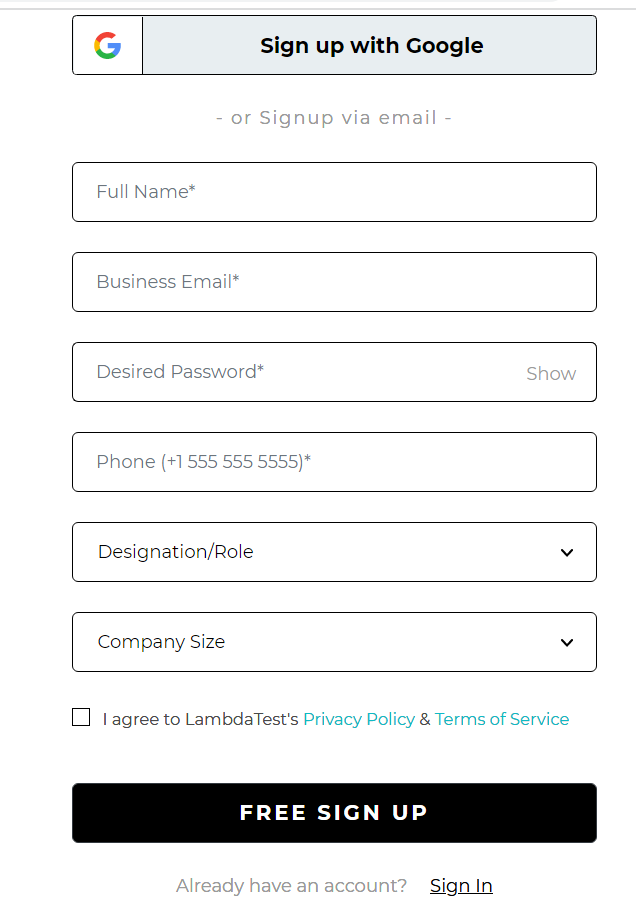
- //a[@class=’googleSignInBtn’] – This XPath is for locating the Google Sign In button on the LambdaTest SignUp Page as highlighted in the below image. Here, I have used the class attribute and its ‘googleSignInBtn’ value of the corresponding tag.
- //input[@placeholder=’Full Name*’]– This XPath is for locating the Full Name text box in the above-shown image. Here, I have used the placeholder attribute and its corresponding value ‘Full Name*’ for the input tag.
- //input[@name=’phone’] – Similar to the first two options, this XPath is for locating the Phone text box where the name attribute is being used with its value being ‘phone.’
- //select[@name=designation]– This XPath is for locating the Designation/Role dropdown and hence, has a select tag with its name attribute having value as designation.
- //a[@href=’/login’]– This XPath is for the Sign In Option of the web page, where I am using its href attribute, which has a value of ‘/login.’
XPath using Contains
Contains() is a very useful method in XPath. It can be used for all such web elements whose value can change dynamically. The syntax for using Contains() method in XPath is
|
1 |
//tagname[contains(@attribute,constantvalue)] |
For example, let’s say the ID for the login field, for instance, signin_01 has the ending number that keeps changing every time the page is loaded. In this case, using contains helps us locate the element in the below way.
|
1 |
//tagname[contains(@attribute,”signin”)] |
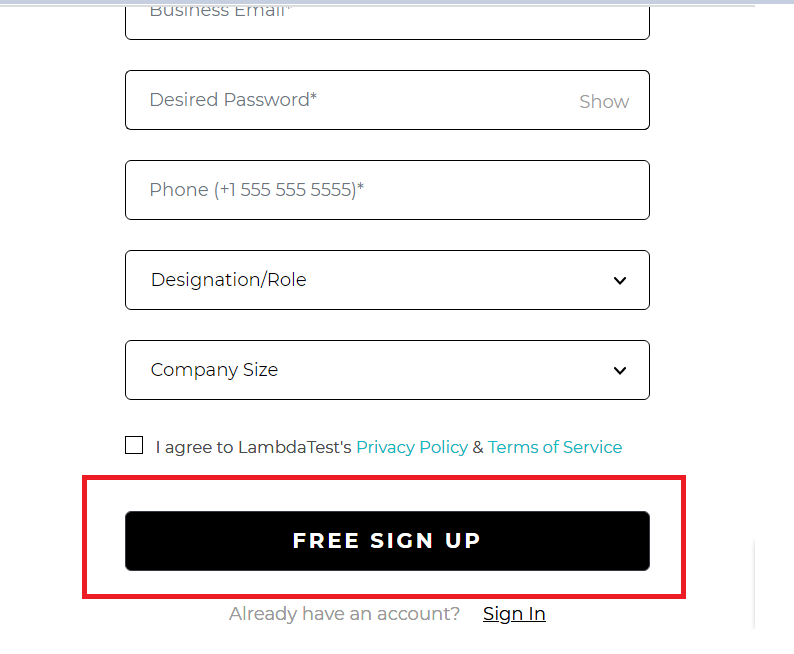
Let us check a similar example on the LambdaTest Page for the Free SignUp Button. On inspecting the element, you will see that the class attribute has a lot of values. However, you can use the contains() method and easily locate the web element.
Element:
|
1 |
//button[contains(@class,'submit-btn ')] |

XPath using Logical Operators: OR & AND
We can use logical operators such as OR & AND on the attributes condition. In the case of OR, any one of the conditions should be true or both, whereas, in the case of AND, both the conditions should be true.
The syntax for using these operators are:
|
OR |
XPath=//tagname[@attribute1=value1 OR @attribute2=value1] |
|
AND |
XPath=//tagname[@attribute1=value1 AND @attribute2=value1] |
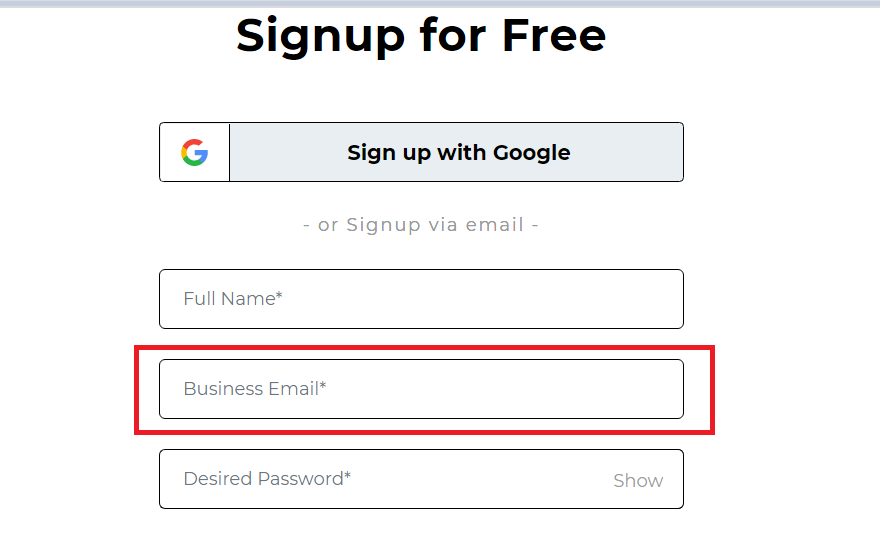
Now, let us see an example for each of these operators. First, we will locate the input text box of Business Email on the Signup page as highlighted below.
Element:
OR
Here, I have made use of the name attribute and the placeholder attribute. In addition, I have also used the Contains method on the placeholder attribute. Now, if you observe closely, I have used an incorrect value for the placeholder attribute. However, I am still able to locate the element as the first expression satisfies the condition. Interesting right?
|
1 |
//input[@name="email" or contains(@placeholder,’abc’)] |

AND
Here, I have made use of the same attributes and have used the AND operator. However, both the expressions need to satisfy the condition; hence, the below XPath locates the element.
|
1 |
//input[@name="email" and contains(@placeholder,'Email')] |

Note: Both ‘and’ and ‘or’ should be case-sensitive. If you tend to use ‘OR’ or ‘AND,’ you will get an error in the console stating an invalid XPath expression.
XPath using Text()
The text() method is used in XPath whenever we have a text defined in an HTML tag, and we wish to identify that element via text. This comes in handy when the other attribute values change dynamically with no substantial attribute value used via Starts-with or Contains.
The Syntax for using text() in XPath is:
|
1 |
//tagname[text()=’Text of the Web Element’] |
Let’s write the XPath for the Sign up with Google button on the LambdaTest Sign Up Page, as highlighted in the below image using the Text() method.
Element:

|
1 |
//span[text()='Sign up with Google'] |

Also Read – SelectorsHub: The Next Gen XPath, CSS Selectors Tool
XPath using Starts-With()
The Starts-With() method is similar to the Contains() method. It is helpful in the case of web elements whose attribute value can change dynamically. In the Starts-With method, the starting value of the attribute’s text is used for locating the element.
Below is the syntax for using Starts-With() method:
|
1 |
//tagname[starts-with(@attribute,value)] |
Let us locate the text box for Phone on the LambdaTest SignUp page using the starts-with method, as highlighted in the below image.
Element:
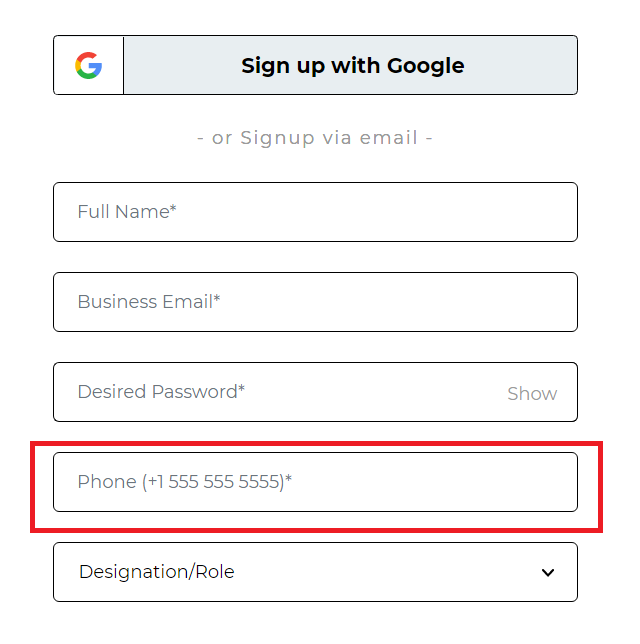
Here, the placeholder attribute of the Phone textbox contains a lot of characters. However, it starts with the word Phone. Hence, by using the starts-with method, you can simply locate the element in this case.
|
1 |
//input[starts-with(@placeholder,'Phone')] |

XPath using Index
This approach comes in handy when you wish to specify a given tag name in terms of the index value you wish to locate too. For instance, consider a DOM with multiple input tags for each field value, and you wish to input text into the 4th field. In such cases, you can use the index to switch to the given tag name.
The syntax for using Index is XPath is:
|
1 |
//tagname[@attribute=’value’][Index Number] |
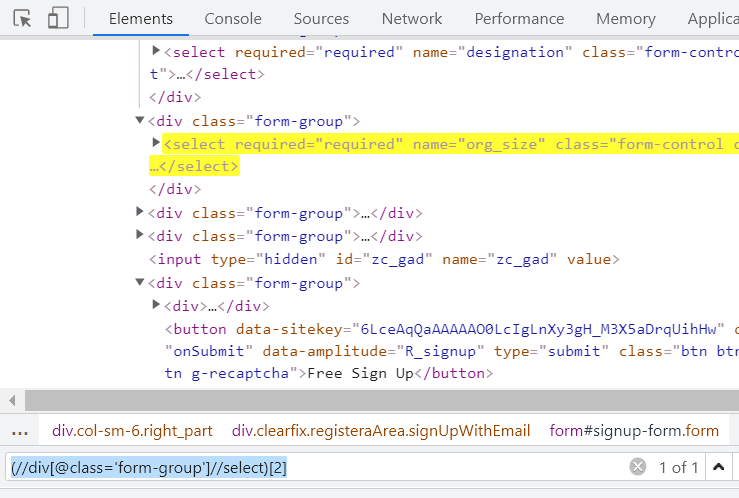
Indexes can also be helpful in such cases where the same XPath is returning you multiple web elements. Let us understand how to use Indexes in such cases by using the Company Size dropdown button on the Signup page. First, we will use a generic XPath for the web element and later use an index for locating the exact element.
Element:

|
1 |
//div[@class='form-group']//select |
Now, observe the Elements tab; you will see that the above XPath returns you two elements since there are two dropdowns on the web page.

However, in such cases, you can simply specify the index for the entire XPath, and bang on, you get the right element. In our case, the Company Size web element is the second dropdown option on the web page. Hence, by specifying the 2nd index for the entire XPath, I can get the Company Size web element.
|
1 |
(//div[@class='form-group']//select)[2] |
Chained XPath in Selenium
As the name signifies, we can use multiple XPath expressions and chain them. The syntax for using Chained XPath is as mentioned below.
|
1 |
//tagname1[@attribute1=value1]//tagname2[@attribute2=value2] |
Let us write a chained XPath for the I agree to LambdaTest’s Privacy Policy text after the checkbox on the LambdaTest Signup page as highlighted below.

Here, we first locate the checkbox using the label tag and then navigate to the text that follows the checkbox.
|
1 |
//label[@class='i_agree']//span[@data-amplitude='R_pp'] |

Also read – Selenium Locators in Protractor
How to write Xpath in Selenium using Axes methods?
XPath axes come in handy when the exact element tagname or its attribute value is dynamic and cannot be used to locate an element. In such cases locating elements after traversing through child/sibling or parent becomes an easy approach.
Run your Selenium tests with AWS marketplace directly on the cloud.
Some of the widely used XPath axes are:
XPath using Following
This can be used when you have a unique attribute of the tag before your actual web element. For example, on using Following, you can have all the elements that follow the current node, and you can simply use Index or another chained XPath to locate your actual web element.
The Syntax for using the Following is:
|
1 |
//tagname[@attribute=’value’]//following::tagname |
Now, let us locate the input text box for Phone on the LambdaTest signup page using the Following.
Element:

In this case, we have first located the div tag for the Password, and then, by using the Following, we get the list of all the div tags after Password. From there, we use the input tag and then locate the input box for the Phone.
|
1 |
//div[contains(@class,'password-group')]//following::div//input[@type='phone'] |

XPath using Following-Sibling
As the term signifies, siblings are those nodes that share the same parent or are at the same level. Hence, Following-Sibling will return you the node at the same level and after the current node.
The syntax for using Following-Sibling is
|
1 |
//tagname[@attribute=’value’]//following-sibiling::tagname |
Let us understand Following-Sibling using the options present in the Designation/Role dropdown in LambdaTest Sign Up page.
Element:

In this case, we first locate the Manager option and later, by using the following-sibling, locate the Director/VP option, since all the option tags share the same parent, or we can say they are at the same level.
|
1 |
//option[@value='Manager']//following-sibling::option[1]] |

However, it is important for you to understand that in the above option, the simplest way of writing this XPath would be an option[@value=’Director/VP’]. The above is one of the implementations for the same element using the following-sibling.
XPath using Preceding
In contrast to the Following, this method helps locate all the elements before the current node, as in the preceding element from the current node with XPath in Selenium.
Using Preceding, you can have all the elements before your current node, and by using Index or another chained XPath, you can locate the actual web element.
The syntax for using Preceding is:
|
1 |
//tagname[@attribute=’value’]//preceding::tagname |
Let us write the XPath for the input text box of Password on LambdaTest Signup page using preceding.
Element:

In this case, I have first located the Show button next to the Password text box. From there, by using the preceding, I get all the input tags before that node, and then by using the type attribute as Password, the actual web element is located.
|
1 |
//div[@class='input-group-append']//preceding::input[@type='password'] |

XPath using Preceding-Sibling
This is a concept very similar to Following-Siblings. The only difference in functionality is that of preceding. So, here, in contrast to Following-Sibling, you get all the nodes that are siblings or at the same level but are before your current node.
The syntax for using Preceding-Sibling is:
|
1 |
//tagname[@attribute=’value’]//preceding-sibling::tagname |
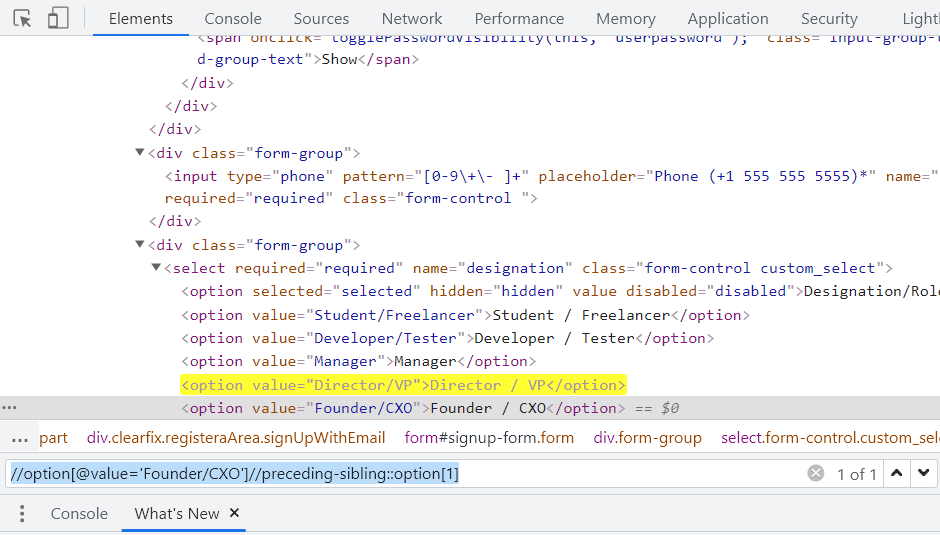
Let us see the same example as in Following-Sibling for locating the below-highlighted web element using preceding-sibling.

In this case, we have first located the Founder/CXO option and later, by using preceding-sibling, navigating to the Director/VP option.
|
1 |
//option[@value='Founder/CXO']//preceding-sibling::option[1] |
XPath using Child
As the name specifies, this approach is used to locate all the child elements of a particular node. For example, a basic use case of this approach could be to circulate all the data in a table through the rows.
The Syntax for using Child is:
|
1 |
//tagname[@attribute=’value’]//child::tagname |
Let us write the XPath for Sign Up With Google Option using Child.
Element:

In this case, I first locate the Google SignIn Button node, which has two child nodes, and later by using Child and specifying the span tag.
|
1 |
//a[@class='googleSignInBtn']//child::span |

For example, using the below referenced DOM structure, we can create an XPath in Selenium as follows:
XPath using Parent
This method is used to select the parent node of the current node.
The syntax for using Parent is:
|
1 |
//tagname[@attribute=’value’]/parent::tagname |
Let us see the XPath of the Password Input text box of the LambdaTest Signup page, shown in the below image.
Element:

In this case, I have first located the node for the Email Text box and then navigated to the parent div of it. From there, by using the following-sibling, we get all the divs at the same level, from where the desired input tag is located with the help of the type attribute.
|
1 |
//input[@type='email']//parent::div//following-sibling::div//input[@type='password'] |

XPath using Descendants
This method is used for selecting the descendants of the current node. Here, Descendants refer to the child nodes, grandchild nodes, etc.
The syntax for using Descendants is:
|
1 |
//tagname[@attribute=’value’]//descendants::tagname |
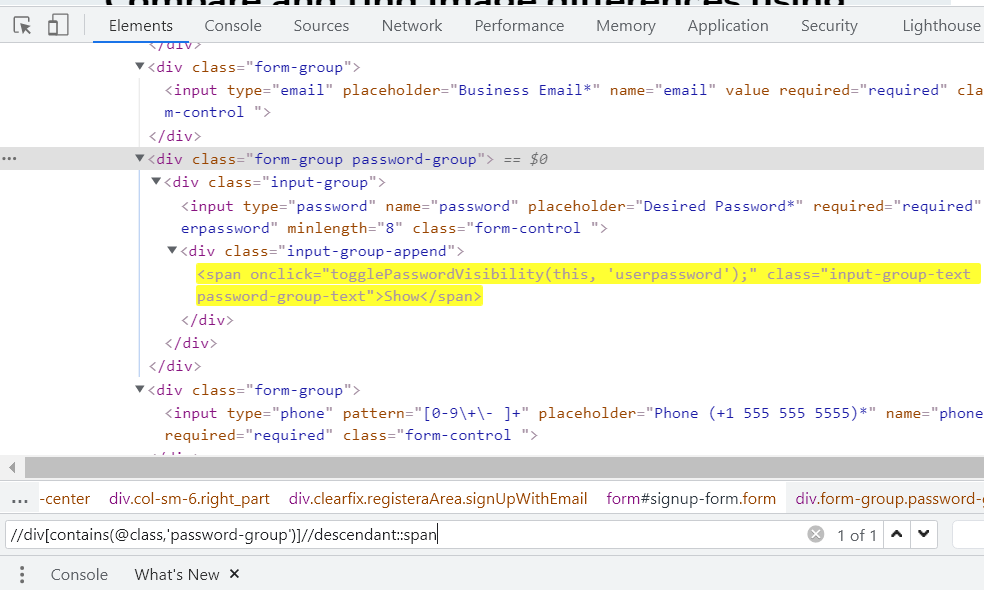
Let us locate the Show button next to the input box for Password by making use of Descendants.
Element:

|
1 |
//div[contains(@class,'password-group')]//descendant::span |
XPath using Ancestors
This method is used for selecting the ancestors of the current node. Here, Ancestors refer to the parent nodes, grandparent nodes, etc.
The syntax for using Ancestors is:
|
1 |
//tagname[@attribute=’value’]//ancestors::tagname |
Let us write the XPath of Email Input box on the LambdaTest Signup page.
Element:
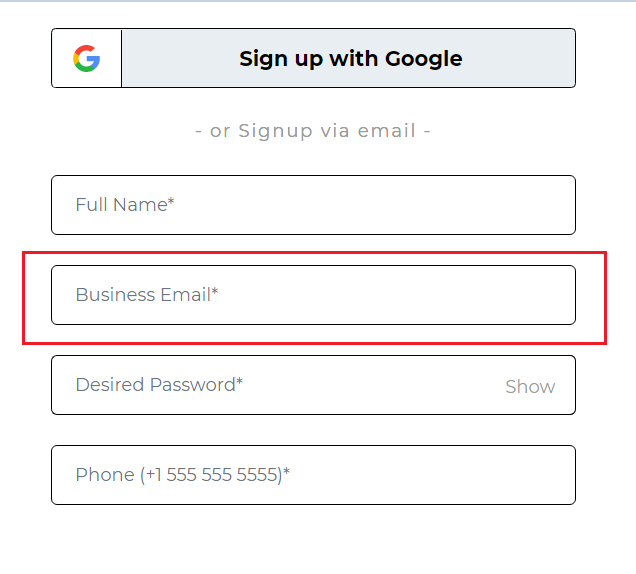
In this case, I first locate the div tag for the Password input box, and by using its ancestor div, locate the email input element.
|
1 |
//div[contains(@class,'password-group')]/ancestor::div//input[@type='email'] |

Also Read – Locating Elements by TagName In Selenium
How to capture XPath of loader images?
While automating Web pages using Selenium, I often came across a few web elements that appeared for a very short duration on the screen. By the time I would start writing the XPath, the elements would disappear.
For example, think of Loading images; they do not appear on your screen for a longer period of time, and hence, identifying their locators can be tricky sometimes.
Below is a screen capture from Twitter which shows its loader image. Now how do you capture the XPath for it? Let me show you that!
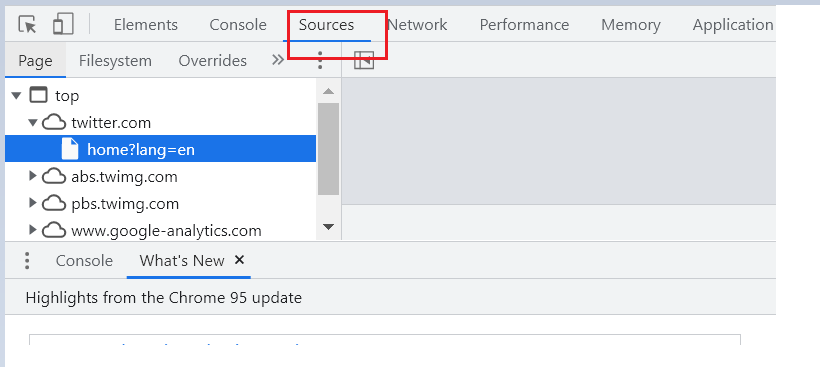
Step 1: As soon as the page starts to open, press F12 to be ready to inspect the element. Switch to the Sources tab as highlighted in the below image.
Step 2: When you see that the loading symbol appears on your screen, simply press F8 or click on the image highlighted below.
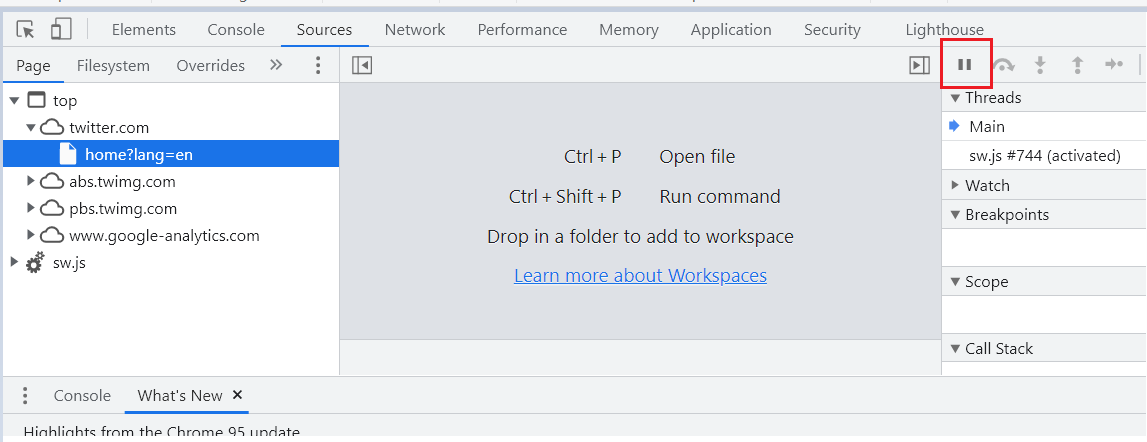
This will pause the execution, and you will see a notification badge like below on top of your screen.

Step 3: Now, you can go back to the Elements tab and start writing the locator.
|
1 |
//div[@aria-label='Loading'] |

Step 4: Go back to the Sources tab and click on the below option to resume.

Wasn’t this easy? This way, you can simply pause the execution and let the element be on your screen till you identify the locator of it 🙂
Also Read – Most Exhaustive XPath Locators Cheat Sheet
Conclusion
In this Selenium locators tutorial on XPath in Selenium, we learned all about XPath and what their types are. Then, we worked on writing some simple XPath using contains() or starts-with(), and we also wrote a few complicated ones using Following or Preceding.
Writing an XPath is the foundation stone for building or contributing to a Selenium automation framework, and when it comes to XPath, there could be n number of ways a simple XPath can be written. However, choosing the right one is the most important here as that determines the stability of your test cases and overall framework. Although there are a lot of plugins and extensions available today which can help you with XPath. You can go through the 10 Of The Best Chrome Extensions to find XPath in Selenium. I believe we must always opt for writing XPath on our own as we can decide which XPath would make our script the most stable, plus learning XPath can be fun 🙂
I hope this article helped you in learning something more about XPath today.
Happy Testing !!
Frequently Asked Questions
What Does Xpath Mean?
XPath (XML Path Language) is a query language used to navigate and select elements in an XML (Extensible Markup Language) document.
What is XPath in Selenium?
XPath is a way to navigate the DOM (Document Object Model) of XML and HTML. XPath in Selenium allows you to run queries against localized documents even if they don’t share the same base tag name.
How do you find XPath?
Visit the name tab, right-click, and inspect. In this case, it will show you a text input tag and attributes such as “id” and “class.” Use this information to construct XPath code which will locate the first name field.
Which locator is faster in Selenium?
IDs are the most precise of all locators and should always be your first choice. IDs are supposed to be unique to each element, so they work even if you change the document’s structure by adding, removing, or manipulating elements.
What is local name () in XPath?
The XPath local-name function will return the name of the first node in a given set. It accepts string arguments.
What is difference between CSS and XPath?
The main difference between XPath and CSS Selectors is that with the former we can navigate in both directions, while to use a CSS selector we must move forward.
What Is Xpath Example?
XPath expressions are used to navigate through the XML document and select elements or attributes based on their name, value or position in the document hierarchy. XPath can also be used to extract data from an XML document or to test if an element or attribute exists.
What Is Xpath And Types?
XPath is a language used for selecting and navigating elements within an XML or HTML document. There are two main types of XPath: absolute XPath- which begins from the root node of the document, and second is relative XPath- which begins from the current node or a selected node. Other types include XPath axes- which allow for more complex navigation, and XPath functions- which can perform actions such as searching for specific values or modifying the document.
How Do You Write An Xpath?
To write an XPath, begin by identifying the root node of the XML or HTML document, and then use a combination of element names, attributes, and values to navigate to the desired element(s). The syntax for XPath expressions typically involves a series of slashes, element names, and attribute names, with optional predicates to filter the results based on specific conditions.
How To Write Xpath Code In Selenium?
In Selenium, XPath expressions can be used to locate web elements using the “findElement” or “findElements” methods of the WebDriver interface.
How to Find XPath In Chrome For Selenium?
To find XPath in Chrome for Selenium:
1. Install Chrome Developer Tools extension.
2. Open the Developer Tools (right-click and select “Inspect” or use the shortcut).
3. Locate the HTML element in the Elements tab.
4. Right-click on the element and choose “Copy” > “Copy XPath.”
5. Use Selenium WebDriver with the copied XPath to interact with the element.
Got Questions? Drop them on LambdaTest Community. Visit now


