Selenium 4 WebDriver Hierarchy: A Detailed Explanation
Faisal Khatri
Posted On: January 18, 2023
![]() 33941 Views
33941 Views
![]() 27 Min Read
27 Min Read
The inception of Selenium can be traced back to a web application that required frequent testing. This prompted Jason Huggins to create a program using JavaScript, which he named JavaScriptTestRunner and released in 2004.
However, he realized that the program was much more powerful and could be helpful to the community in testing; hence, he decided to open-source it and renamed it to Selenium Core.
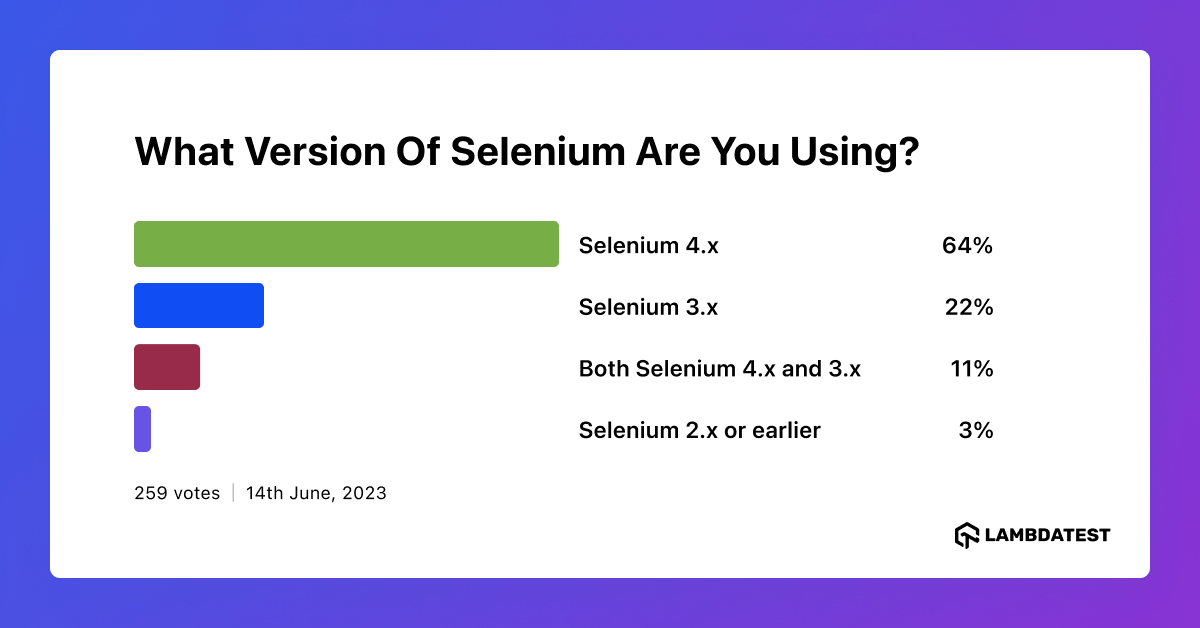
In a recent poll on LambdaTest’s social media platform, the pulse of the Selenium community was measured with the question, “What version of Selenium are you using?” The resounding response echoes in favor of progress, with a whopping 64% embracing the cutting-edge Selenium 4.x.
Paul Hammant created Selenium Remote Control (Selenium RC) or Selenium 1, an upgraded version of Selenium Core. It fixed the issue where testers had to install Selenium Core and the web servers containing the web applications. Hence, they belong to the same domain as the Same-origin policy prohibits JavaScript from being used from a different domain name from which it was launched.
Patrick Lightbody developed Selenium Grid for running the tests in parallel to reduce the test execution time to minimal. Shinya Kasatani from Japan contributed to the creation of Selenium IDE in 2006, which helps to automate the browser using record and playback features.
Selenium WebDriver was created in 2006 by Simon Stewart. Selenium WebDriver is an open-source, cross-platform library designed to help automate browser testing. It is designed to provide a simple and consistent interface for interacting with web browsers and different elements on the web page to simulate user actions on the websites. Over the years, Selenium has undergone many changes and improvements and introduced new features per the latest software industry trend.
It is composed of three main components:
- Language Bindings – Language bindings are a set of classes and methods that allow you to use a specific programming language with Selenium WebDriver for writing automated tests for the website. Currently, WebDriver supports multiple programming languages, including Java, C#, Python, Ruby, JavaScript, etc.
- WebDriver API – The API is a set of classes and methods that allow you to interact with the browser through code. The API allows running the tests on different browsers like Chrome, Firefox, MS Edge, etc.
- WebDriver Implementation – WebDriver is an interface to access web browsers programmatically. It manages the communication between the language bindings and the browser. It lets you automate and interact with the elements in the DOM.
The API gives you access to browser controls like the navigation bar, back button, tabs, windows, etc. You can also get information from the browser, such as the current URL and page source.
Also, different actions like typing in a textbox and working with WebElements like checkboxes, radio buttons, and dropdowns can be performed using WebDriver API.
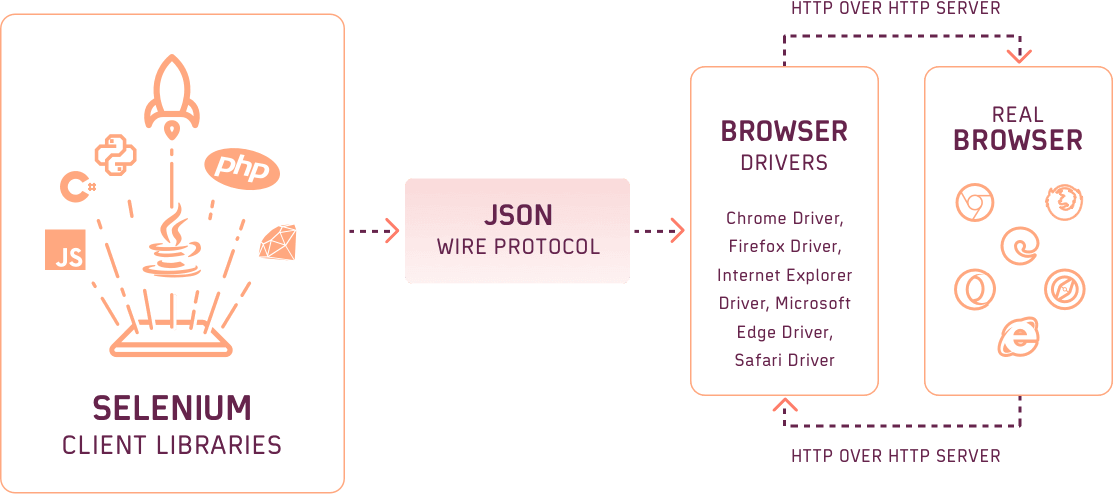
However, Selenium 4 is now W3C Compliant with Selenium 4. You may no longer be required to add ‘tweaks’ in the test script to make it work across different browsers, as everything (i.e., browsers & WebDriver APIs) runs in the W3C standard protocol.
If you are using Selenium 3 and want to get your hands dirty with Selenium 4, please check our detailed guide on upgrading from Selenium 3 to Selenium 4.
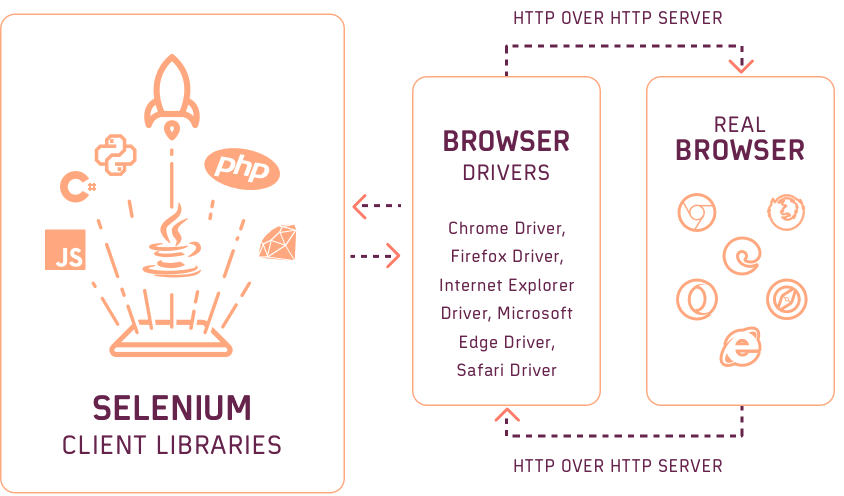
The introduction of Selenium Manager in Selenium version 4.6.0 is a big relief for the automation test engineers as it is not required to provide the executable driver path, nor do we need to use third-party libraries like WebDriverManager to start the browsers. Selenium Manager takes care of these browser drivers. We just need to have the respective driver installed in our machine on which we need to run the tests.
With WebDriver becoming completely W3C standardized, you can use it across different frameworks without any compatibility issues.
Though many of us would have used Selenium WebDriver for automation testing, there is a lower probability of each of us knowing the internals of architecture. The integral question is, “Does knowing the internal workings of Selenium and to what extent?.”
In my experience with Selenium, Appium, and other automation testing frameworks, understanding the internals of any framework helps in making the best possible use of the interfaces, classes, and methods provided by the same. We have witnessed how far Selenium has changed from its inception in 2002!
In this blog on Selenium 4 WebDriver Hierarchy, we will delve into the Selenium 4 WebDriver framework, specifically focusing on the hierarchy of the Selenium WebDriver and the abstract methods and nested interfaces within the WebDriver Interface. Additionally, we will also explore the hierarchy of the WebElement Interface and the abstract methods used within it.
TABLE OF CONTENTS
Selenium WebDriver Hierarchy
As an automation test engineer, we have been using Selenium WebDriver. Currently, while writing this blog on Selenium 4 WebDriver Hierarchy, Selenium’s latest version is 4.7.0. We know that by running the following line of code, the Chrome browser will be started, and we will be able to test the web page further using WebDriver methods.
|
1 |
WebDriver driver = new ChromeDriver(); |
However, very few automation test engineers know about the internal working of the WebDriver Interface. So, let’s dive deep into this and understand how Selenium WebDriver works.
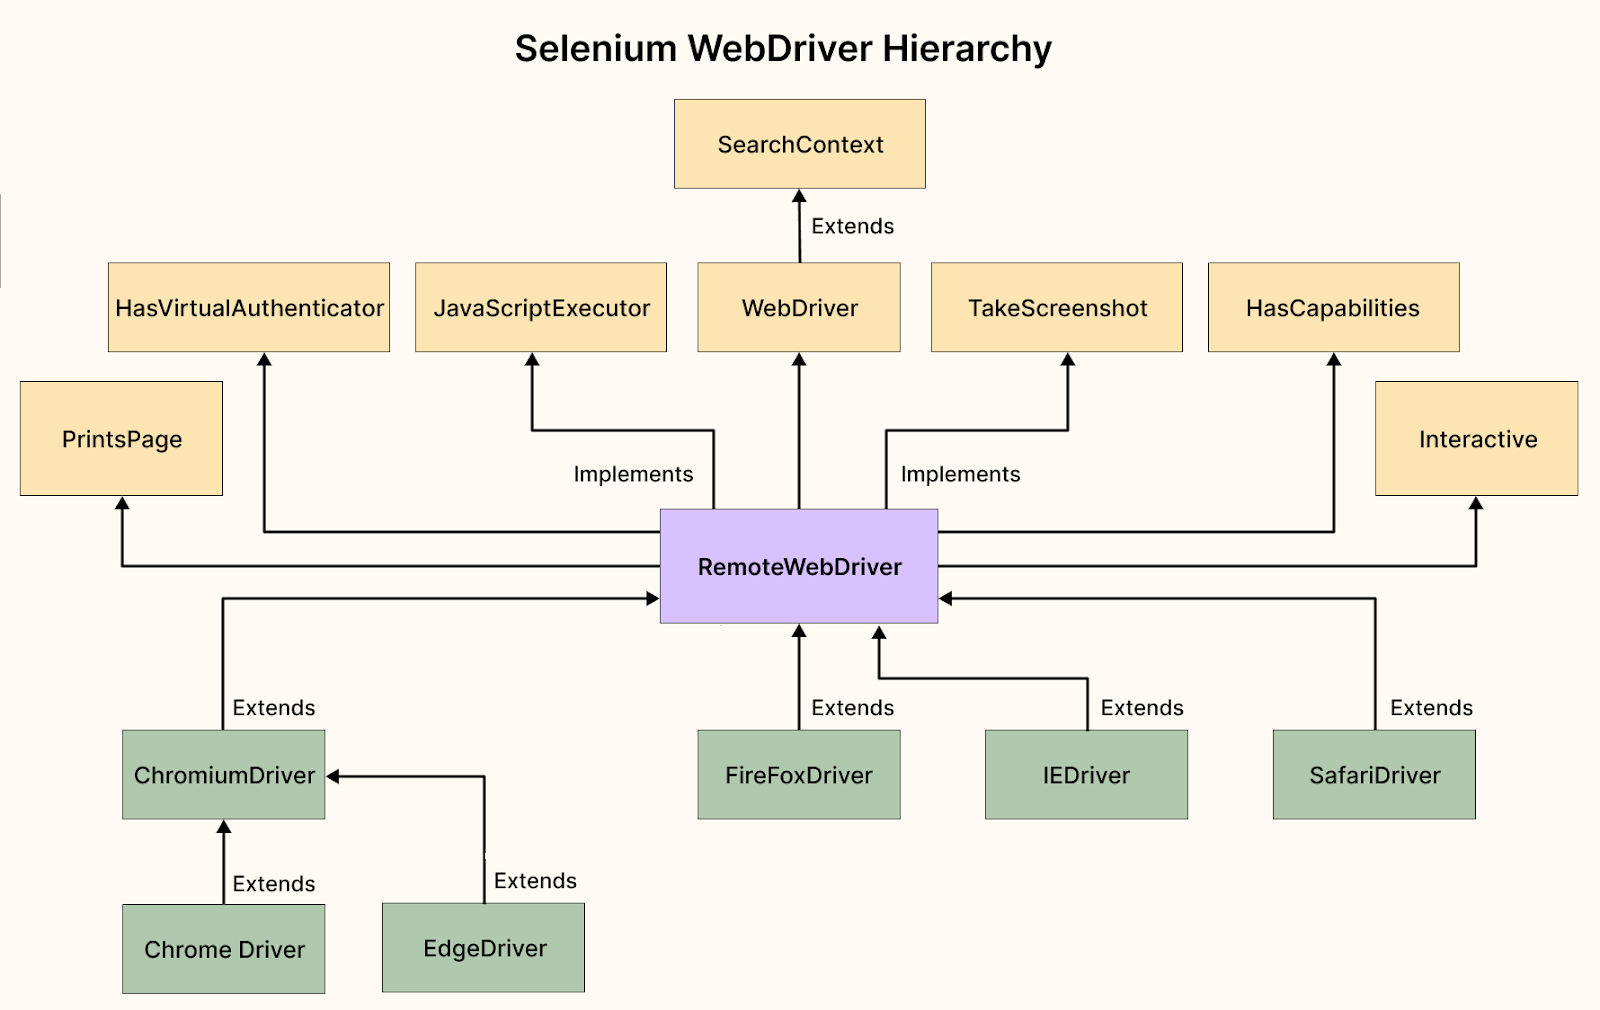
Here is the pictorial representation of the Selenium WebDriver hierarchy.
RemoteWebDriver Class
Let’s start with the RemoteWebDriver class because it is a fully implemented WebDriver Interface class extended by every BrowserDriver class within the Selenium framework.

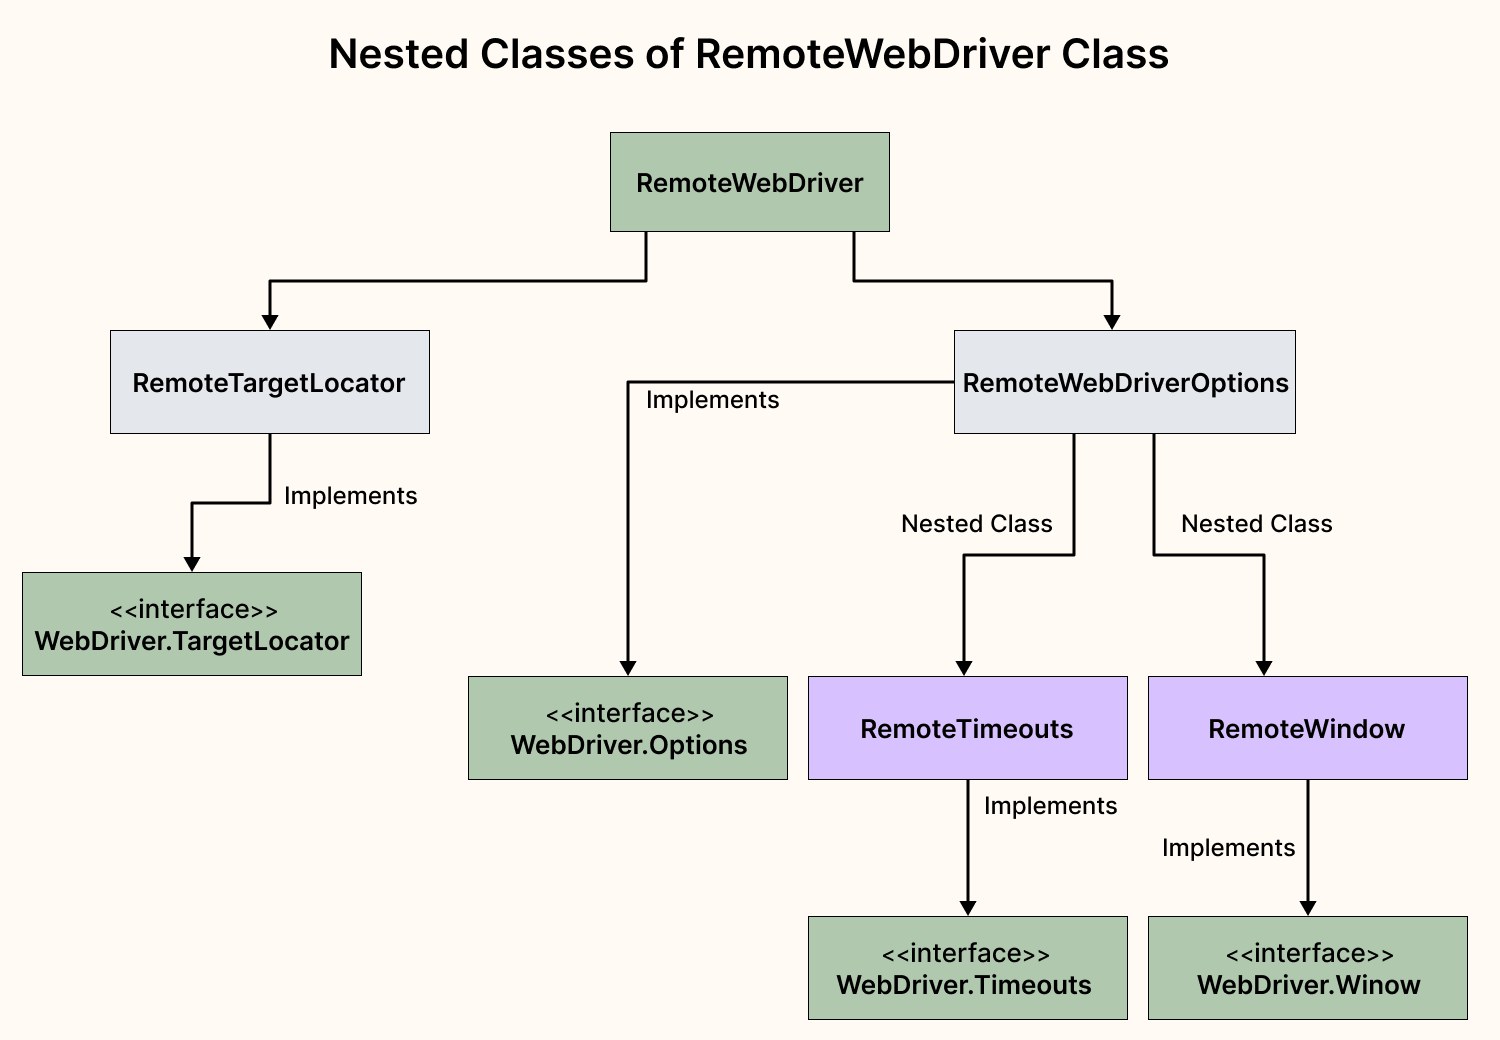
RemoteWebDriver class has the following nested classes:
- RemoteTargetLocator – This is a fully implemented class of WebDriver.TargetLocator interface.
- RemoteWebDriverOptions – This is a fully implemented class of WebDriver.Options interface. This class has the following nested classes:
- RemoteTimeouts – This class implements WebDriver.Timeouts interface and provides the full implementation of all its abstract methods.
- RemoteWindow – This class implements WebDriver.Window interface and provides the full implementation of all its abstract methods.


How to use the RemoteWebDriver class?
This class is important for running tests on cloud testing platforms like LambdaTest. As on the cloud platform, we may need to run the tests on multiple browsers and different platforms.
Cloud Selenium Grid like LambdaTest offers many benefits, including scalability, reliability, and security, which can be challenging to achieve with a local Selenium Grid. By performing Selenium automation testing on the cloud, it allows for a wider range of browser coverage, test coverage, and test execution in parallel, which is not possible in a local Selenium Grid.
Subscribe to the LambdaTest YouTube Channel and stay updated with the latest tutorials around Selenium testing, Cypress testing, and more.
Since we are running on remote machines, we need to provide the remote URL, so the tests get executed correctly on the desired platforms and browsers.
RemoteWebDriver Class has the following constructors, which can be used to instantiate an instance of the class:
RemoteWebDriver(ICapabilities)
RemoteWebDriver(Uri, ICapabilities)
RemoteWebDriver(ICommandExecutor, ICapabilities)
RemoteWebDriver(Uri, ICapabilities, TimeSpan)
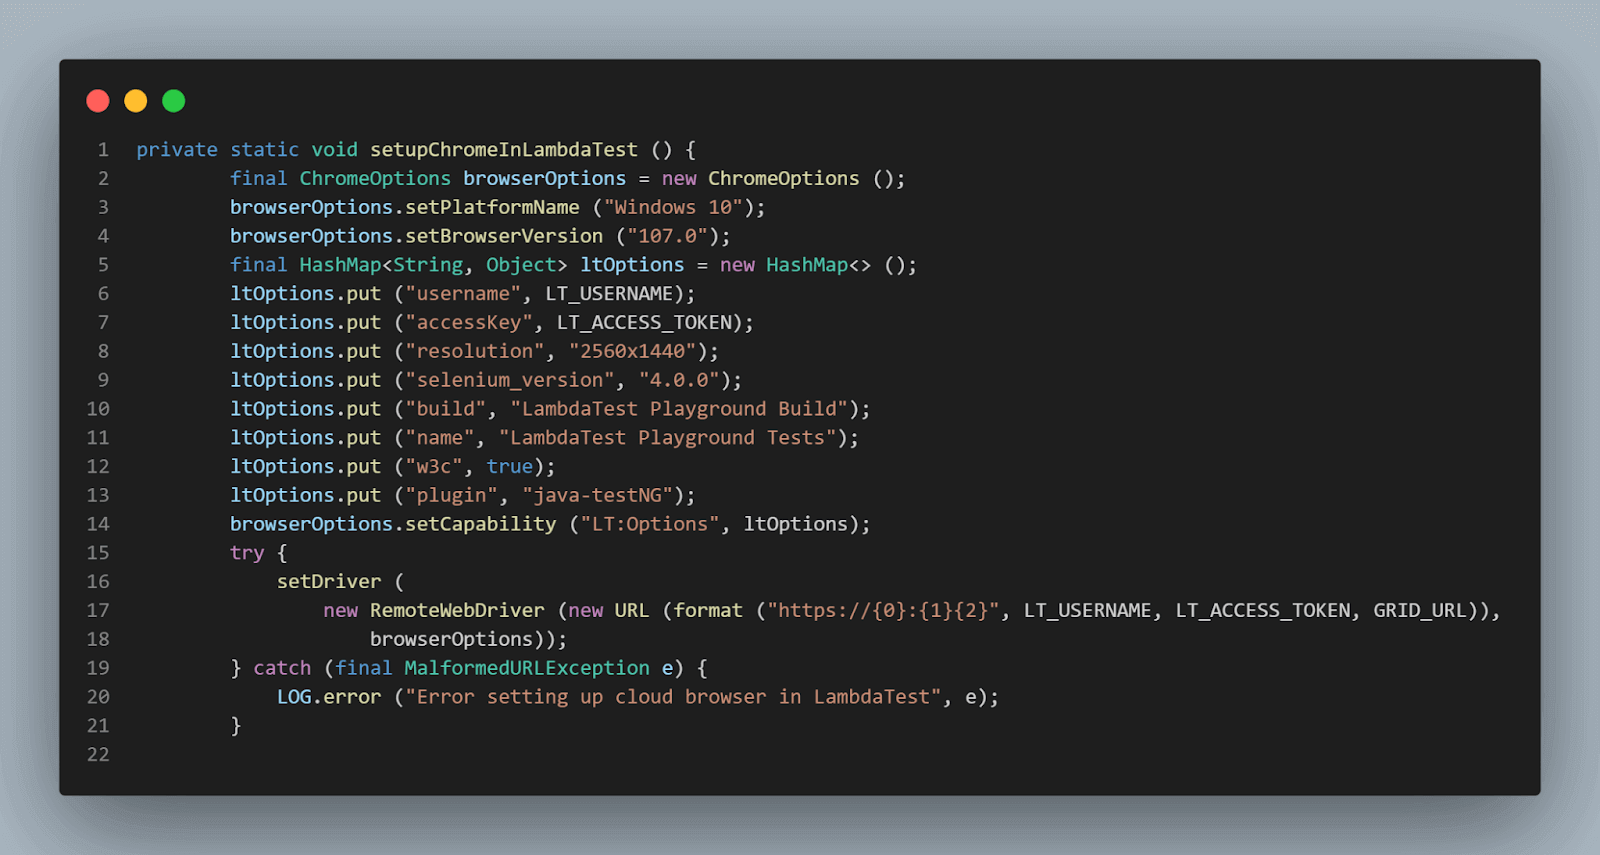
We will be using the RemoteWebDriver(Uri, ICapabilities) to run the tests on the LambdaTest platform. The capabilities shown in this example may differ from platform to platform as per their configuration settings. However, the usage of the RemoteWebDriver class remains the same.
Here is the screenshot of a method showing how we can use the RemoteWebDriver class to run the tests on the LambdaTest platform.
RemoteWebdriver class implements the following interfaces:
- WebDriver
- JavaScriptExecutor
- TakesScreenshot
- HasVirtualAuthenticator
- PrintsPage
- HasCapabilities
- Interactive
Let’s talk about each of the interfaces implemented by RemoteWebDriver class in detail, starting with the WebDriver Interface first.
Perform Selenium automation testing across 3000+ real browsers and OS. Try LambdaTest Now!
WebDriver Interface
WebDriver Interface is the core of the Selenium WebDriver as it has all the required methods and respective nested interfaces defined within it, which helps in simulating user actions inside the browser.
Following is the UML diagram of WebDriver Interface (Selenium WebDriver 4):
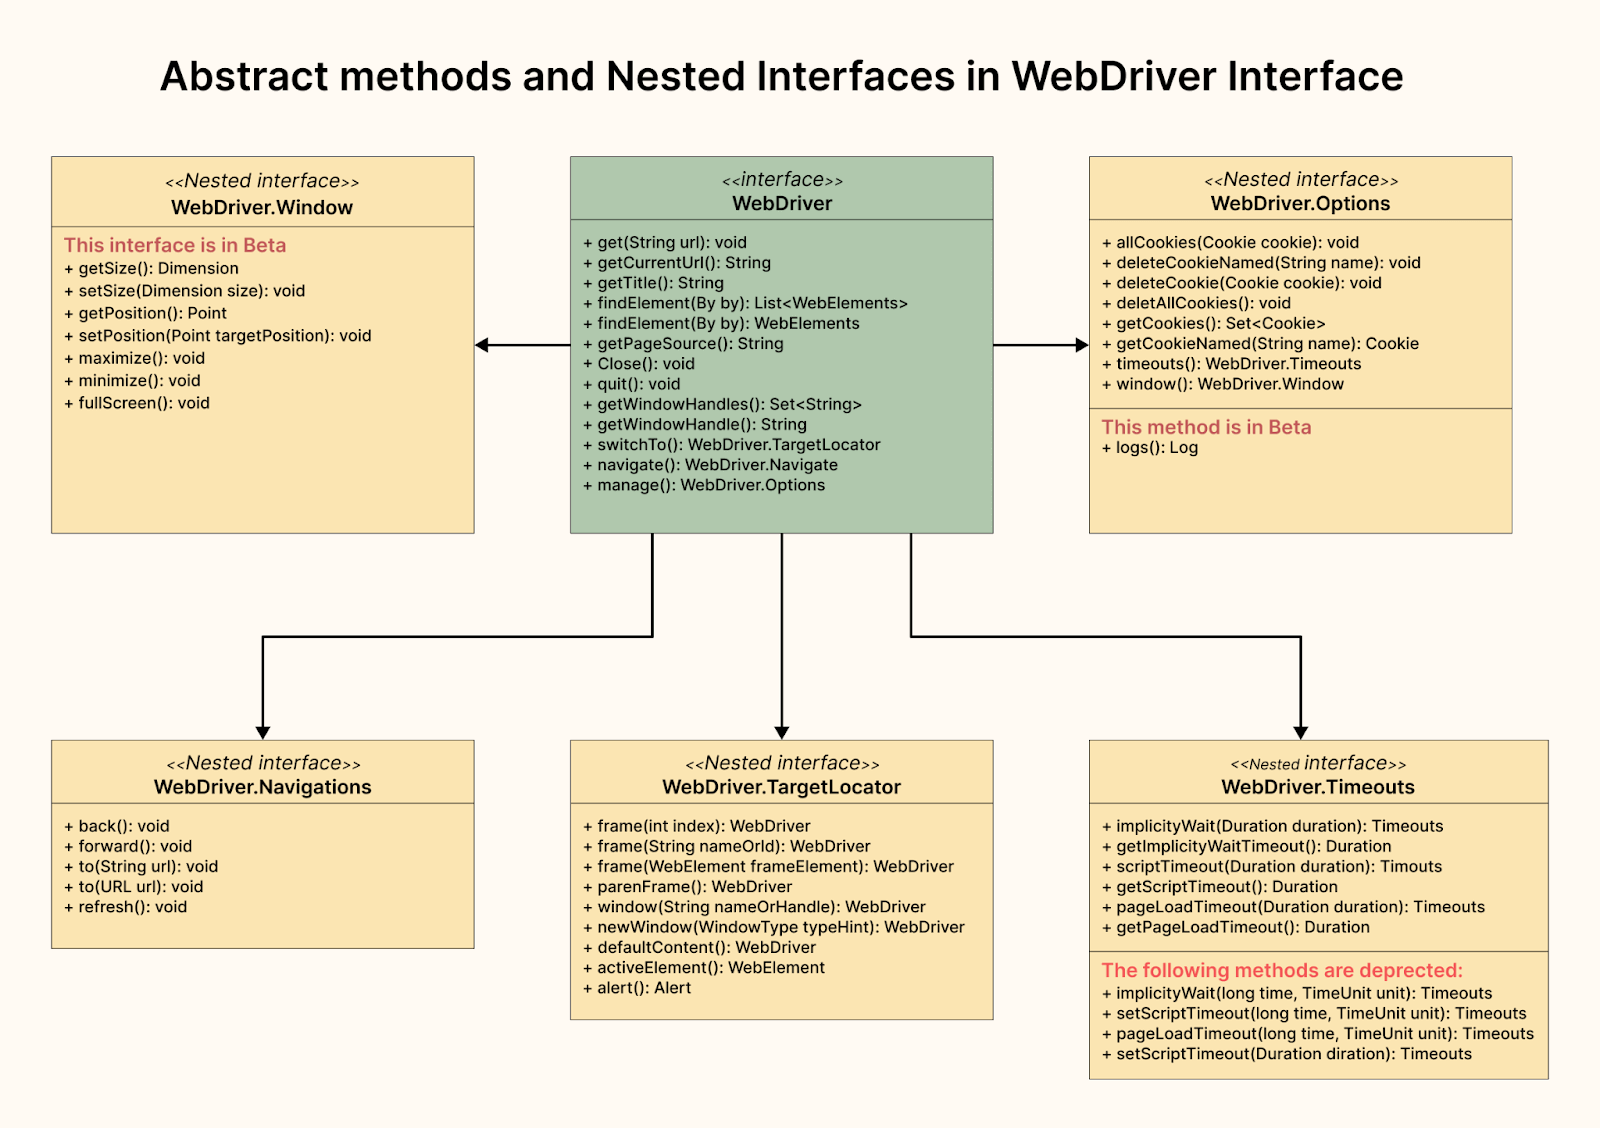
WebDriver Interface has the following abstract methods defined in it, which has no body, and these methods are fully implemented by RemoteWebDriver class:
| get(String url) | This method will return void and help us to navigate to the URL we provide in the method parameter. |
| getCurrentUrl() | This method will return the current URL of the web page. |
| getTitle() | This method will return the title of the current web page. |
| findElements(By by) | This method will return a list of webelements per the locator strategy called using Selenium’s By class which is an abstract class. |
| findElement(By by) | This method will return a webelement as per the locator strategy called using Selenium’s By class. |
| getPageSource() | This method will return the source of the last loaded page in the representation of DOM. |
| close() | This method will close the current window and quit the browser if it is the last window currently open. |
| quit() | This method quits the driver session, closing every associated window. |
| getWindowHandles() | This method will return a set of window handles that can be used to iterate over all open windows of this WebDriver instance. |
| getWindowHandle() | This method returns the current window handle, which is in focus within the current WebDriver instance. This can be used to switch to this window at a later stage. |
| switchTo() | It returns a TargetLocator, which can be used to select a frame or window and send future commands to it. |
| navigate() | It is an abstraction allowing WebDriver to navigate to a URL and access the browser’s history. |
| manage() | It returns the Options interface. |
How to use the WebDriver Interface?
The WebDriver interface defines methods for interacting with a web page through a web browser. To use the WebDriver interface, you must first import the appropriate libraries and instantiate a WebDriver object.
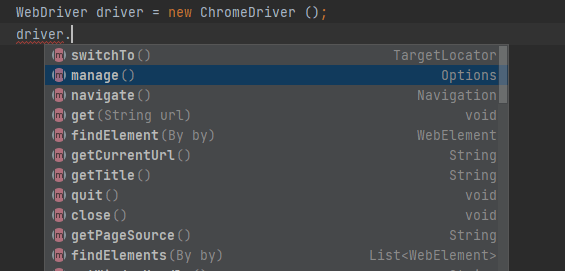
Next, let’s move toward the nested interfaces within the WebDriver Interface and discuss them in detail.
Nested Interfaces within WebDriver Interface
The following are the nested interfaces within the WebDriver Interface. Let’s discuss each nested interface in detail.
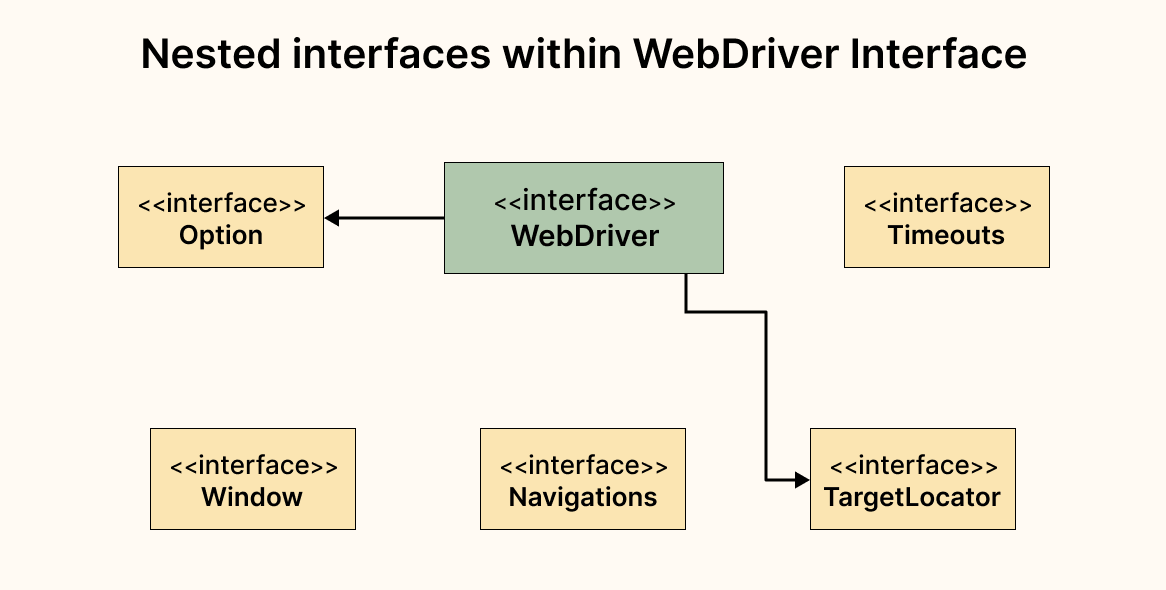
Window Interface
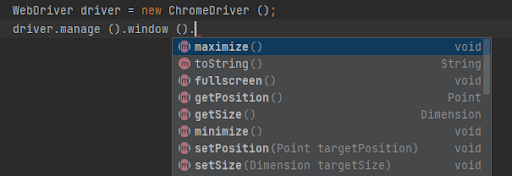
This interface has all the methods that help manage the current window. Currently, at the time of writing this blog on Selenium 4 WebDriver Hierarchy, Selenium’s latest version is 4.7.0, and in this current version, this Window interface is in Beta.
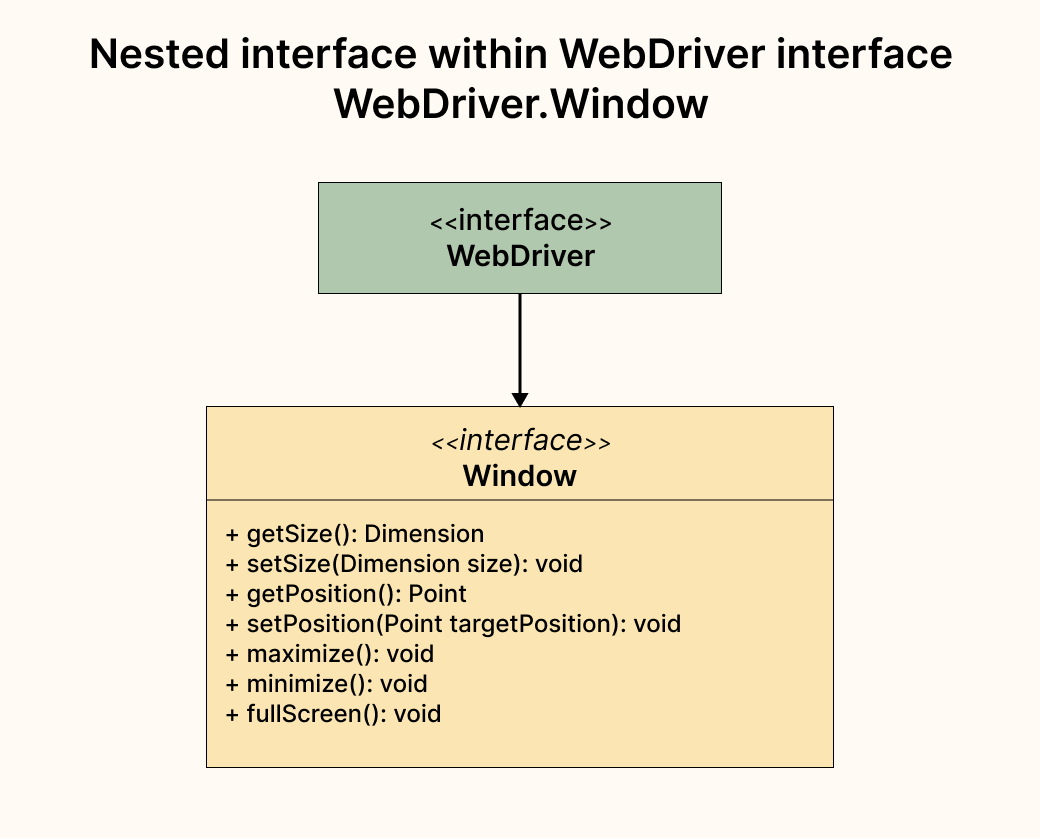
This interface has the following abstract methods, which are fully implemented by the RemoteWebDriver Class:
| getSize() | This method returns the outer window dimension of the current window. |
| setSize(Dimension dimension) | This method will change the current and outer window dimensions. This method is synonymous with the window.resizeTo() in JS. |
| getPosition() | This method returns the position of the current window relative to the upper left corner of the screen. |
| setPosition(Point targetPosition) | This method sets the position of the current window relative to the upper left corner of the screen. This method is synonymous to the window.moveTo() in JS. |
| maximize() | This method will maximize the current window if it is not already maximized. |
| minimize() | This method will minimize the current window if it is not already minimized. |
| fullScreen() | This method will make the current screen into full screen size, it is not already in full screen. |
How to use the Window Interface with WebDriver?
We need to instantiate the WebDriver interface by creating a new object by calling its implementing class. Once the object is created, we can simply use the Window interface as shown in the screenshot below:
Options Interface
This interface has all the methods to help manage the stuff in a browser menu. With the help of this interface, we perform the following actions:
- Add, get, and delete a cookie
- Set timeouts in the browser
- Manage window
- Fetch different types of logs. (This is in beta as per the latest Selenium WebDriver version 4.7.0)
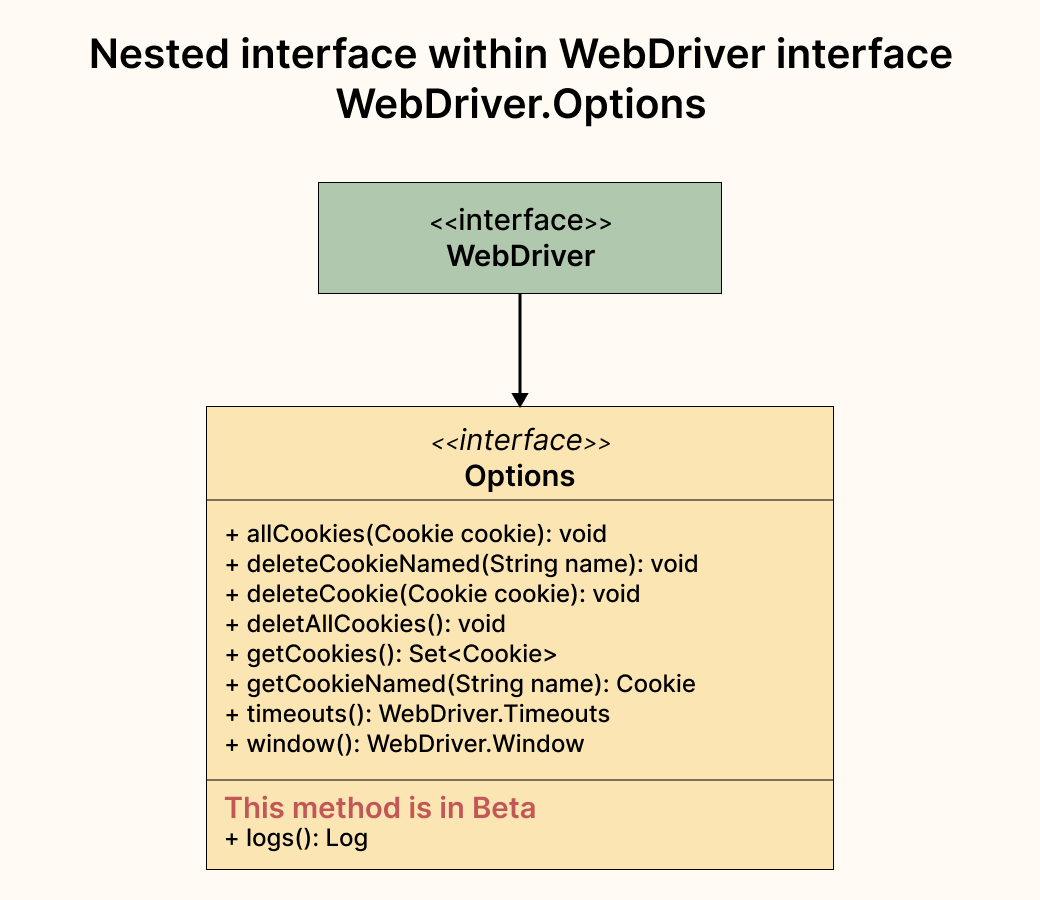
This interface has the following abstract methods, fully implemented by the RemoteWebDriver Class.
| addCookie (Cookie cookie) | This method adds a specific cookie to the current browsing context. Cookies are mostly used to identify the user and load the stored information. A cookie is data sent from a website and stored on your computer. We need to send the cookie parameter in this method to add the cookie. It is assumed that the cookie is meant for the domain of the current document if the cookie’s domain name is left blank. |
| deleteCookieNamed (String name) | This method will delete the cookie with the specified Cookie name supplied in the method parameter from the current domain. |
| deleteCookie (Cookie cookie) | This method deletes the cookie from the browser’s “cookie.jar” ignoring the cookie’s domain. |
| deleteAllCookies() | This method deletes all cookies from the current domain. |
| getCookies() | This method returns a Set of cookies from the current domain. |
| getCookieNamed(String name) | This method returns a cookie with the given name. If the cookie with the given name is not present, it will return null. |
| timeouts() | It returns the interface for managing the driver timeouts. |
| window() | It returns the interface for managing the current window |
How to use Options Interface with WebDriver?
We need to instantiate the WebDriver interface by creating a new object by calling its implementing class. Once the object is created, we can simply use the Options interface, as shown in the screenshot below.

Navigation Interface
This interface has all the methods to access the browser’s history and navigate to a URL. With the help of this interface, we perform the following actions:
- Navigate Back, Forward in the browser
- Navigate to a URL in the browser
- Refresh the WebPage
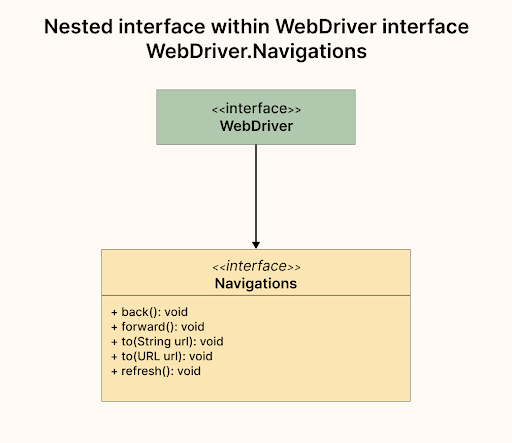
This interface has the following abstract methods, which are fully implemented by the RemoteWebDriver Class:
| back() | This method will simulate the user action of pressing the back button in the browser’s window. |
| forward() | This method will simulate the user pressing the forward button in the browser’s window. |
| to(String url) | This method will navigate the user to the url provided in the String format in the method parameter. |
| to(URL url) | This is an overloaded method of to(String url). Does the same action of navigating the user to the URL provided in the method parameter in URL format. |
| refresh() | This method will refresh the current web page. |
How to use Navigations Interface with WebDriver?
We need to instantiate the WebDriver interface by creating a new object by calling its implementing class. Once the object is created we can simply use the Window interface as shown in the screenshot below:

TargetLocator Interface
This interface has all the methods to send future commands to different frames and windows. With the help of this interface, we perform the following actions:
- Working with different Frames.
- Working with different windows or Tabs in the browser.
- Working with different Alerts in the browser.
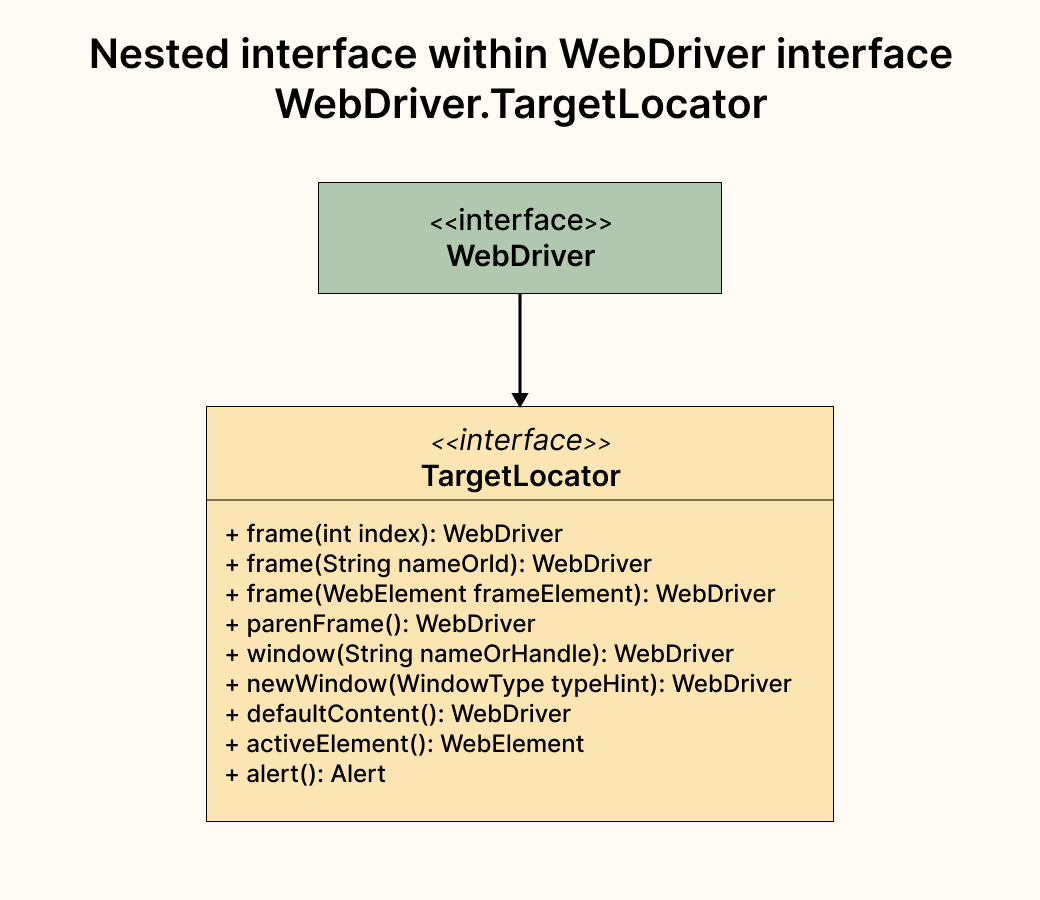
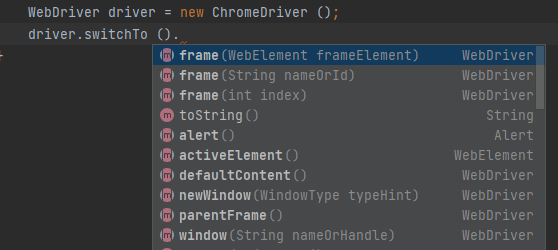
This interface has the following abstract methods, fully implemented by the RemoteTargetLocator class, which is a nested class in the RemoteWebDriver class:
| frame(int index) | This method will allow selecting a frame by its index (index starts from zero). Once the frame is selected, all the subsequent calls on the WebDriver instance will be made to that frame. If the frame is not found, it will return NoSuchFrameException. |
| frame(String nameOrId) | This method will allow selecting a frame using its name or ID, provided in the method parameter. If the name or ID is not unique on the page, the first one found will be switched. Once the frame is selected, all the subsequent calls on the WebDriver instance will be made to that frame. If the frame is not found, it will return NoSuchFrameException. |
| frame(WebElement frameElement) | This method will allow selecting a frame using a previously located WebElement. Once the frame is selected, all the subsequent calls on the WebDriver instance will be made to that frame. Since this method accepts WebElement as a parameter, multiple exceptions could be thrown in case the frame is not found:
|
| parentFrame() | This method will change the focus to the parent frame. The context will remain unchanged if the current context is the top-level browsing context. |
| window(String nameOrHandle) | As per the name of the window or handle as returned by the getWindowHandle() method. This method will switch the focus of the future commands for the current driver instance to the window with the given name or handle. NoSuchWindowException will be thrown if the window with the given name or handle cannot be found. |
| newWindow(WindowType typeHint) | This method will create a new browser window or Tab as per the Window Type (TAB or WINDOW) provided in the method parameter and switch the focus for the future commands to the new window. |
| defaultContent() | This method will help in switching back to the main page or the first frame on the page. |
| activeElement() | This method helps in switching the focus to the active element in focus on the web page. |
| alert() | This method helps switch to the current active modal dialog box for the current driver instance. It will throw NoAlertPresentException when the dialog can not be found on the page. |
How to use TargetLocator Interface with WebDriver?
We need to instantiate the WebDriver interface by creating a new object by calling its implementing class. Once the object is created, we can simply use the TargetLocator interface, as shown in the screenshot below.
Timeouts Interface
This interface has all the methods to manage the timeout behavior for WebDriver instances. With the help of this interface, we perform the following wait actions in Selenium:
- Implicit Wait
- Script timeout
- Page load timeout
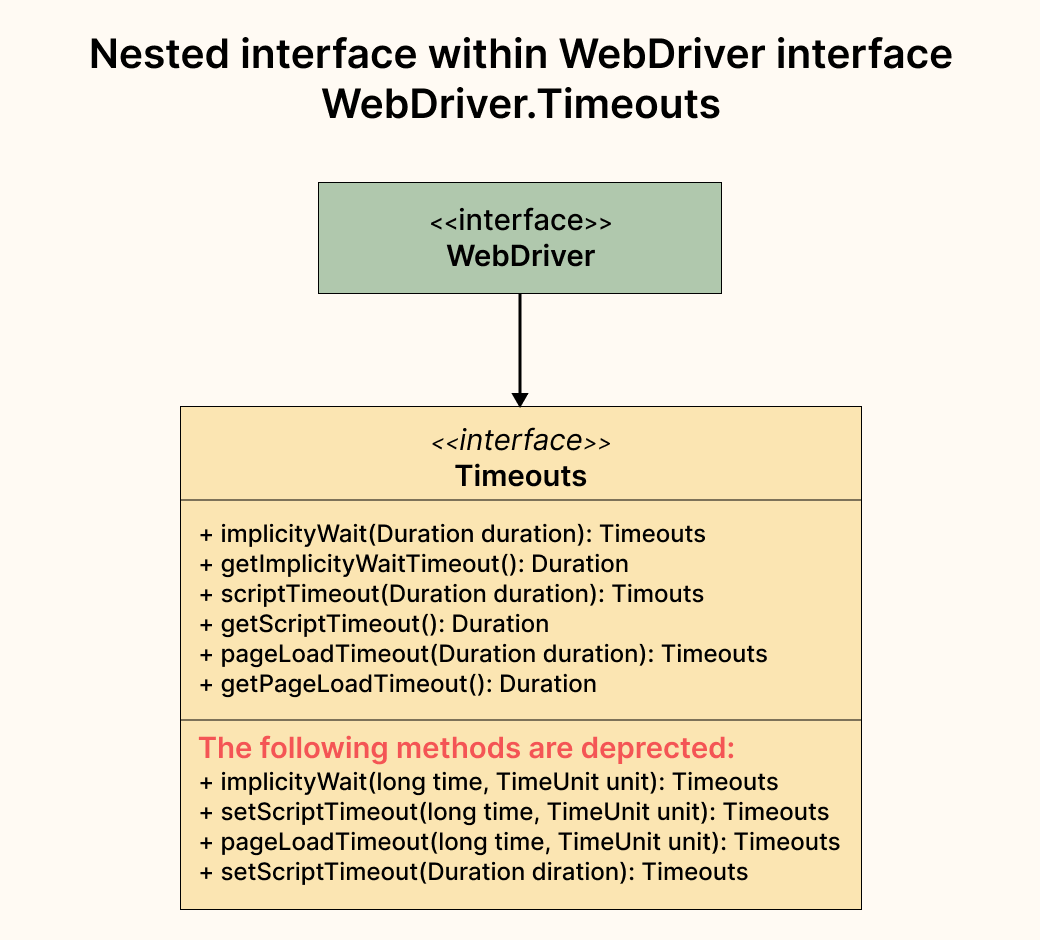
This interface has the following abstract methods, which are fully implemented by the RemoteTimeouts class, which is a nested class in the RemoteWebDriver class:
| implicitlyWait(Duration duration) | This method directs the WebDriver to wait for the specified duration of time for searching an element as defined in the method parameter. If the element is not found, NoSuchElementException is thrown. |
| getImplicitlyWaitTimeout() | This method will get the time the WebDriver should wait to search an element. |
| scriptTimeout(Duration duration) | This method sets the amount of time the WebDriver has to wait for an asynchronous script to finish execution before throwing an error. An error code with an invalid argument will be returned if the timeout is negative or not null. |
| getScriptTimeout() | This method gets the amount of time the WebDriver has to wait for an asynchronous script to finish execution before throwing an error. |
| pageLoadTimeout(Duration duration) | This method will direct the WebDriver to wait for the specified amount of time as provided in the method parameter for a page load to complete before throwing an error. |
| getPageLoadTimeout() | This method gets the amount of time the WebDriver has to wait for the page load to complete. |
How to use Timeouts Interface with WebDriver?
We need to instantiate the WebDriver interface by creating a new object by calling its implementing class. Once the object is created, we can simply use the Timeouts interface as shown in the screenshot below:
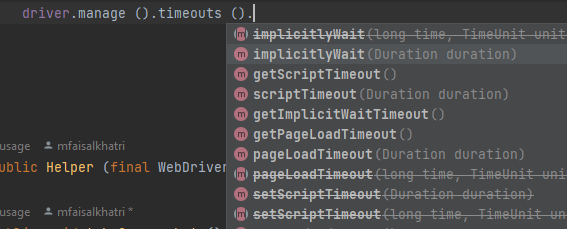
The following methods are deprecated as per the current Selenium Version 4.7.0:
- implicitlyWait(long time, TimeUnit unit)
- setScriptTimeout(long time, TimeUnit unit)
- pageLoadTimeout(long time, TimeUnit unit)
- setScriptTimeout()
Let’s now move towards the next interface that is implemented by RemoteWebDriver class.
JavaScriptExecutor Interface
JavaScriptExecutor Interface provides the mechanism to WebDriver so that it can execute JavaScript code snippets. This interface has the following two abstract methods, which are fully implemented in the RemoteWebDriver class.
| executeScript(String script, Object… args) | This method will execute the script as provided in the method parameter in the context of the currently selected frame or window. |
| executeAsyncScript(String script, Object… args) | This method will execute an asynchronous script as provided in the method parameter in the context of the currently selected frame or window. |
TakesScreenshot Interface
This interface helps the WebDriver take screenshots of the web page or WebElement as required and store them in different ways. The screenshot captured is returned to the WebDriver endpoint in Base64 format.
This interface has the following abstract method, which is implemented in the RemoteWebDriver class:
| getScreenshotAs(OutputType target) | This method allows you to capture the screenshot and store it in the specified location. It can be used to capture the screenshot for the WebPage as well as the WebElement. |
HasVirtualAuthenticator Interface
This interface helps in allowing the WebDriver to access the virtual authenticator API.
A user’s public-key credentials can be stored in a hardware device, or a software entity called an authenticator. Authenticators help enable the key-based authentication mechanism in a passwordless manner. Virtual Authenticator emulates such authenticators for testing.This interface has the following abstract methods, which are fully implemented by the RemoteWebDriver class:
| addVirtualAuthenticator(VirtualAuthenticatorOptions options) | This method helps add a virtual authenticator with the options provided in the method parameter. |
| removeVirtualAuthenticator(VirtualAuthenticator authenticator) | This method removes the previously added virtual authenticator. |
PrintsPage Interface
This interface allows the printing of the current page within the browser. It has the following abstract method, which is fully implemented in RemoteWebDriver class:
| print(PrintOptions printOptions) | This method will allow printing the page within the browser as per the print options given in the method parameter. To print the pages from it, it is required to run the Chromium browsers in headless mode. In case of any error, while printing the page, WebDriverException will be thrown. |
HasCapabilities Interface
This interface can be used for run-time detection of features by classes to indicate that they can describe their capabilities.
This interface is fully implemented by the RemoteWebDriver class and has the following abstract method:
| getCapabilities() | This method returns the capabilities of the current driver. |
With this, we come to the end of the discussion on the WebDriver interface. Let’s now jump on to another important topic around Selenium WebDriver, which is about WebElements and understanding its hierarchy.
WebElement Hierarchy
Knowing about WebElement hierarchy is also required. We can not run the web automation tests unless we locate the WebElements on the page to perform the required user simulation steps.
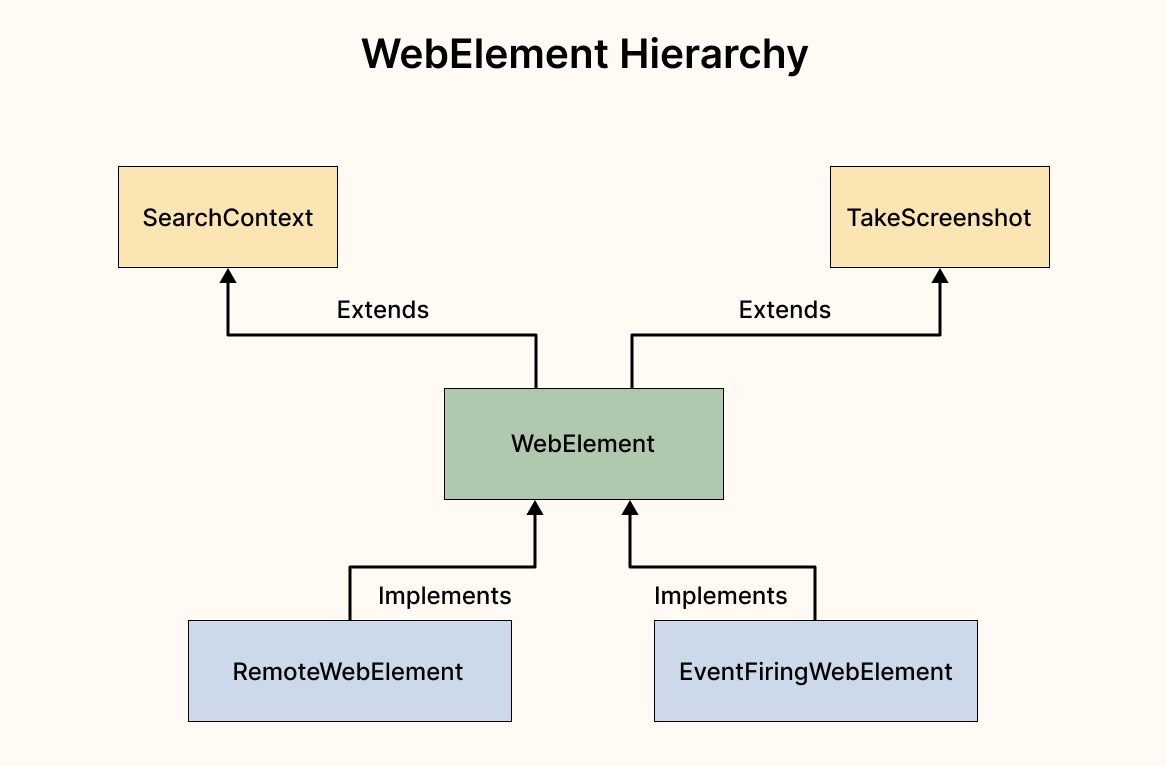
WebElement is an interface that extends the SearchContext and TakesScreenshot interfaces.
RemoteWebElement class is the fully implemented class of the WebElement interface.
The following image shows the WebElement in pictorial representation:
Abstract methods declared within the WebElement Interface
As you can check in the UML diagram below, abstract methods are declared, which are implemented by the RemoteWebElement and EventFiringWebElement classes:
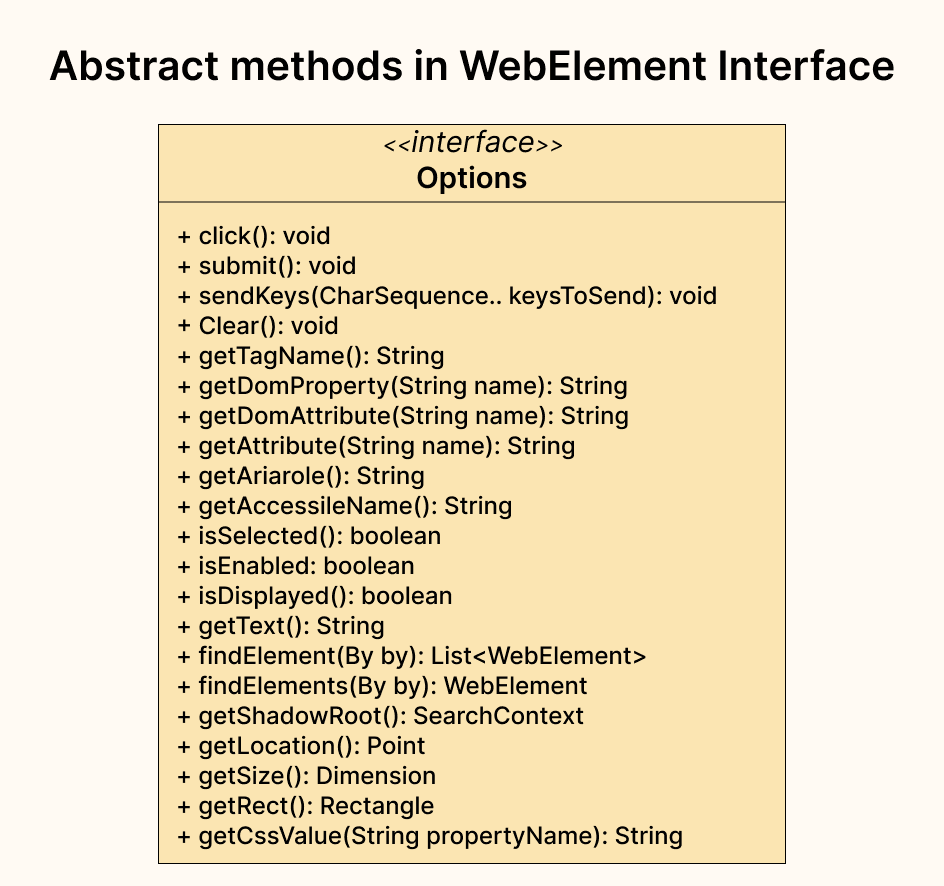
| click() | This method will click on the current element. It has the following pre-conditions:
|
| submit() | This method is useful when working with forms on the web page. When used, it will submit the form to the remote server. StaleElementReferenceException will be thrown if the element is not within the form. Note: In Selenium 4, this is no longer implemented with a separate endpoint and functions by executing a script. As per Selenium 4 documentation, it is recommended not to use this method and click on the Submit button to submit the form. |
| sendKeys(CharSequence… KeystoSend) | This method will simulate typing into the WebElement. The element should be an element with content-editable attribute or an input of a form with a text type. InvalidElementStateException will be thrown if the element is not editable. If the KeystoSend parameter is null, this method will throw IllegalArgumentException |
| clear() | This method will reset the content of the WebElement. The precondition for this method is: The WebElement should be editable and resettable. It will throw an InvalidElementStateException if the element is not editable and resettable. |
| getTagName() | This method will return the tag name of the WebElement. For example, for the following <input name=”foo” />, this method will return “input”. |
| getDomProperty(String name) | This method is used to get the value of the current property of the element. It will return the property’s current value, even if it has been modified after loading the page. If the value is not set, it will return null. |
| getDomAttribute(String name) | This method will return the value of the given attribute of the element. If the value is not set, null will be returned. |
| getAttribute() | This method will return the property’s value with the given name. If the value is not set, null will be returned. |
| getAriaRole() | This method will return the result of computing the WAI-ARIA role of the element. ARIA roles can describe elements that don’t natively exist in HTML or exist but don’t yet have full browser support. |
| getAccessibleName() | This method will return the accessible name and description computation for the Accessible Name of the element. |
| isSelected() | This method will return a boolean value of true or false based on whether the current element is selected. This operation applies to input elements like checkboxes, options in a select, and radio buttons. |
| isEnabled() | This method will return a boolean value of true or false based on whether the current element is enabled or not. |
| isDisplayed() | This method will return a boolean value of true or false based on whether the current element is displayed. |
| getText() | This method helps get the element’s visible text, including the sub-elements. |
| findElements(By by) | This method will help locate all the elements within the current context and returns a list of WebElement, which can further be used to interact on the web page based on the locating strategy used in the method parameter. This method is impacted by the implicit wait in force at the time of execution. This method will return the respective WebElements as soon as it collects more than 0 items. If the timeout is reached and no elements are found, it will return an empty list. |
| findElement(By by) | This method will help locate the element within the current context and returns a list of WebElement, which can be used to interact on the web page based on the locating strategy used in the method parameter. This method is impacted by the implicit wait in force at the time of execution. If no matching element is found, it will throw NoSuchElementException. How to Automate Shadow DOM in Selenium WebDriver provides in-depth detail of automating Shadow DOM elements using Selenium WebDriver. |
| getShadowRoot() | This method returns a representation of an element’s Shadow root for accessing the Shadow DOM of a web component. In case Shadow root is not found, it will throw NoSuchShadowRootException. |
| getLocation() | This method returns a location point containing the location of the top left-hand corner of the element. |
| getSize() | This method returns the width and height of the rendered element on the page. |
| getRect() | This method will return the location and size of the rendered element. |
| getCssValue(String propertyName) | This method will return the value of a given CSS property. Color values will be returned as rgba or rgb strings. For example, if the background color of the element is set as green, this method will return rgba(0, 255, 0, 1) or rgb(0,255,0). |
With this, we come to the end of this blog on Selenium 4 WebDriver Hierarchy explaining the Selenium WebDriver’s architecture. Let’s summarize the points that we discussed.
Summary
With this blog on Selenium 4 WebDriver Hierarchy, I hope you are now fully aware and better understand the Selenium WebDriver architecture. I hope you will be able to utilize this knowledge in your project and make efficient use of the Selenium WebDriver framework. Some key takeaways:
- RemoteWebDriver class is the fully implemented class of the WebDriver interface.
- RemoteWebDriver class implements the following interfaces:
- WebDriver
- JavaScriptExecutor
- HasCapabilities
- HasVirtualAuthenticator
- Interactive
- PrintsPage
- TakesScreenshot
- Each BrowserDriver (ChromeDriver, FirefoxDriver, etc.) class extends the RemoteWebDriver class.
- RemoteWebDriver class has the following nested classes:
- RemoteTargetLocator
- RemoteWebDriverOptions
- RemoteTargetLocator class which is a nested class within RemoteWebDriver class that implements the WebDriver.TargetLocator interface.
- RemoteWebDriverOptions which is a nested class of RemoteWebDriver class, implements the WebDriverOptions interface, and it has the following nested classes within it:
- RemoteTimeout – This class implements the WebDriver.Timeouts interface.
- RemoteWindow – This class implements the WebDriver.Window interface.
- WebDriver interface extends SearchContext interface.
- WebDriver interface has the following nested interfaces:
- Options
- Window
- Timeouts
- Navigation
- TargetLocator
- WebElement interface implements the SearchContext and TakeScreenshot interfaces.
- RemoteWebElement and EventFiringWebElement classes are fully implemented classes of the WebElement interface.
Happy Testing!
Frequently Asked Questions (FAQs)
What is Selenium hierarchy?
Selenium is a suite of tools for automating web browsers. The Selenium hierarchy refers to the organization of the various components of the Selenium suite and how they interact.
What is the super interface of WebDriver?
The super interface of the Selenium WebDriver is the SearchContext interface.
WebDriver is the main interface in Selenium, and it defines a set of methods for controlling a web browser. SearchContext is an interface that WebDriver extends, which defines methods for finding elements on a web page.
Got Questions? Drop them on LambdaTest Community. Visit now


