Bitbucket Pipelines Integration With LambdaTest
Bitbucket Pipelines offers a free, automated continuous integration service through Bitbucket cloud servers. With Bitbucket Pipelines, teams can ship their product faster as they could rapidly test their code as soon as they commit. Once the code is tested, Bitbucket Pipeline deploys it into the Production environment automatically. It does so with the help of containers that can be fully customized according to your project requirements.
LambdaTest integration with Bitbucket Pipelines will help you perform cross browser testing on 3000+ real browsers & browser versions through a Selenium Grid hosted on LambdaTest cloud servers. All you need is to set up your Bitbucket Pipelines with your LambdaTest account & you can trigger tests onto LambdaTest, directly from your Bitbucket Pipelines.
In this topic, you will learn about the:
- Prerequisites
- Setup to integrate LambdaTest with Bitbucket Pipelines
- Parallel execution on LambdaTest Selenium Grid
Prerequisites
Important: Visit LambdaTest GitHub repository for Bitbucket Pipelines.
Make sure you have your Bitbucket Credentials.
LambdaTest Authentication Credentials
Be aware of your LambdaTest authentication credentials i.e. your LambdaTest username, access key, and HubURL. You need to set them up as your environment variables. You can retrieve them from your LambdaTest automation dashboard by clicking on the key icon near the help button.For Linux/Mac:
 $ export LT_USERNAME= {YOUR_LAMBDATEST_USERNAME}
 $ export LT_ACCESS_KEY= {YOUR_LAMBDATEST_ACCESS_KEY}
For Windows:
$ set LT_USERNAME= {YOUR_LAMBDATEST_USERNAME}
$ set LT_ACCESS_KEY= {YOUR_LAMBDATEST_ACCESS_KEY}
Integrating LambdaTest With Bitbucket Pipelines
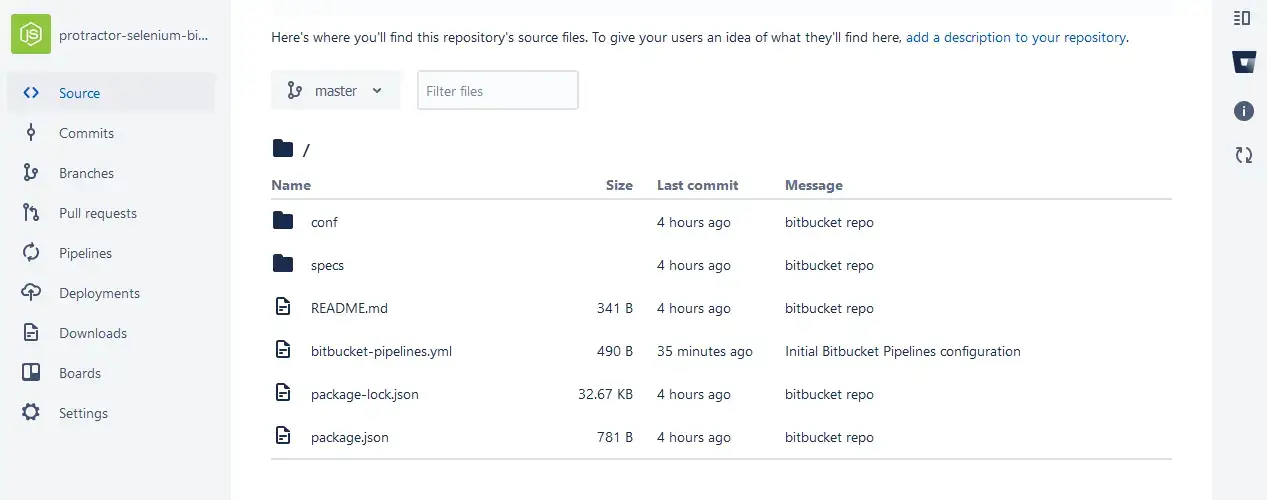
Step 1: Log in to your Bitbucket account. Go to repositories & import the LambdaTest Git repository for Bitbucket Pipelines. You will be facing the below screen after import is successful.

Step 2: After importing the Git repository, fetch the yml file to run your automation tests using the Protractor framework on LambdaTest Selenium Grid.
# This is a sample build configuration for JavaScript.
# Check our guides at https://confluence.atlassian.com/x/14UWN for more examples.
# Only use spaces to indent your .yml configuration.
# -----
# You can specify a custom docker image from Docker Hub as your build environment.
image: node:10.15.3

pipelines:
  default:
    - step:
        caches:
          - node
        script: # Modify the commands below to build your repository.
          - npm install
          - npm run single
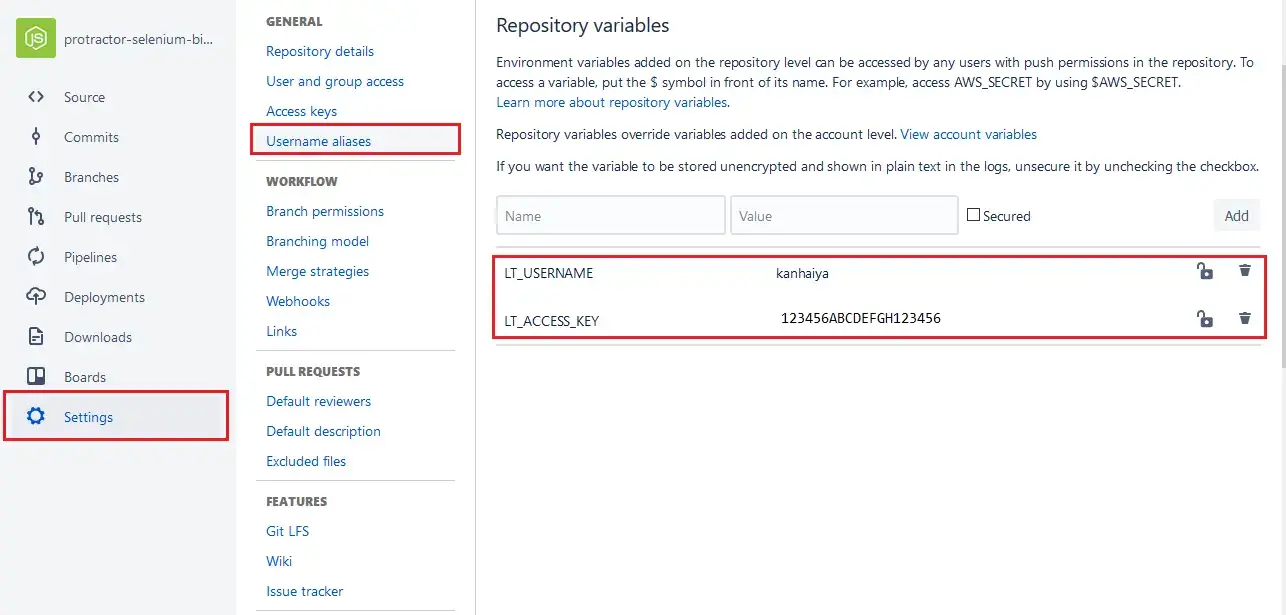
Step 3: Now, you need to add LambdaTest environment variables into your Bitbucket pipelines. These environment variables will help to authenticate your test before they are executed on LambdaTest Selenium Grid. Go to Settings --> General --> Username aliases --> Repository variables.

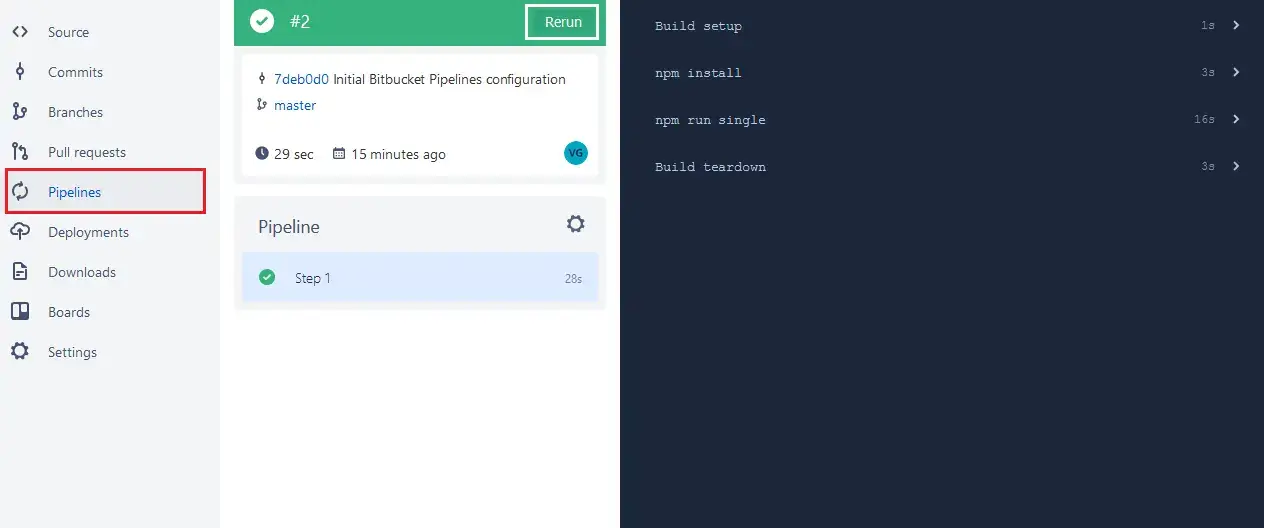
Step 4: After adding the environment variables, you need to visit your pipeline & click on Rerun.

Step 5: Run the below command to execute a test on LambdaTest Selenium Grid.
npm run single
You will find the below log generated:
> protractor-lambdatest@0.1.0 single /opt/atlassian/pipelines/agent/build
> protractor conf/single.conf.js
[10:23:53] I/launcher - Running 1 instances of WebDriver
[10:23:53] I/hosted - Using the selenium server at https://LT_USERNAME:LT_ACCESS_KEY@hub.lambdatest.com/wd/hub
Started
.
1 spec, 0 failures
Finished in 7.713 seconds
[10:24:10] I/launcher - 0 instance(s) of WebDriver still running
[10:24:10] I/launcher - chrome67.0 #01 passed
Running Tests In Parallel On LambdaTest Selenium Grid
LambdaTest Selenium Grid will help you execute multiple test cases in parallel. You can run a single test scenario over numerous browsers + OS combinations, simultaneously. You can also run different test cases in a similar browser + OS combinations. This would significantly trim down the time taken on your cross browser testing activities.
For running test in parallel, replace the run command from single to parallel as you update the pipeline’s yml file.
Replace: npm run single
With: npm run parallel